Chaincode
What is Chaincode?
Chaincode is a smart contract of Hyperledger Fabric that handles the business logic of a particular application. A smart contract programmatically accesses two distinct pieces of the ledger – a blockchain, which immutably records the history of all transactions, and a world state that holds a cache of the current value of these states.
In other words, a chaincode is programmable code that runs on the peers and facilitates transactions on a Hyperledger Fabric blockchain application allowing the users to update the world state of the assets.
You can find more information about chaincodes here
The chaincode structure usually represents business logic, asset definition, or transactional flow. Catalyst Blockchain Manager supports JavaScript, Golang, and Java for smart contract development. Read more about how to use a chaincode with Catalyst Blockchain Manager here
Endorsement
Any transaction generated by the chaincode must be approved by specific organizations, which are defined according to the business logic.
The chaincode endorsement policy defines which organization in the channel is required to validate the transaction by signing it digitally for that transaction to be declared valid. See more information here
Valid Transactions
When a smart contract executes, it runs on a peer node. The contract takes a set of input parameters (transaction proposal) and uses them in combination with its program logic to read and write to the ledger. Changes to the world state are captured as a transaction proposal response, which contains a read-write set with both the states that have been read and the new states that are to be written if the transaction is valid. See more information here
Each peer completes the validation of a transaction in two phases.
-
Ensuring that all the parties mentioned in the endorsement policy have signed the transaction.
-
Checking the authenticity of a transaction as it matches the current value of the world state with the value present at the time of signing the transaction, ensuring that there have not been any changes in between.
In cases where the transaction is not valid, the read activity is still recorded to the blockchain history. However, only the valid transactions update the world state.
Chaincode Namespace
Chaincode namespaces provide isolation between different world states.
The contracts inside a single chaincode share access to the same world state, while the contracts in different chaincodes do not have access to each other’s world state.
Users cannot choose the chaincode namespace; it is assigned by Hyperledger Fabric and maps directly to the name of the chaincode. More information is available here.
External Chaincodes
With Hyperledger Fabric v2.0, the user can add a Chaincode externally through a Docker image. The process of adding an external chaincode becomes difficult if you do not possess enough technical knowledge. However, on Catalyst Blockchain Manager, you can refer to your Docker image that was uploaded to your online repository. Catalyst Blockchain Manager will run the chaincode container in the same environment as the Hyperledger Fabric application.
Deploy a Chaincode
Chaincodes Lifecycle
Catalyst Blockchain Manager supports Hyperledger Fabric application v2.0 capabilities, which define the following Chaincode lifeciclye:
-
Pack the chaincode - his step can be completed by one organization or by each organization. The user needs to create a Docker image and provide a link to the Docker repository while adding a chaincode template in Catalyst Blockchain Manager.
|
You need to add environment variables mentioned in guide to run chaincode in Catalyst Blockchain Manager. |
-
Install the chaincode on your peers - Every organization that will use the chaincode to endorse a transaction or query the ledger needs to complete this step.
-
Approve a chaincode definition for your organization - Every organization that will use the chaincode needs to complete this step. The chaincode definition needs to be approved by a sufficient number of organizations to satisfy the channel’s Lifecycle Endorsement policy before the chaincode can be started on the channel.
-
Commit the chaincode definition to the channel.
How to Add a Chaincode in Catalyst Blockchain Manager?
Chaincode templates - After adding a chaincode on the platform, you do not need to add it individually on each peer because you can install the already added chaincode on the peer. Templates help keep the same version of chaincode for all peers, ensuring the seamless execution of transactions and queries among the peers.
To see information regarding all of the chaincodes templates currently added on the platform, you need to click on the “Chaincode” tab. To add a new chaincode template click on the "Add chaincode" button.
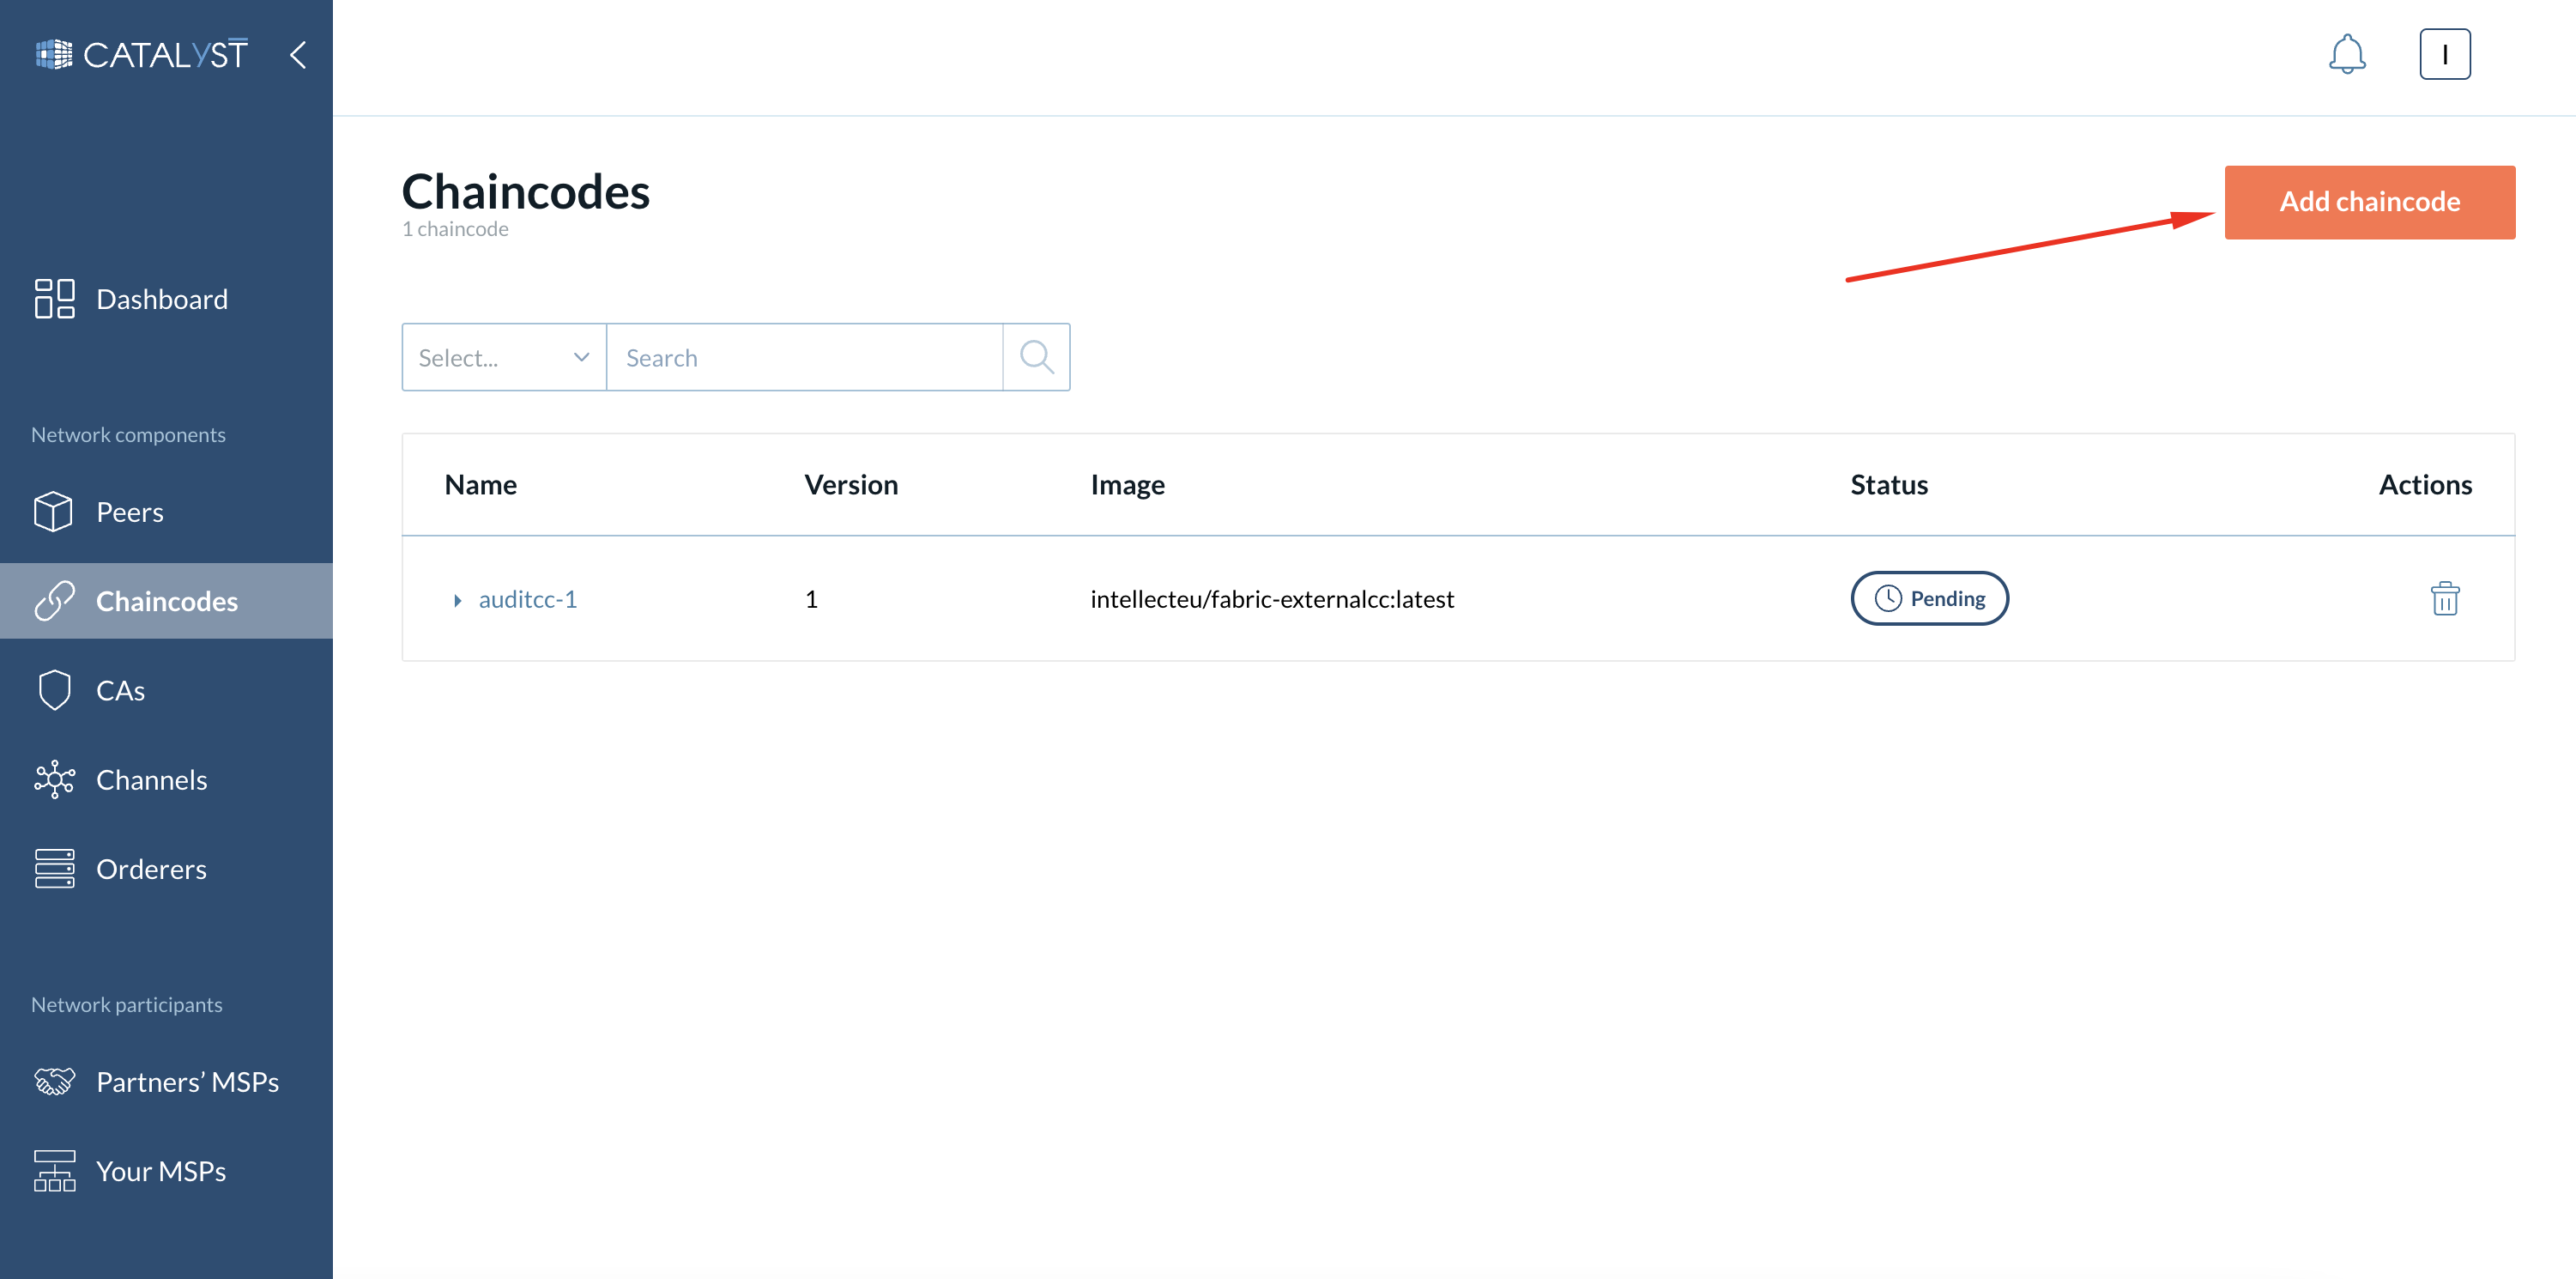
This button allows you to add a new chaincode to your Catalyst Blockchain Manager. Clicking this option opens up a new window as a panel on the right that includes all of the necessary fields for adding the chaincode.
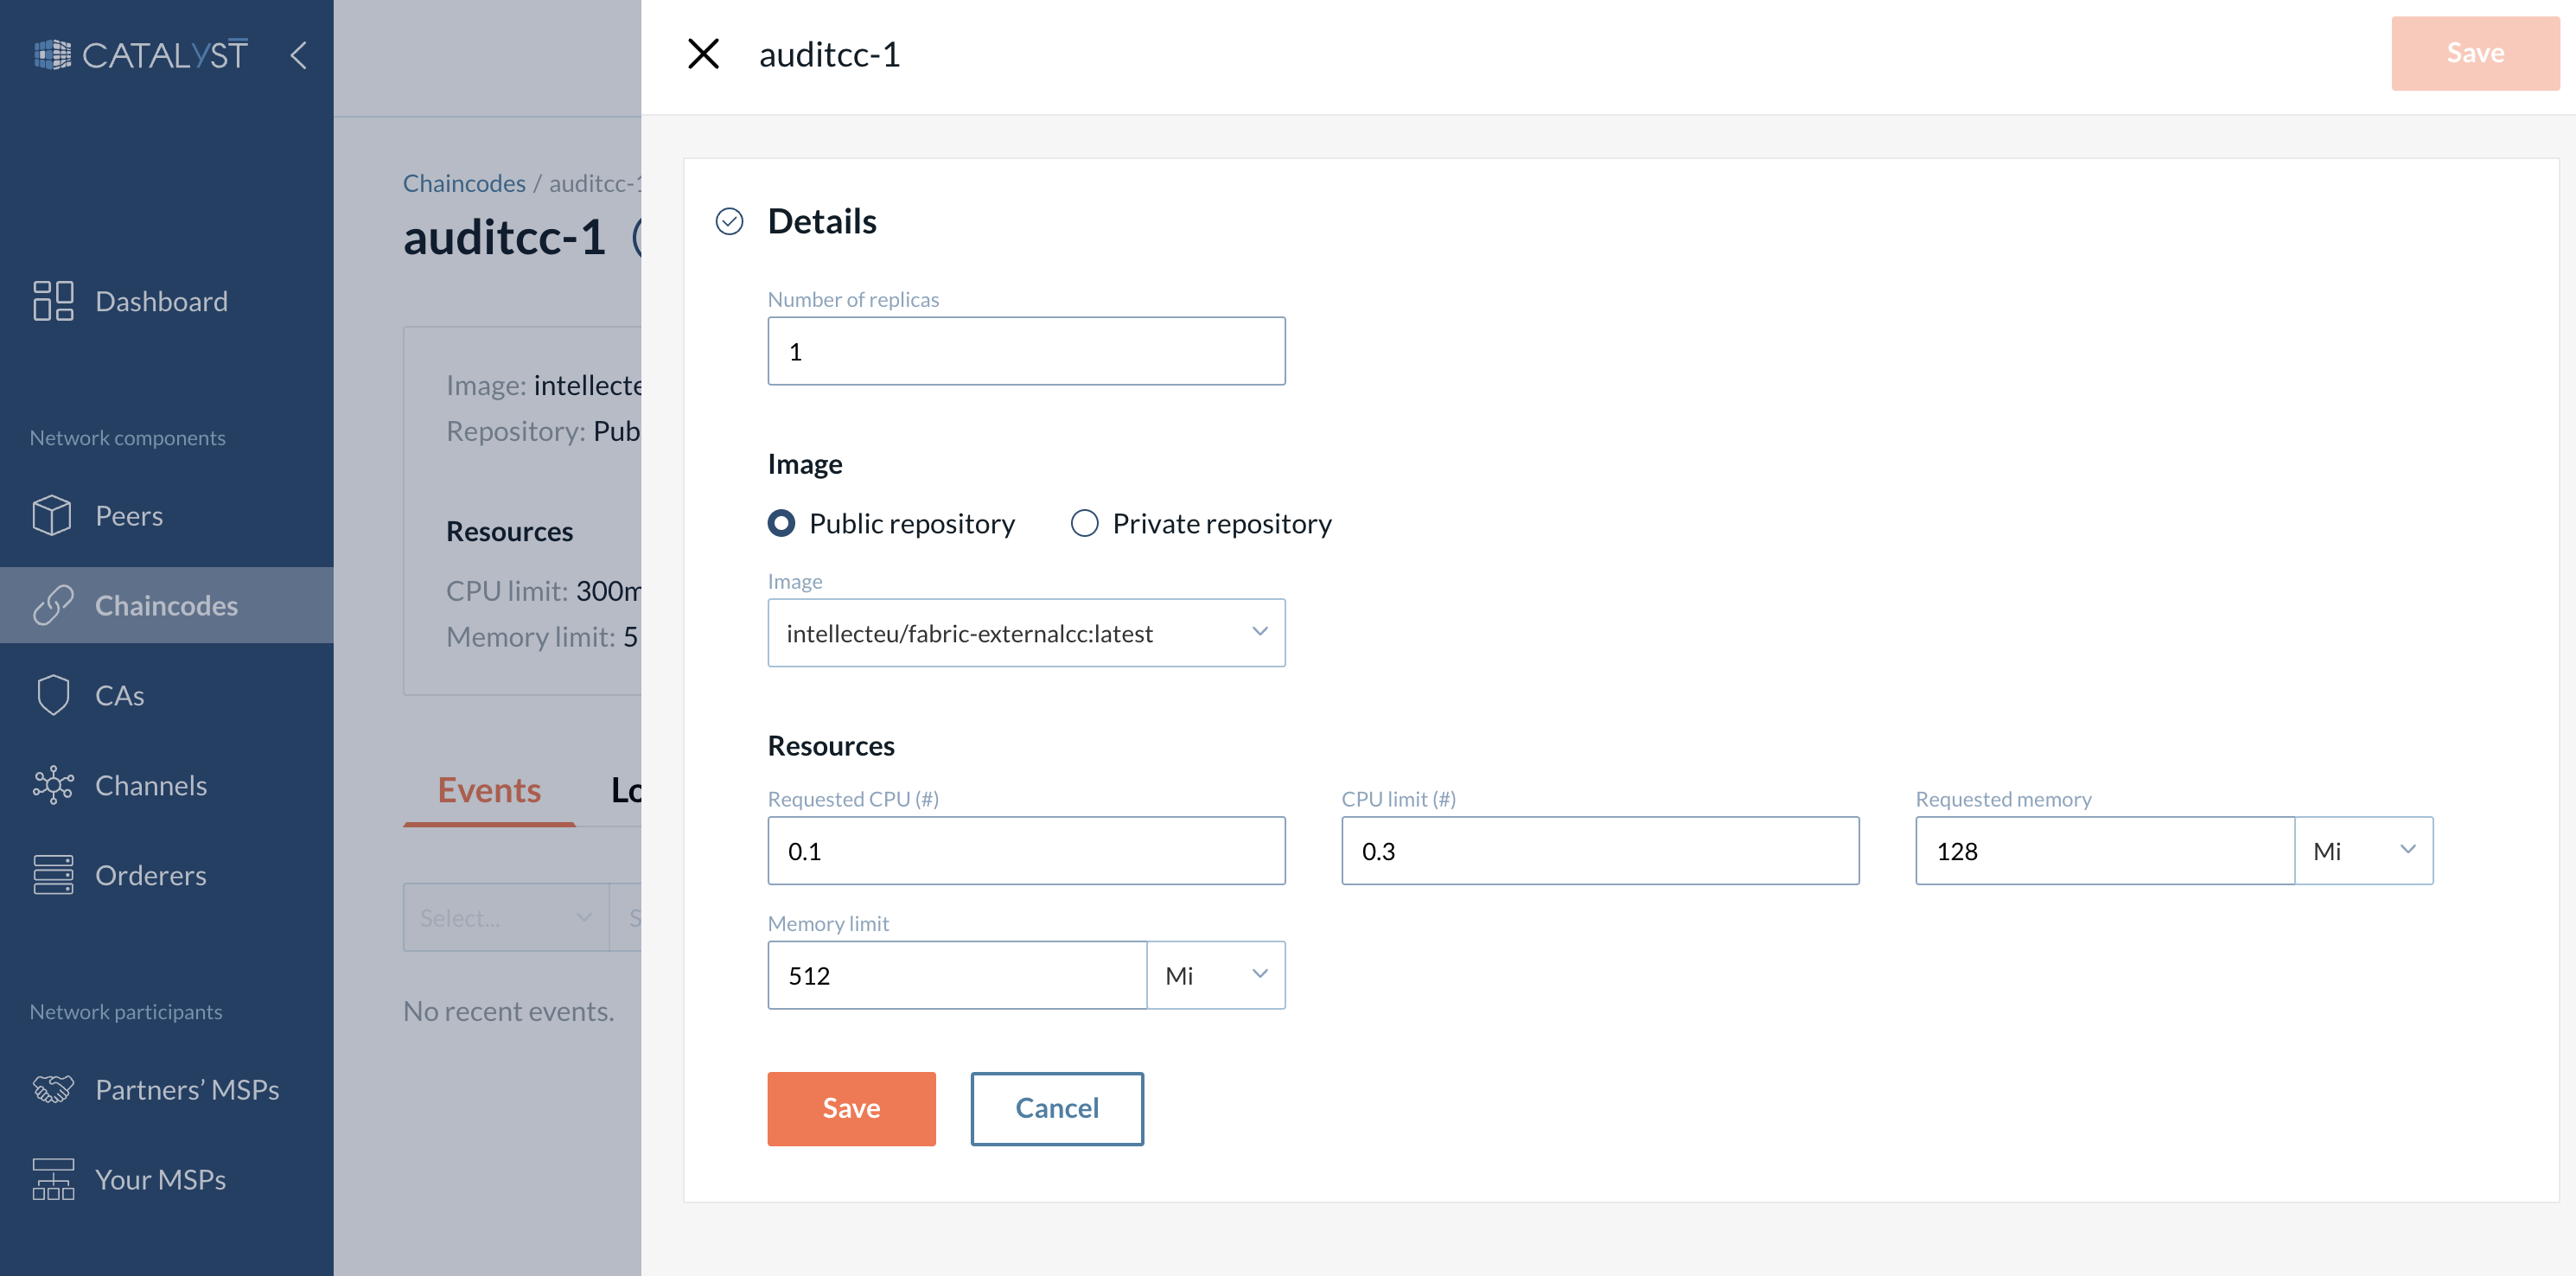
You can see the following fields:
-
Chaincode name.
-
Number of replicas - Chaincode replicas amount to be deployed.
-
Image - Link to your chaincode docker container at the public docker repository.
|
If you want to use an image from a private repository you should specify an imagePullSecret (a server name, your login, and your password). You need to specify a secret only once and then select the secret from a drop-down list. You can create an imagePullSecret in your Kubernetes cluster and add the label "app.kubernetes.io/name": "image-pull-secret". After that, the secret will be available in the drop-down list. |
-
Resources
-
Requested CPU - Guaranteed CPU resource that will be allocated to the chaincode.
-
CPU limit - Maximum CPU resource that will be allocated to the chaincode.
-
Requested memory - Guaranteed amount of RAM that will be allocated to the chaincode.
-
Memory limit - The maximum amount of RAM that can be allocated to the chaincode.
-
-
Version.
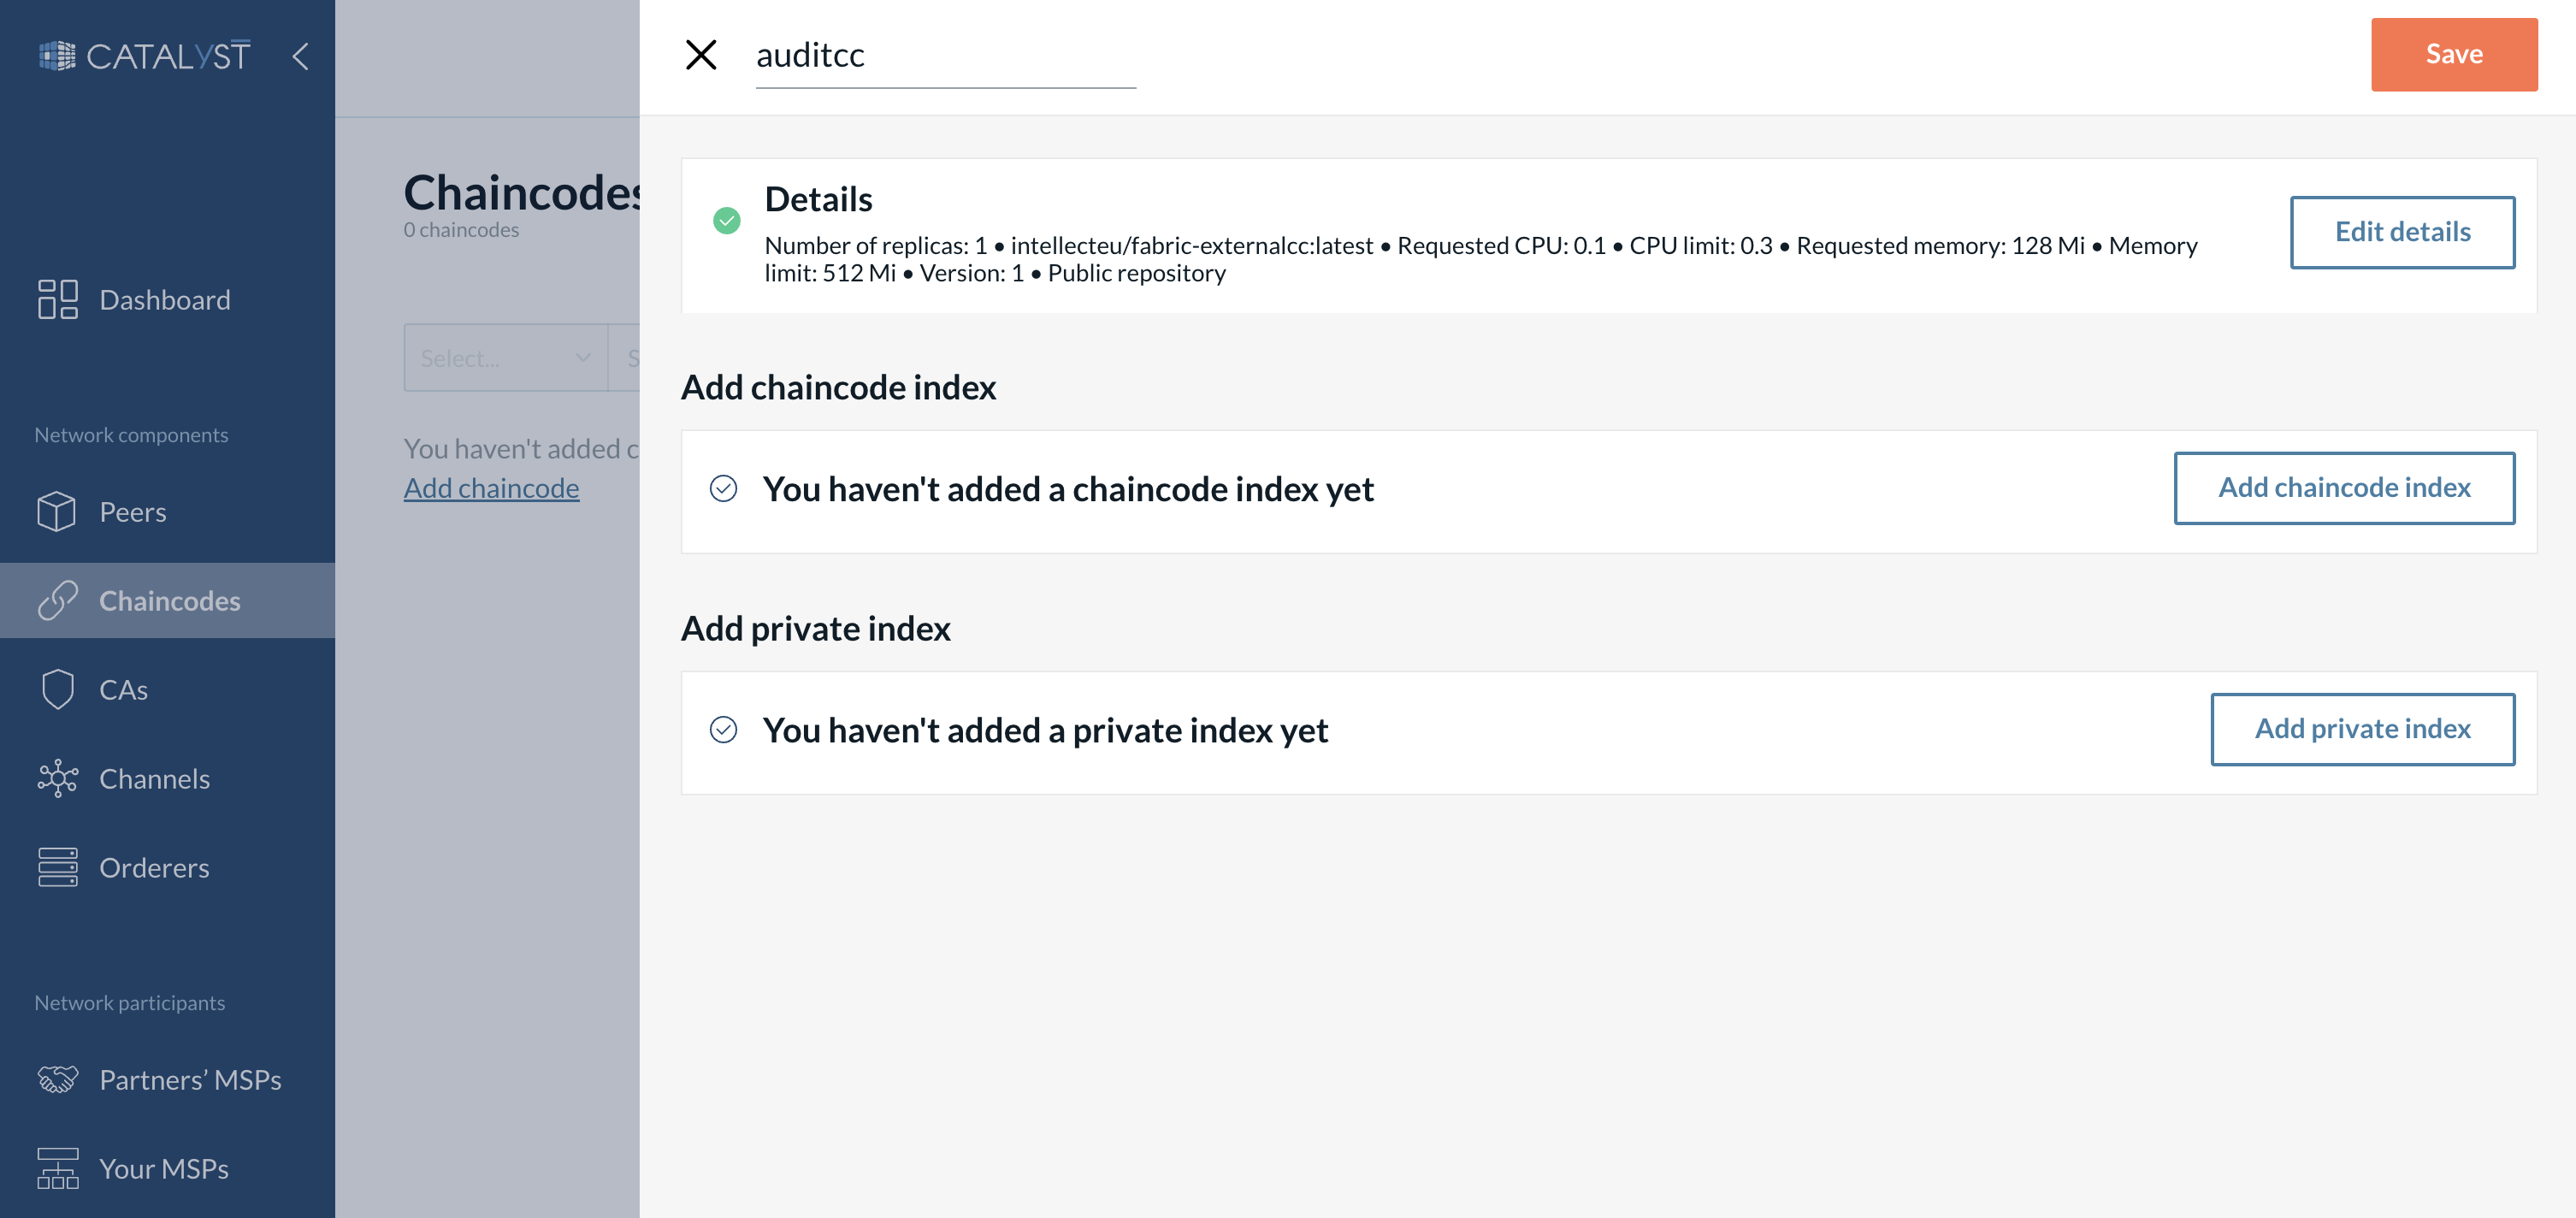
You can also add indexes for optimizing performance:
| Indexes can be applied only to CouchDB. LevelDB does not support indexes. |
-
Chaincode index
-
Private index. These indexes refer to private data collections.
|
In order to provide more granularity to the network, Hyperledger Fabric allows the creation of private data collection. The private data collection contains private data and hash. o provide more granularity to the network, Hyperledger Fabric allows the creation of private data collection. The private data collection contains private data and hash. |
Click on the "Save" button to add the chaincode template on the platform.
Chaincode Details
Click on the chaincode name to see all of the information and actions available for a particular chaincode.
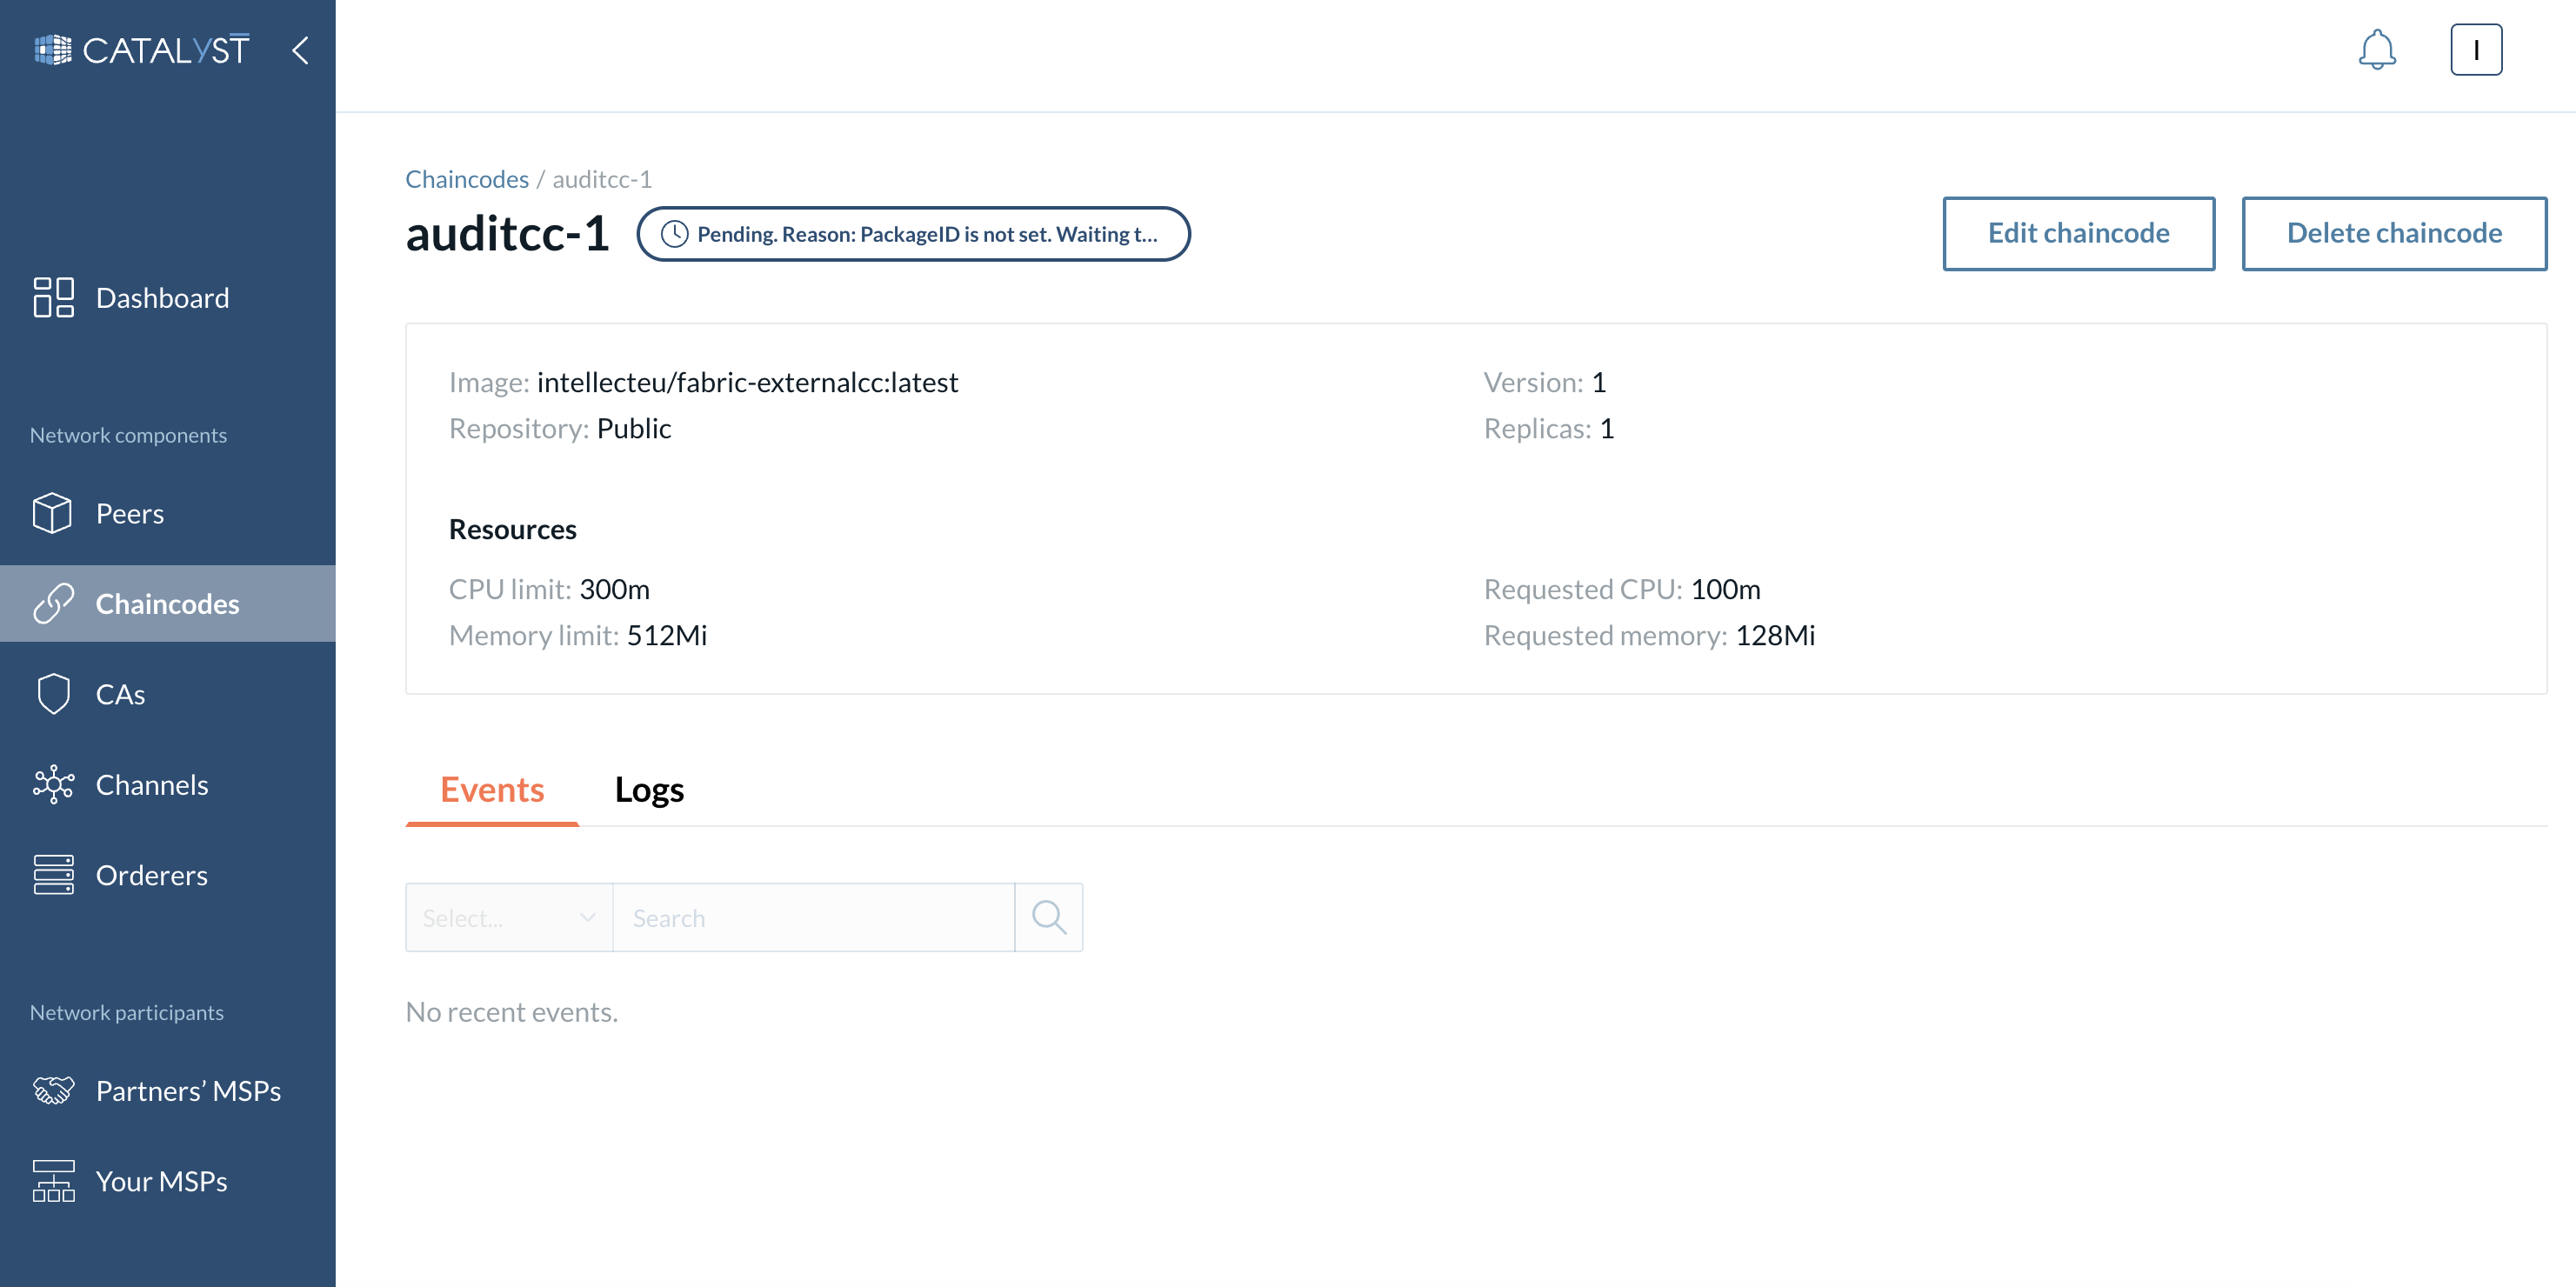
In the upper part of this screen, you can see the information related to the chaincode, such as resources allocated to the chaincode or the image selected at the time of creation, etc.
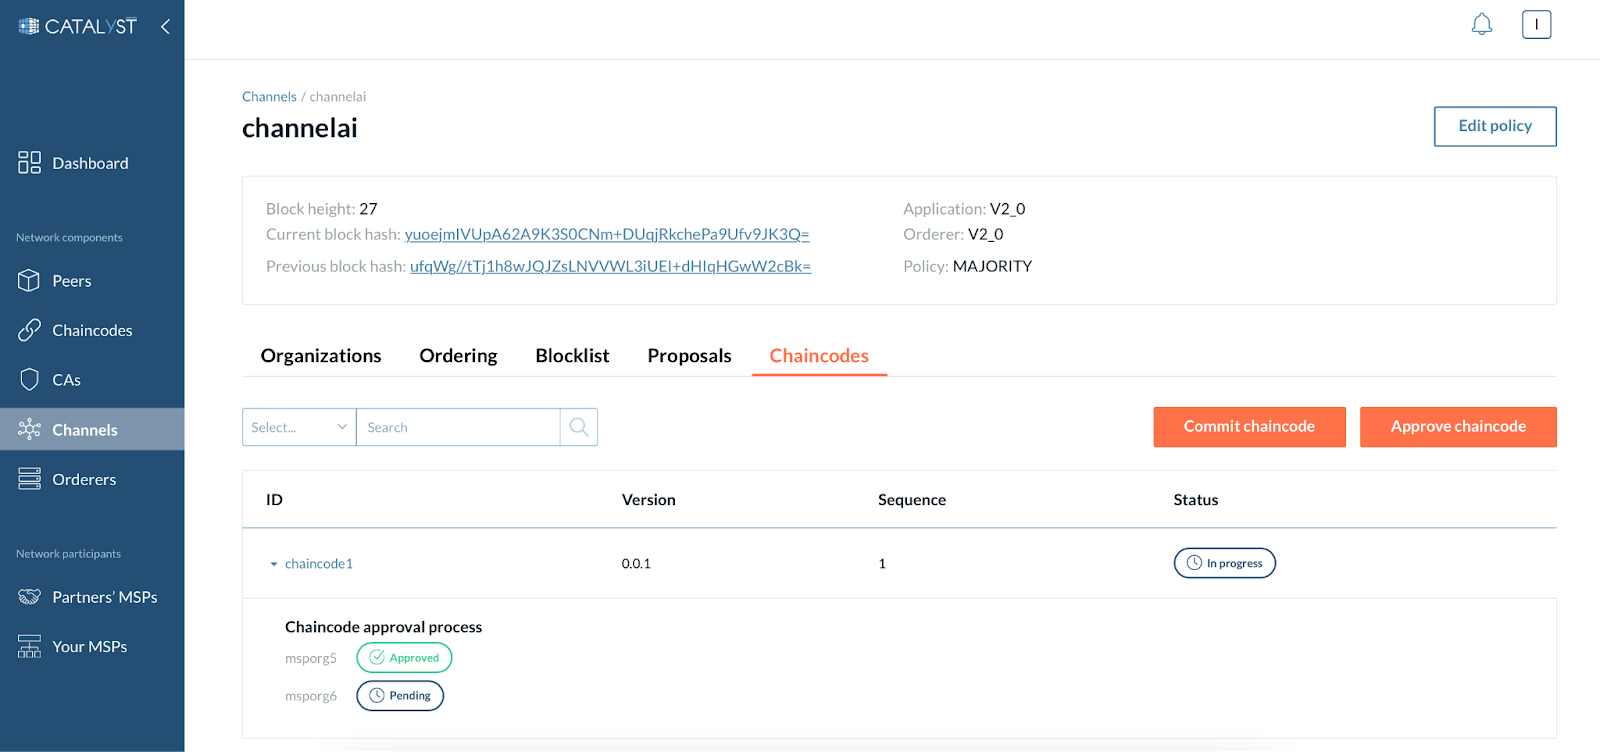
Every chaincode has a status attribute associated with it. A chaincode, at any instance, can exist in one of the five possible statuses:
-
Pending - A chaincode is ready to be installed on a peer.
-
Running - A chaincode pod is running. The chaincode can be committed on a channel and used by business applications.
-
Failed - All chaincode pods have the "failed" status.
-
Deleted - The chaincode was deleted.
You can edit or delete a chaincode
At the bottom of the chaincode details page, you can see two tabs: Events and Logs.
Events
This tab displays events with a particular chaincode.
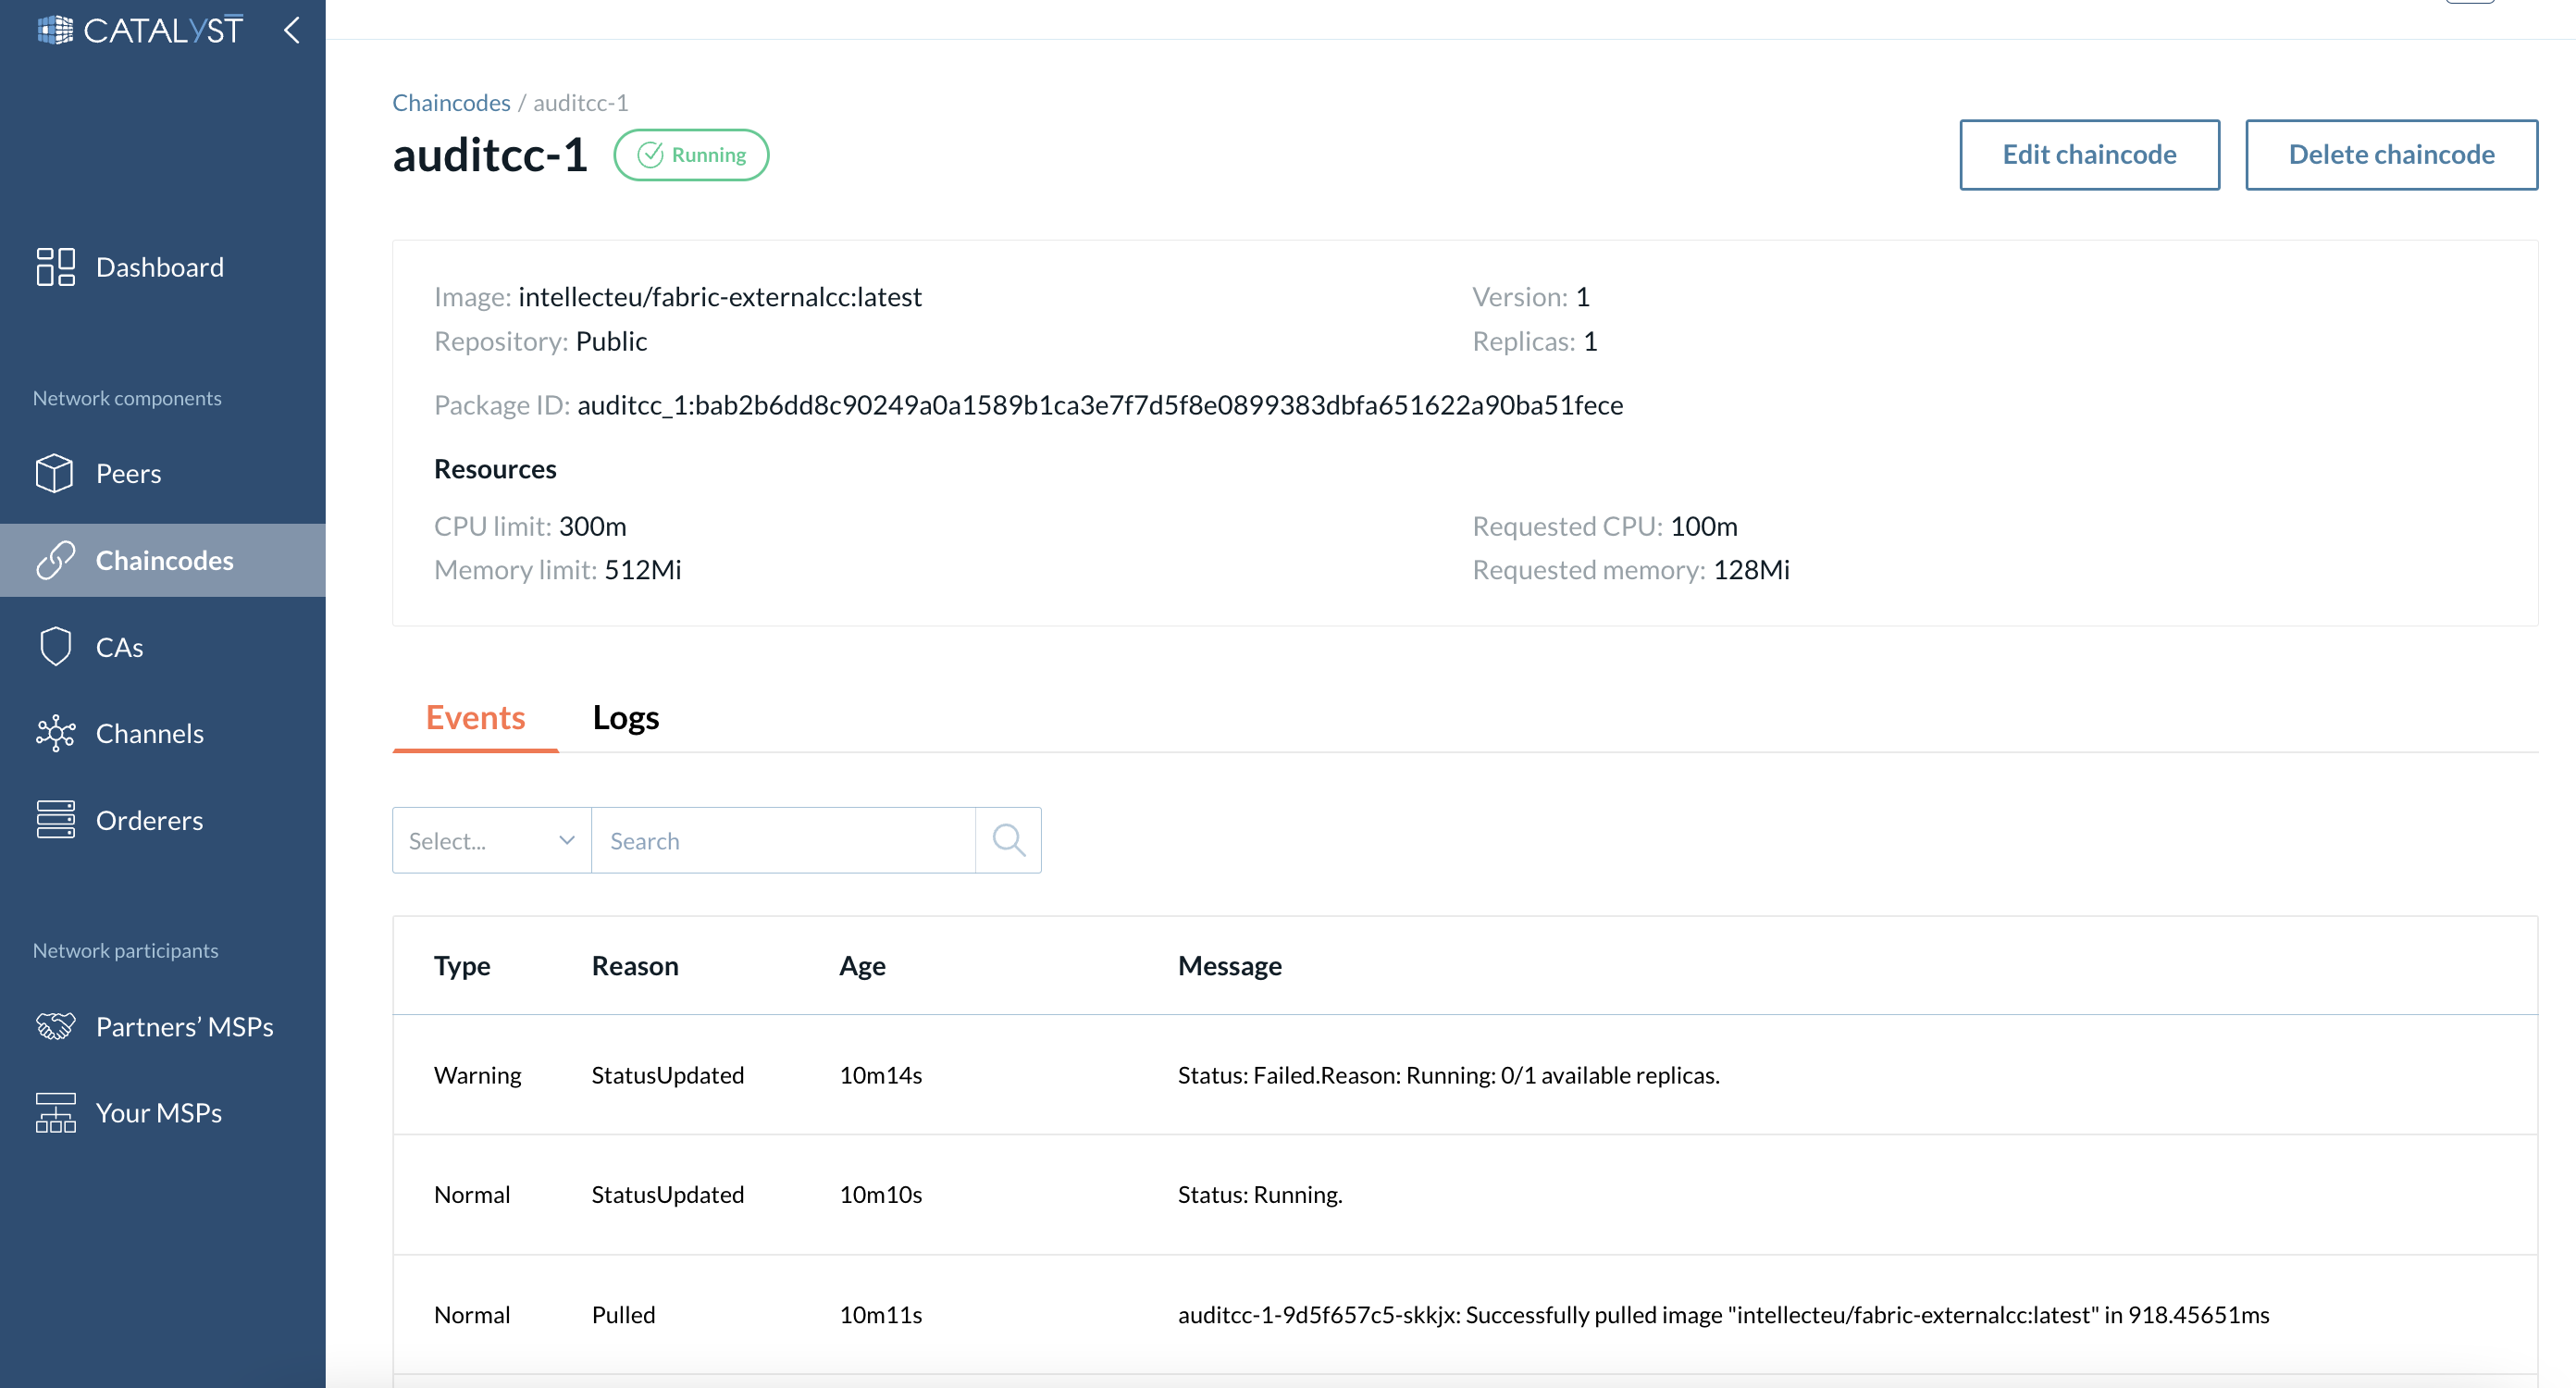
Logs
This tab displays Logs with a particular chaincode pod.
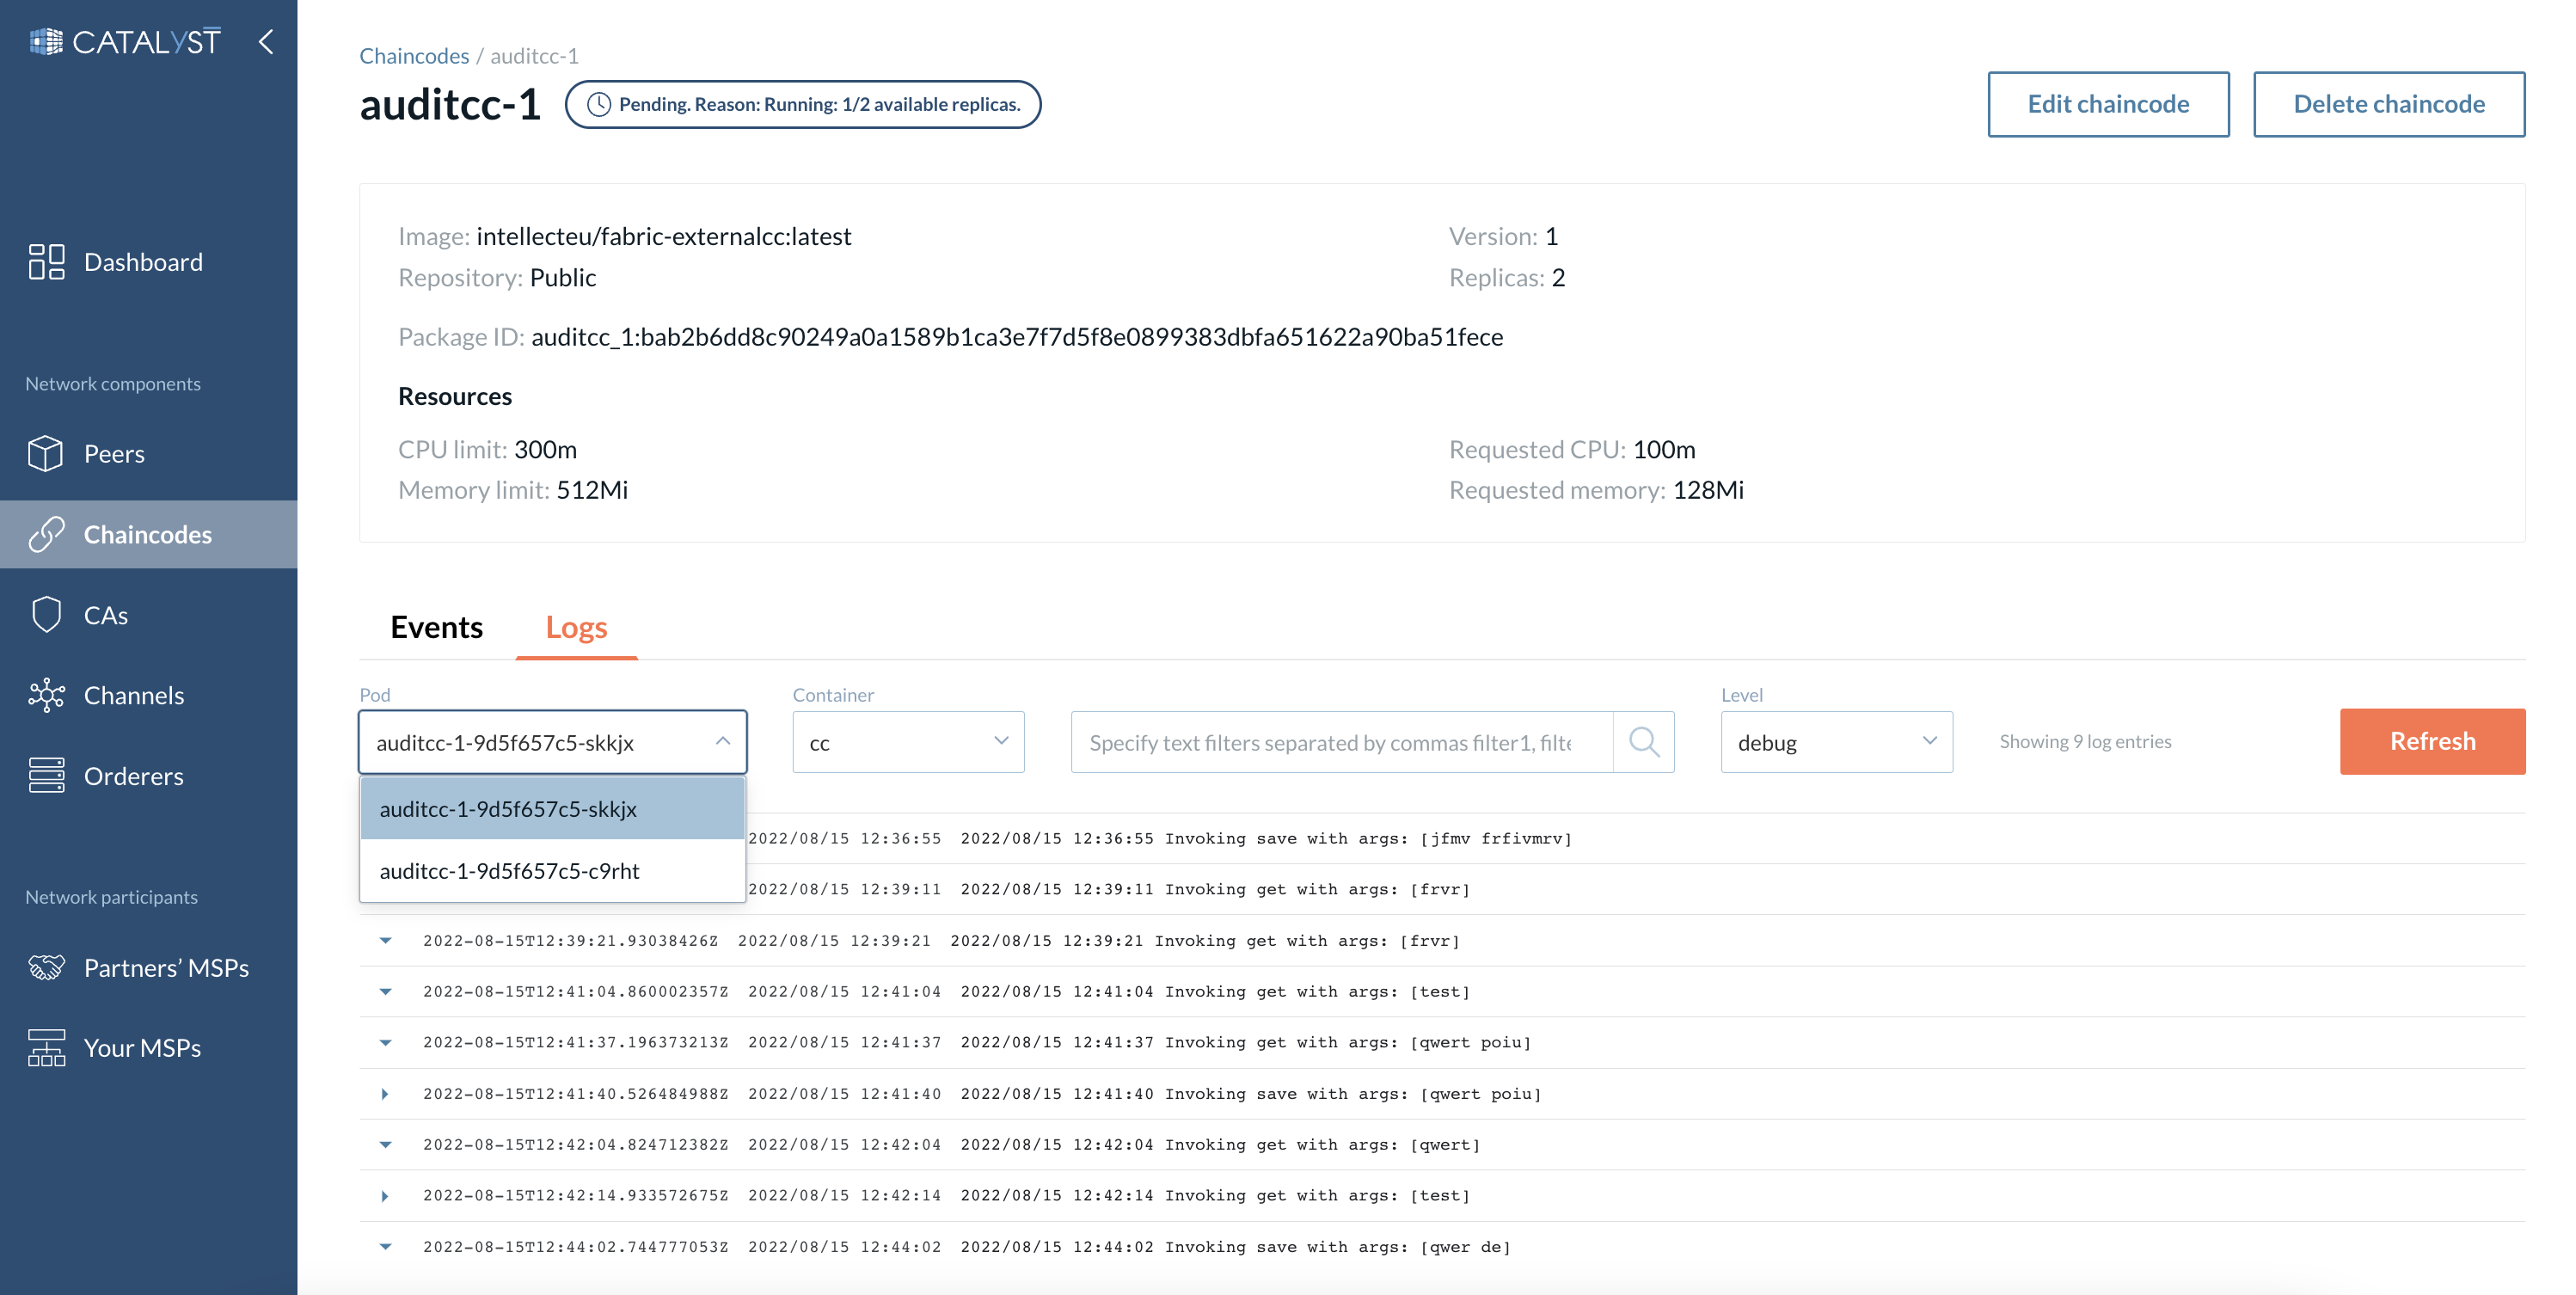
You can filter logs by text and/or level.
| Scroll down to see the newest logs. |
How to Install Chaincode on a Peer?
Any peer that wants to leverage the chaincode to complete a transaction or query the ledger must install that particular chaincode. If the installation of a chaincode is done through code, it requires extensive knowledge of Docker containers and Linux commands, not to mention the time consumed throughout the process. However, Catalyst Blockchain Manager streamlines the entire process by allowing users to add the chaincode through just a few clicks.
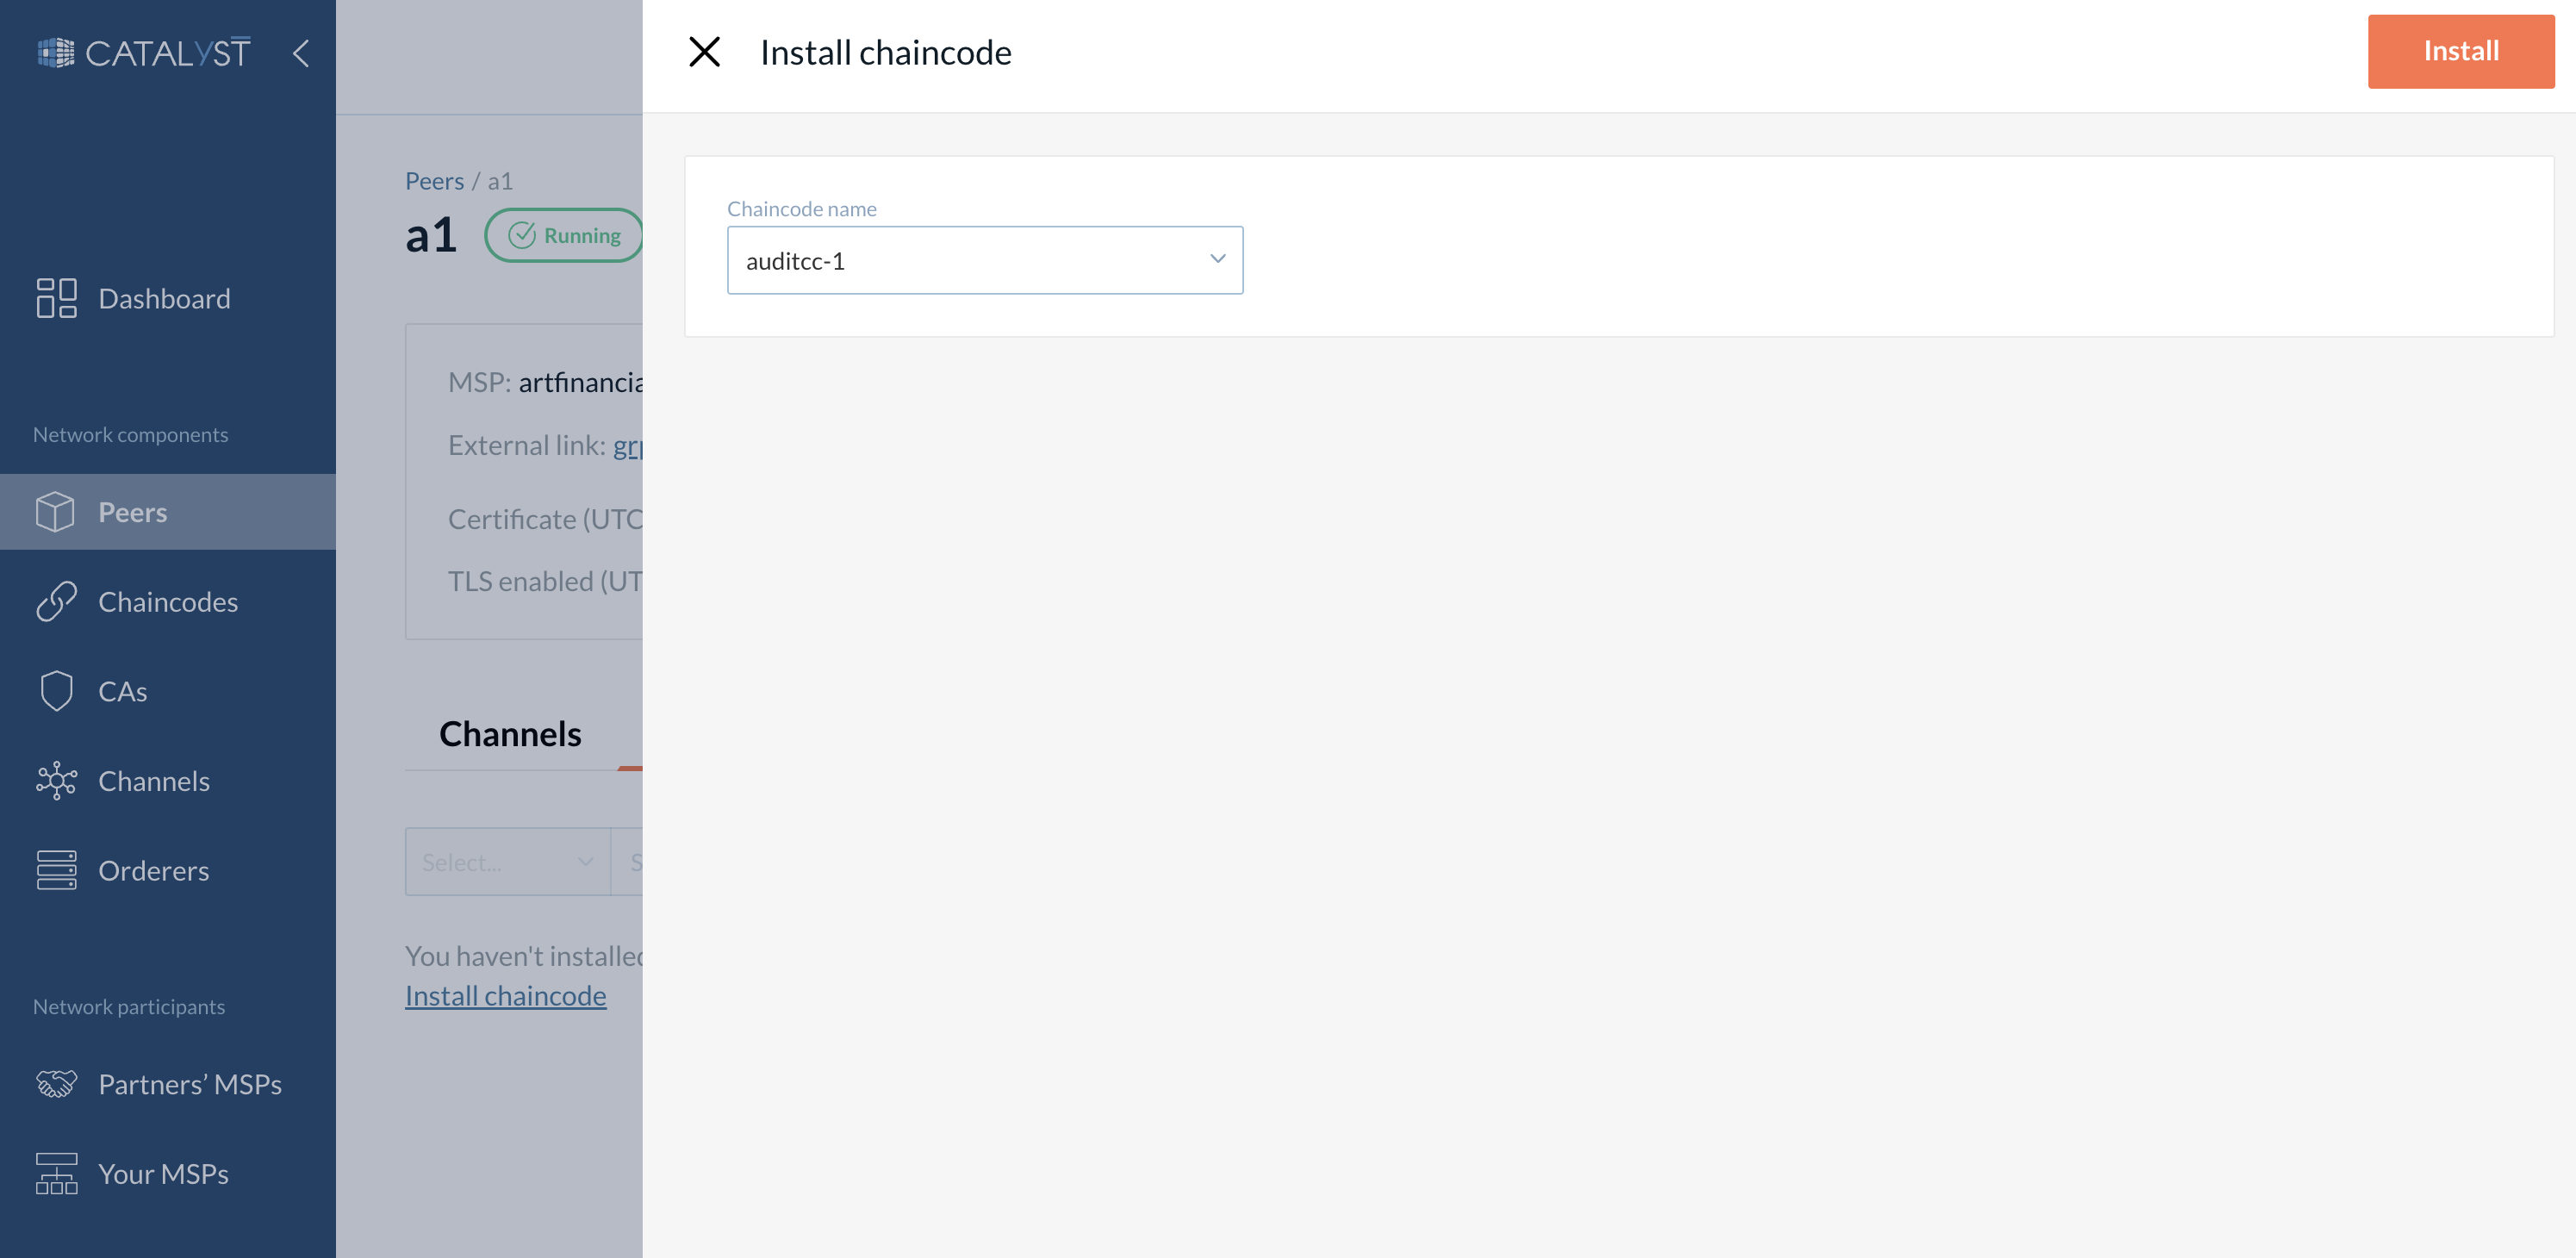
Please go to the “Peer” tab present in the left navigation bar on Catalyst Blockchain Manager, displaying the available peers in a particular organization. Ensure that the peer on which you want to install the chaincode has the “running” status. (For information about peer status, please refer to this section ). Click on a specific peer, go to the Chaincodes tab, and click the “Install chaincode” button.
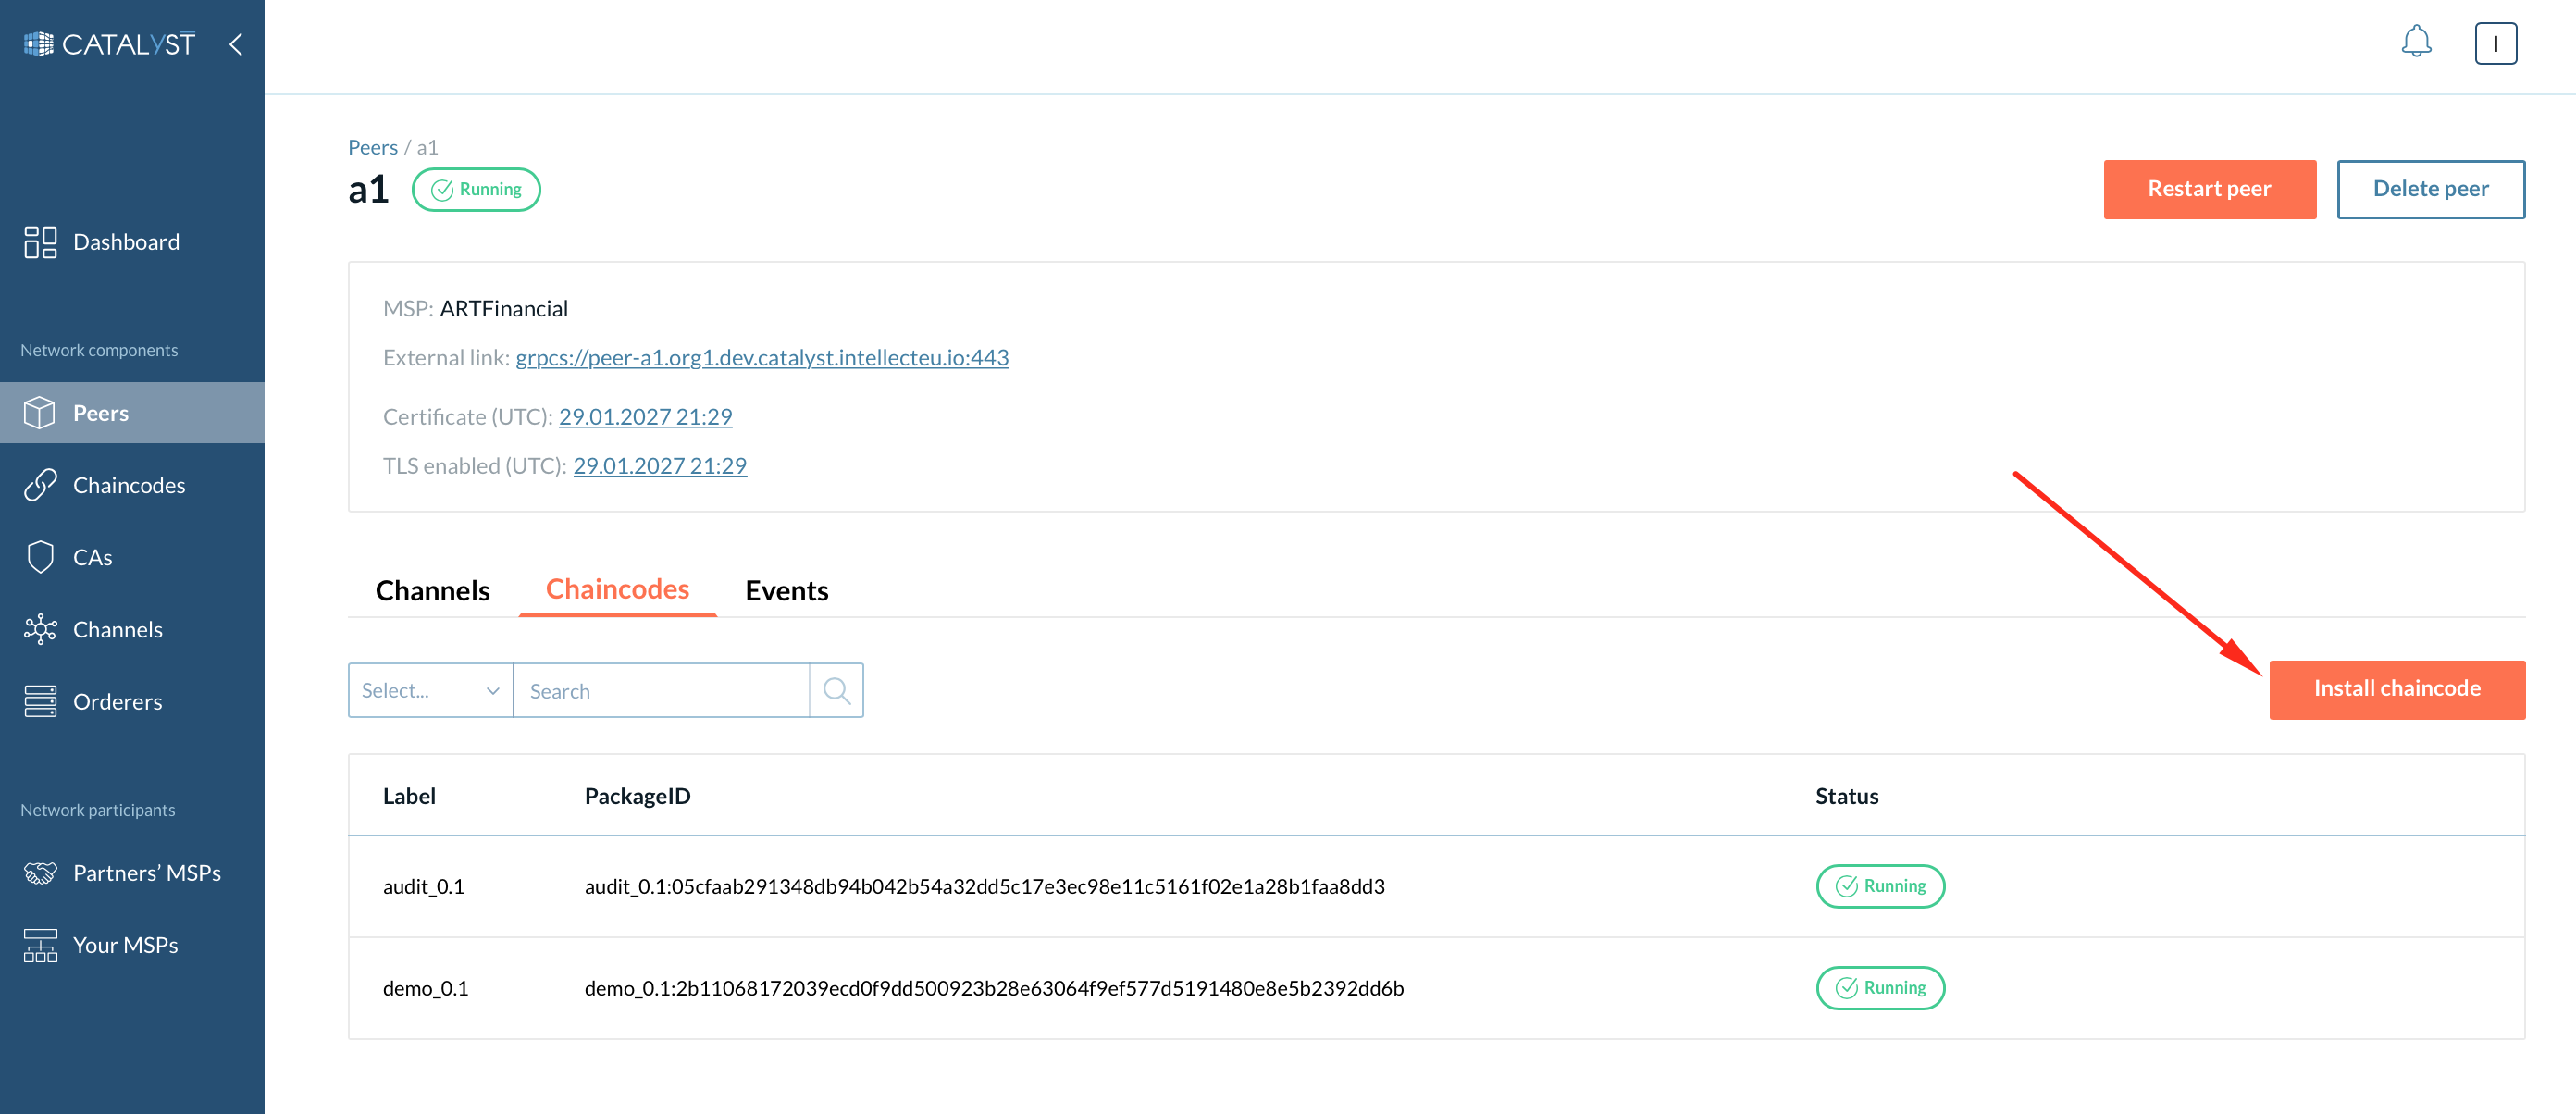
It opens an on-screen menu when clicked. You can select the chaincode from a drop-down menu that displays all of the chaincode templates added to the platform.
By clicking the “Chaincodes” tab on the “Peer Details” tab, you can see installed chaincodes on that specific peer. The information displayed under this tab are Label, PackageID, and a status of the chaincode deployment.
-
Label - Human-readable description of the package.
-
PackageID - A package identifier is used to associate a chaincode package installed on your peers with a chaincode definition approved by your organization. The peer generates it.
-
Status
-
Running - A chaincode pod is running. The chaincode can be committed on a channel and used by business applications.
-
Pending - There are no available replicas.
-
Failed - All chaincode pods have the "failed" status.
-
Deleted - The chaincode was deleted.
-
After the chaincode was installed on the peer, the chaincode container(s) will launch, allowing channel members to start using the chaincode. It may take a few minutes for the chaincode container to start.
How to approve Chaincode on a Channel?
Every chaincode has a definition that includes certain parameters such as name, version, endorsement policy, and more. The approval of the chaincode is subject to the endorsement policy, which defines the voting mechanism. The endorsers (regarding the channel policies) are responsible for authenticating the chaincode. Each endorser should approve the same chaincode definition to be able to commit it to the channel. The chaincode needs to be approved only once by each endorser organization according to the channel policy.
| For example: If the channel policy is ANY, only one endorser’s approval is needed. If the channel policy is ALL, each endorser on the channel has to approve the chaincode to be able to further commit the chaincode. And so on. |
To approve a chaincode on a channel:
-
Go to the “Channels” tab and open the specific channel where you need to approve the chaincode.
-
Under the “Chaincodes” section, click the “Approve chaincode” button.
| Each Endorser organization needs to approve the same chaincode definition to commit this chaincode on a channel. Only the peer and package ID are different for each organization. |
| You cannot approve a chaincode definition twice. If an error appears while you’re trying to approve a chaincode, check to make sure that it has not been approved earlier. |
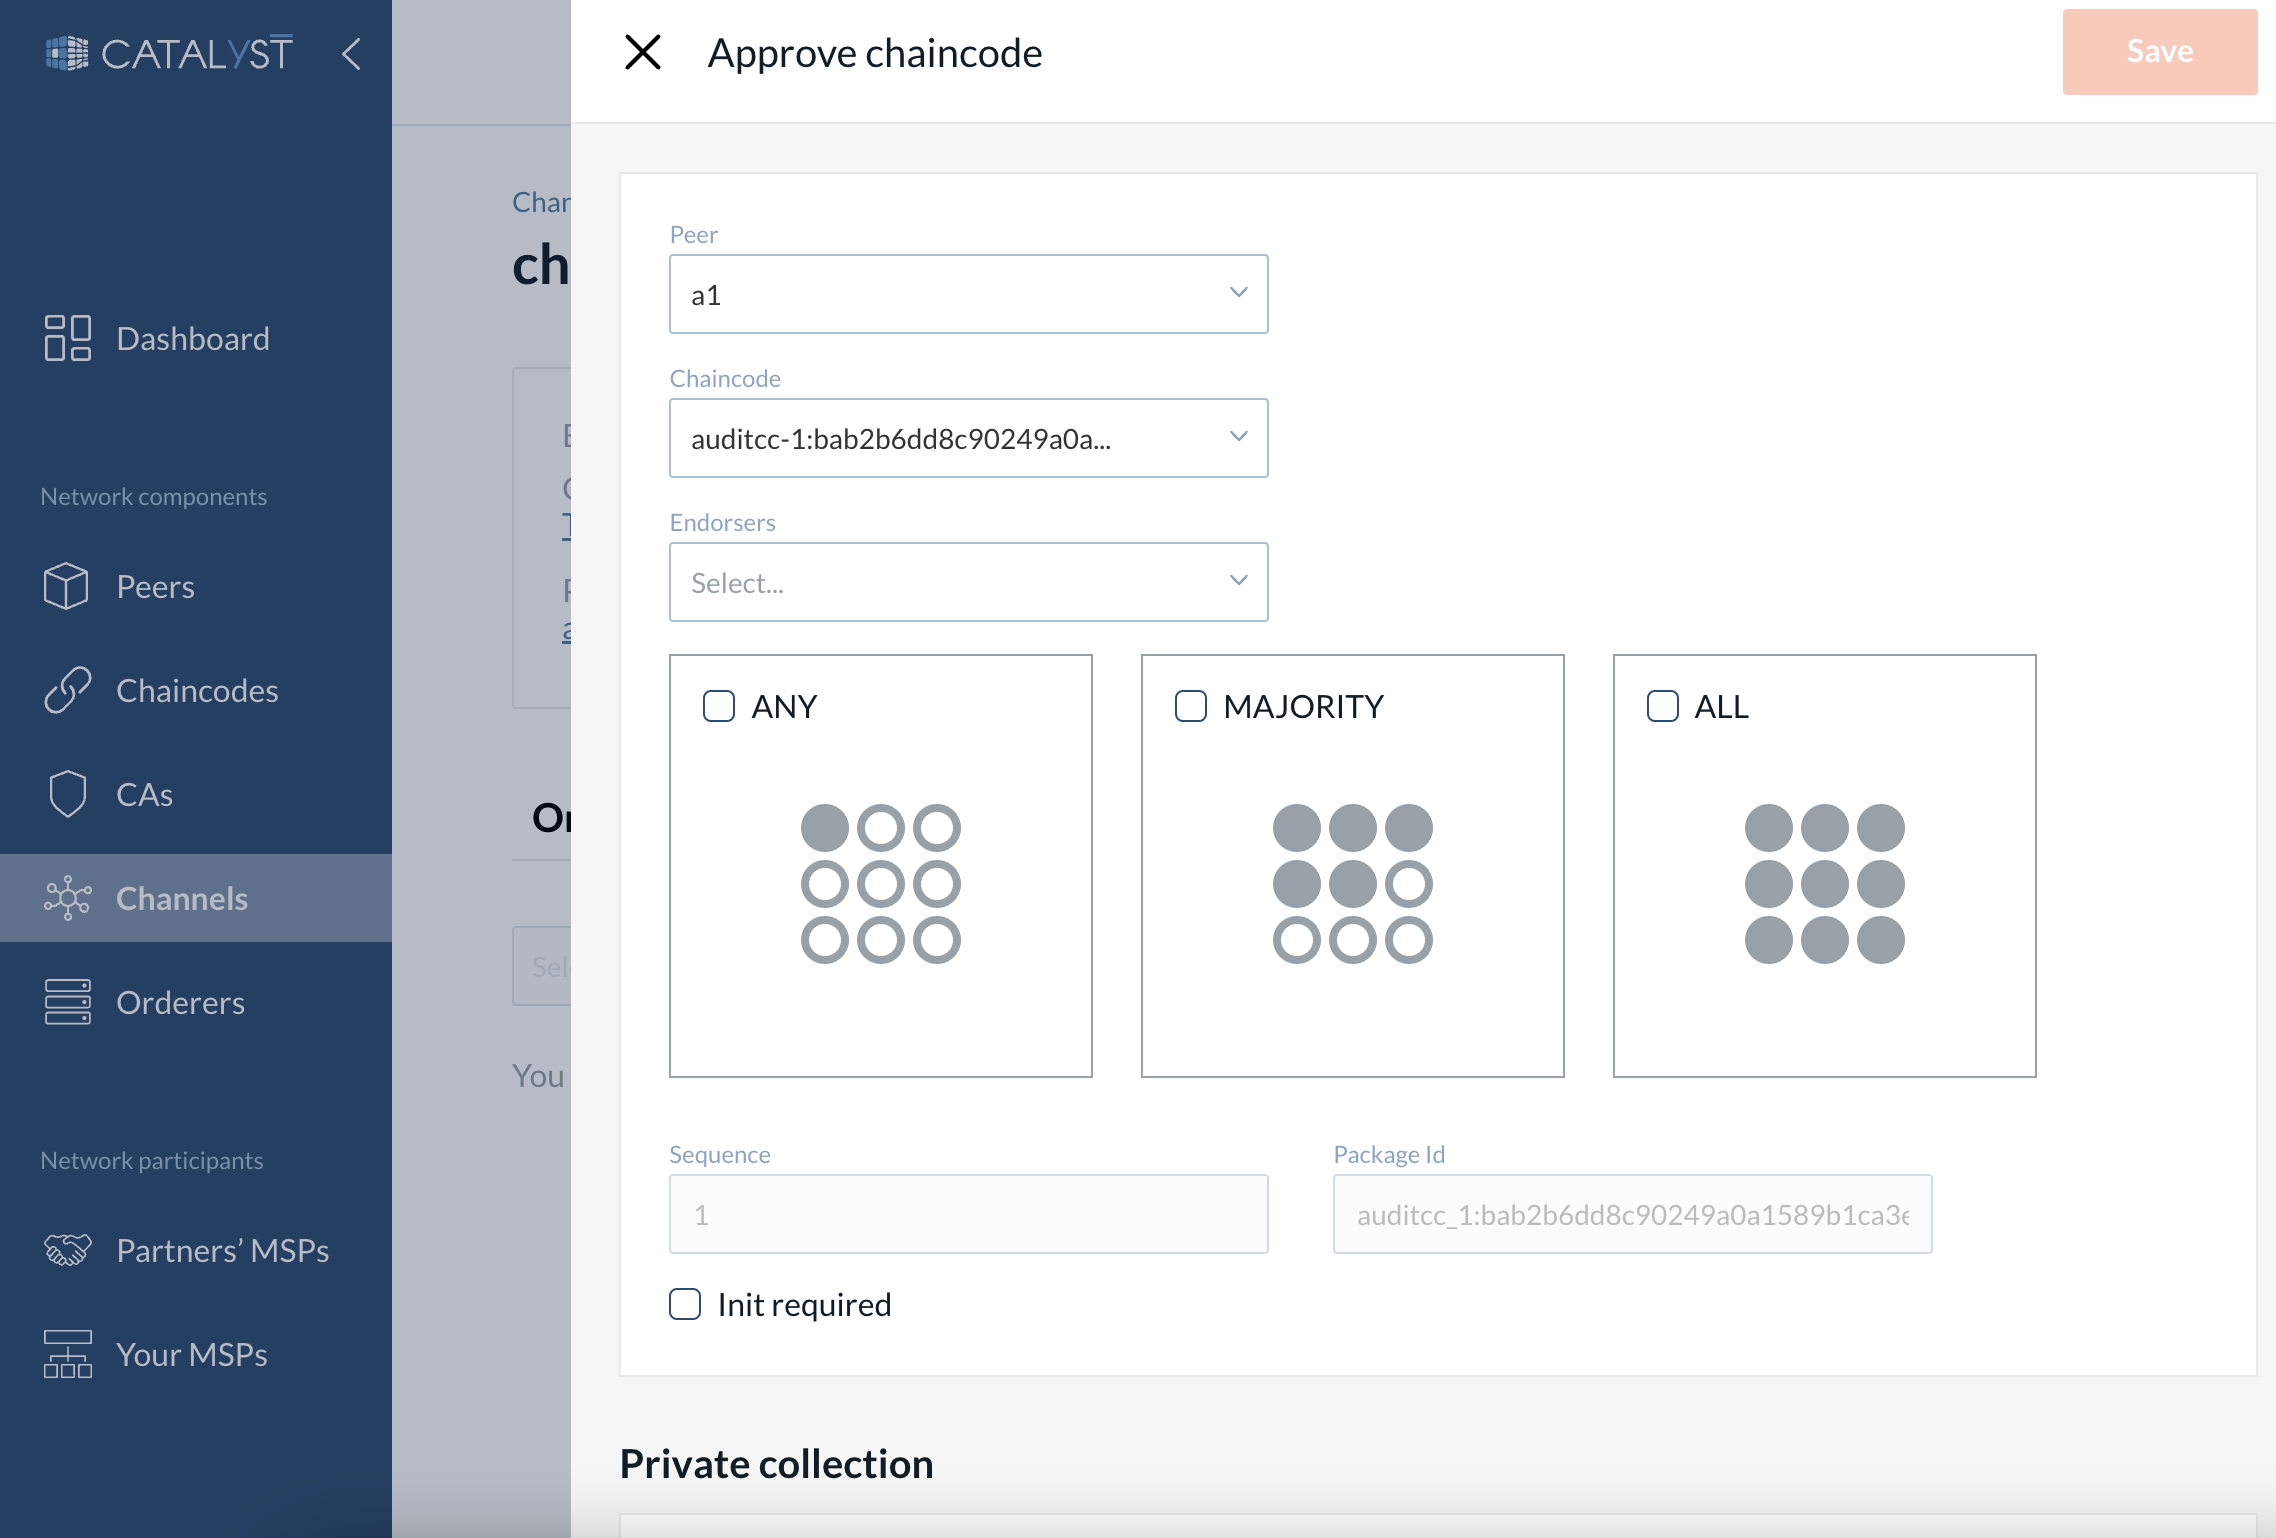
-
Peer - A peer node where this chaincode was installed earlier.
-
Chaincode - Choose a chaincode from a drop-down menu.
-
Endorsers - Which organizations need to execute and validate the transaction output. Only these organizations will be able to interact with the chaincode.
-
Policy - ANY type of policy, MAJORITY or ALL. This policy will be applied for calculating how many approvals from the endorsers are required to make a proposal.
-
Sequence - The number of times the chaincode was defined, automatically specified by the platform (it increases every time when upgrading the chaincode on a channel).
-
Package ID - The package ID value is generated by the peer while installing the chaincode on the peer. It is automatically specified by the platform when you choose a peer in the field above.
-
Init required checkmark - If you specify that Init is required, Fabric will ensure that the Init function is invoked before any other function in the chaincode and is only invoked once (to read more about init, please, refer to the Hyperledger Fabric documentation here).
-
You can also add a private collection if needed. If you want to keep data private from other organizations on the channel, you can use private data collection instead of new channel creation. The private collection comprises the actual private data and a hash of that data. You can read more about private data collection here.
-
Name - Any name can be given
-
Block to live - Represents how long the data should live on the private database in terms of blocks. To keep private data indefinitely, meaning that the private data is not purged, set this property to 0.
-
Required peer count - A minimum number of peers (across authorized organizations) that each endorsing peer must successfully disseminate private data to before the peer signs the endorsement and returns the proposal response to the client.
-
Max peer count - The maximum number of peers.
-
Members - You should also specify members who will have access to this private collection, and choose rights (read-only or write-only) according to your business rules.
-
You can also choose Override chaincode policy to specify a policy to utilize for the collection. If this option is not chosen, the chaincode endorsement policy applies to the private collection. You can read more about all private collection fields in the official Hyperledger Fabric documentation
-
After you approve a chaincode you will see the chaincode commitment status at the Chaincodes tab. When all the approvals according to the channel policy are received you can commit a chaincode.
How to Commit a Chaincode?
Once a sufficient number of channel members have approved a chaincode definition, one organization can commit the definition to the channel. The channel policy governs the number of organizations with endorser rights that need to approve a definition before it can be successfully committed to the channel.
| Only an organization with endorser rights on the particular channel, who approved this chaincode definition earlier, can commit it. |
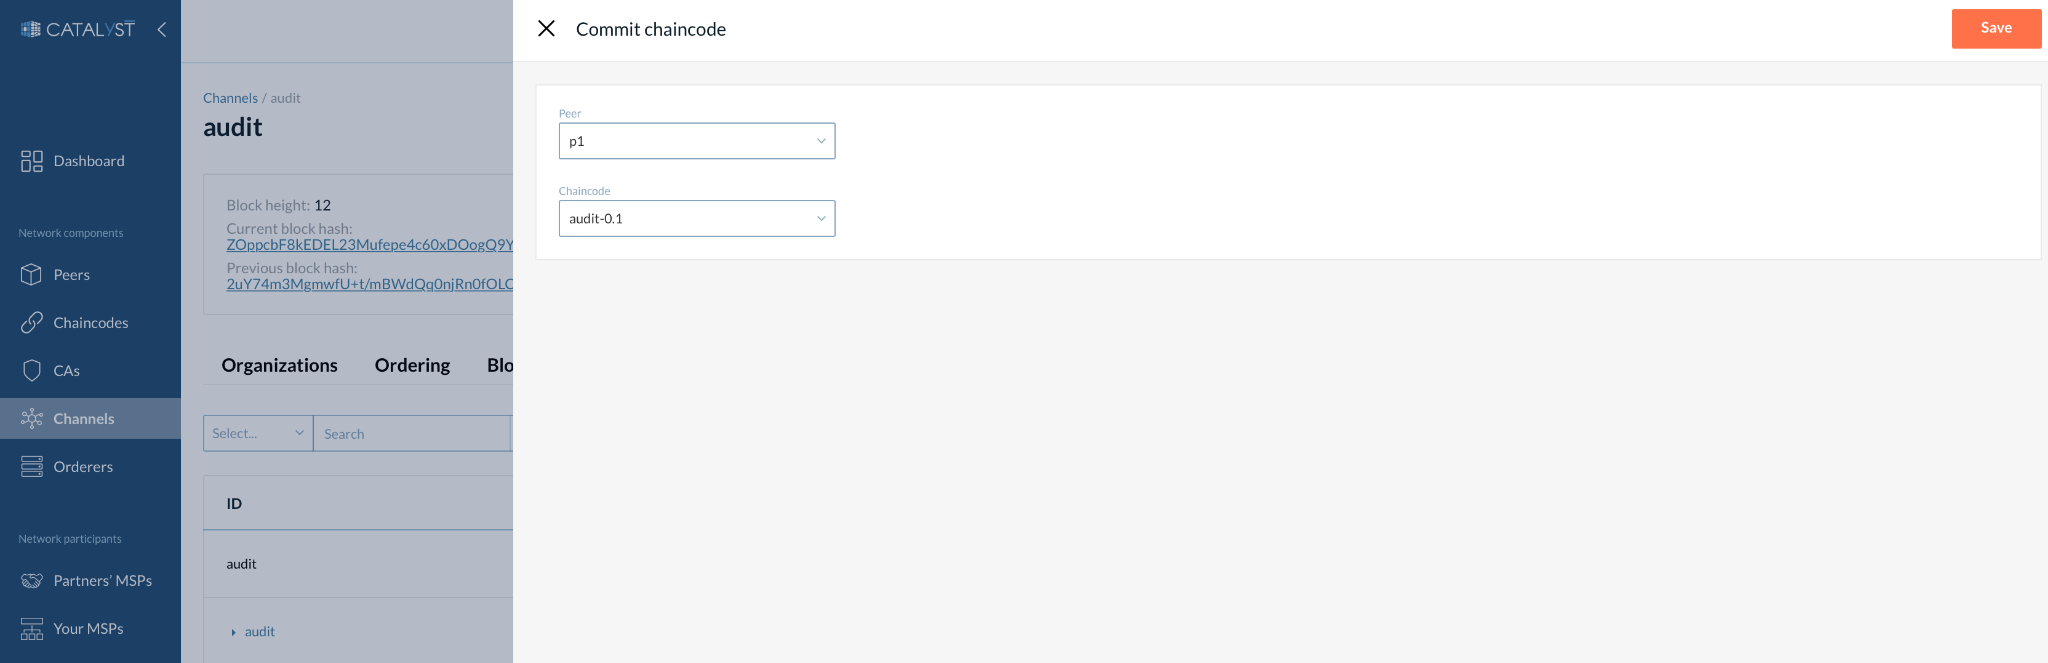
To commit a chaincode on a channel, go to the “Channels” tab and open the specific channel to commit the chaincode. Under the “Chaincodes” section, there is a button labeled “Commit chaincode.” Select a peer and the chaincode from the dropdown menu, and click the “Save” button.
|
Sometimes you cannot commit a chaincode even all the approvals from endorsers organizations are made. It can be caused by no anchor peer specified for some of these organizations. If an organization hasn’t specified an anchor peer on the channel, the organization’s peers won’t be returned in a discovery service request and therefore cannot be reached out to send the committing request. |
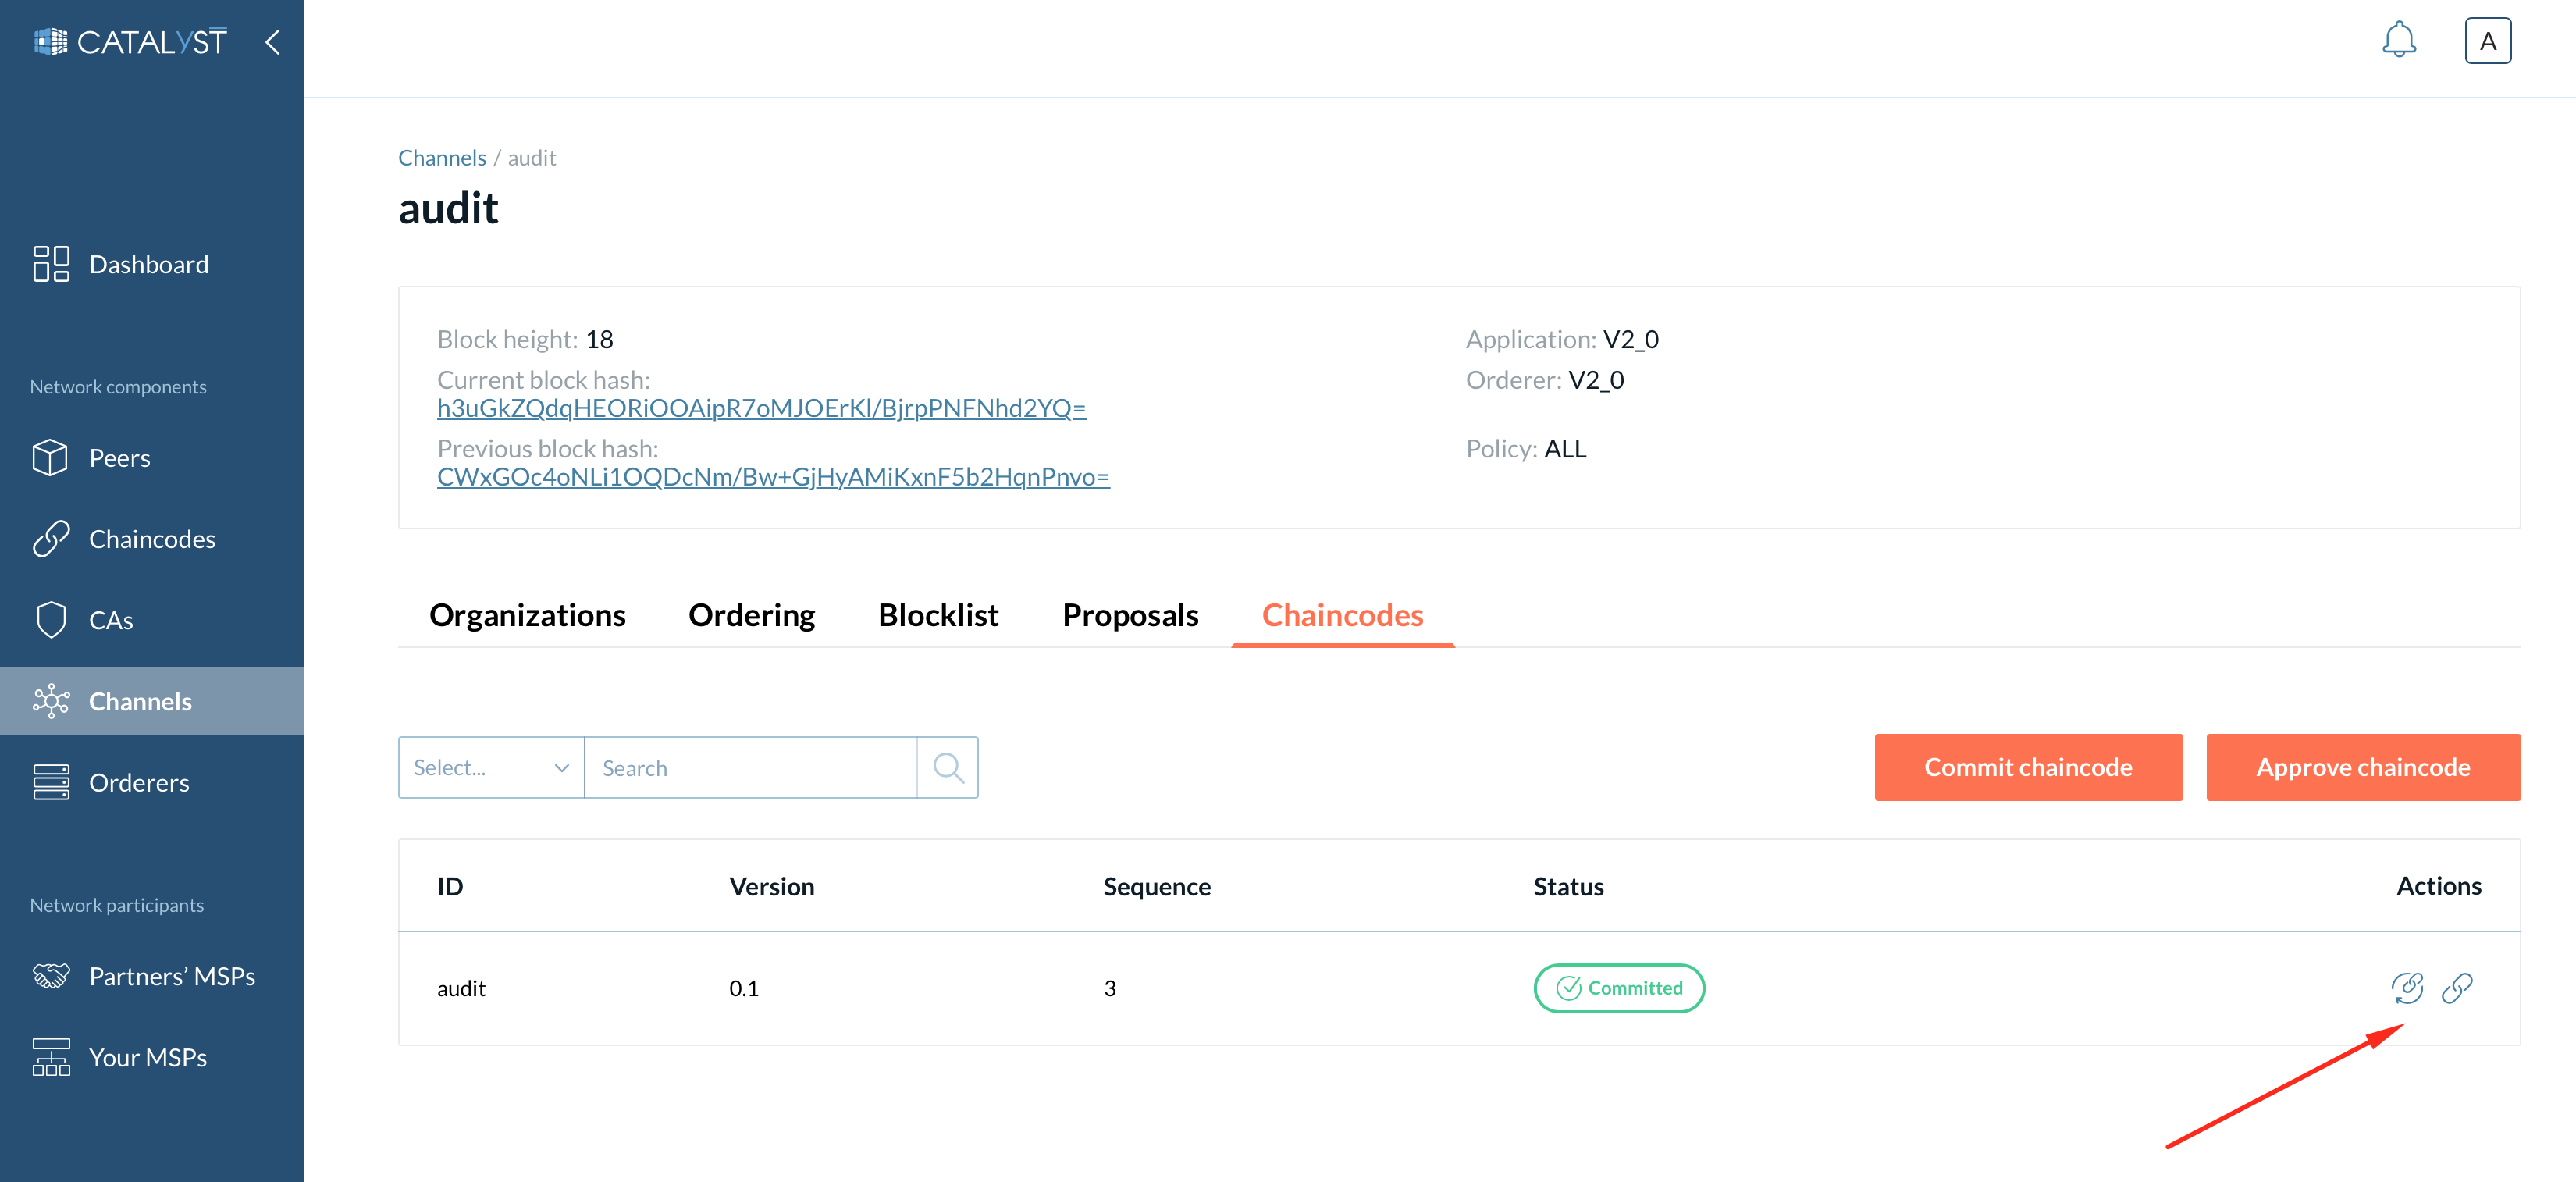
After the chaincode is successfully committed, it will be displayed in the “Chaincodes” section. Chaincode can be queried or invoked. You can test it by clicking the "Query" or the "Invoke" buttons.
|
If the chaincode is already committed to the channel, you do not need to approve it for using the chaincode. You can install the chaincode on the peer joined to the channel if you want your peer to be an endorser for this particular chaincode. The chaincode should have the same parameters (the name, the version) as was committed to the channel. However, your organization needs to be the chaincode endorser to be able to interact with the chaincode. |
How to Upgrade a Chaincode?
You can upgrade a chaincode using the same Hyperledger Fabric lifecycle process as you used to install and start the chaincode. You can upgrade the chaincode binaries or only update the chaincode policies.
Follow these steps to upgrade a chaincode:
-
Add a new chaincode version to the platform (as described in the “Adding chaincode” section). You should add the same name as the chaincode you want to upgrade and specify a new version.
-
Install the new chaincode package on your peers.
-
Approve a new chaincode definition.
-
Commit the definition to the channel.
If you want just to update the chaincode policies, you can skip Steps 1 and 2 and just approve and commit the same chaincode with a new policy.
When a sufficient number of channel members regarding the channel policy have approved the new chaincode definition, one organization can commit the new definition to upgrade the channel’s chaincode definition.
| Only an organization with endorser rights on the particular channel, who approved this chaincode definition earlier, can commit it. |
How to Remove a Chaincode?
You can remove a chaincode by clicking on the "Remove" button present under the actions column inside the" Chaincodes" action table.
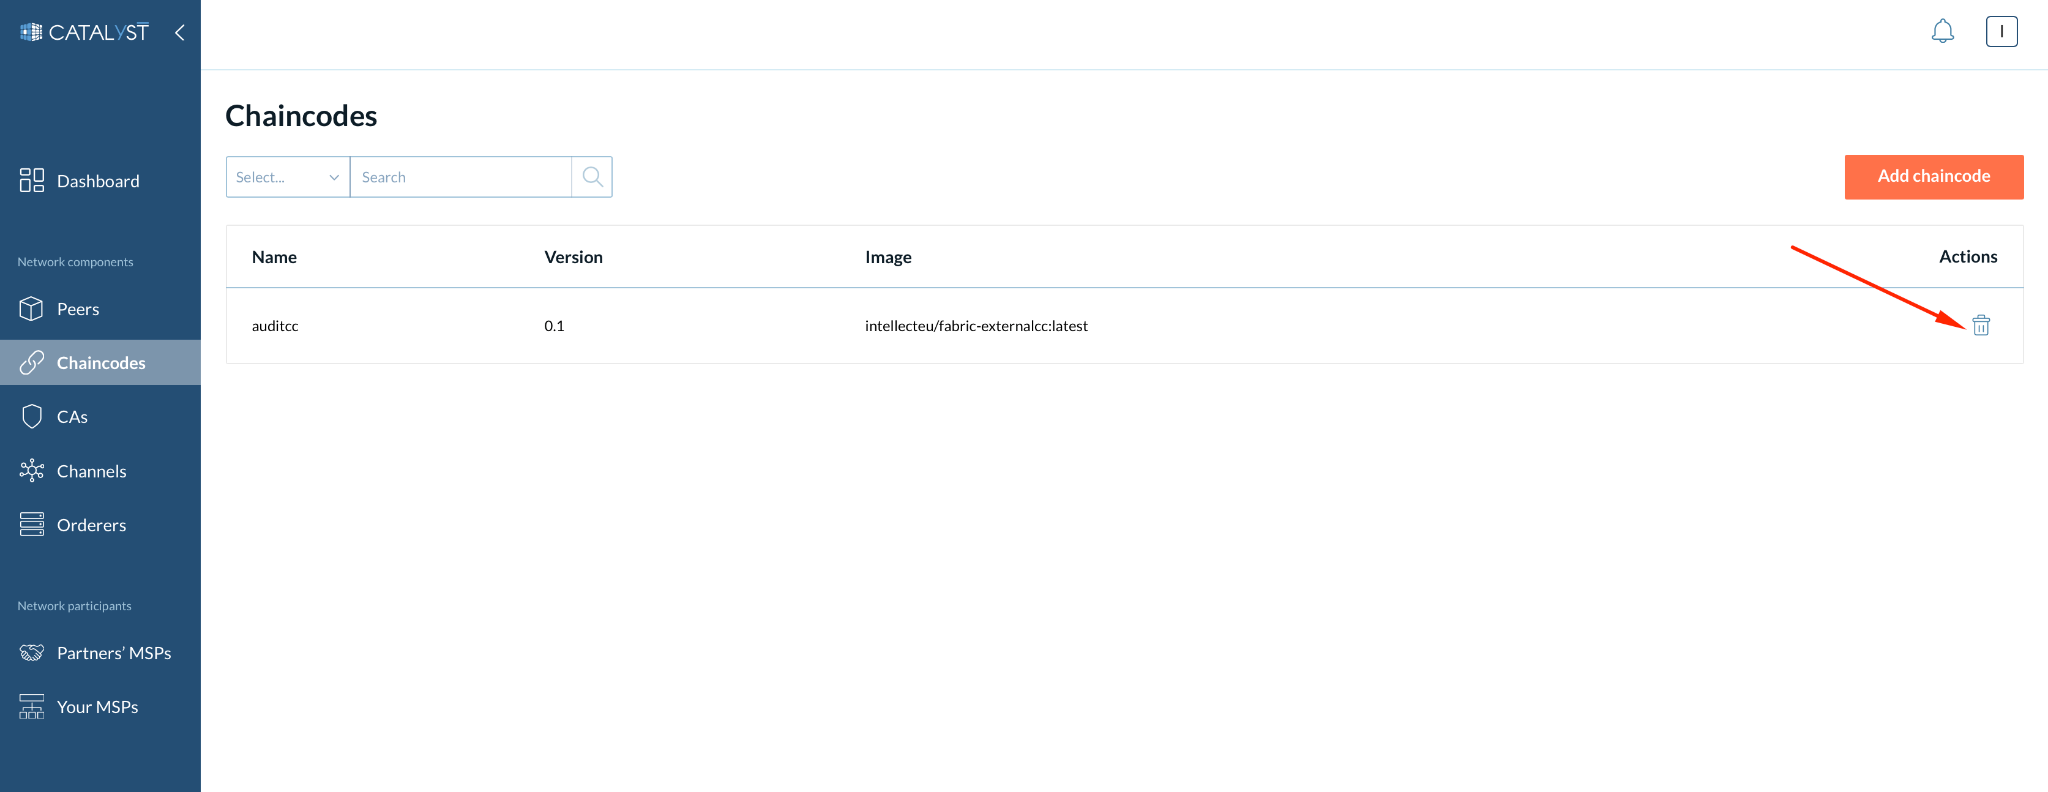
| Removing a chaincode will delete all the chaincode deployments. Please do not remove a chaincode if you want it to be up and running, committed to a channel, and used by business applications. |