Peer Set
What is а peer set?
Multiple types of peers need different configurations according to the requirements of the user. Even with the advanced user interface of Catalyst Blockchain Manager, managing the peers for each channel and specifying individual configurations for each peer can be highly time-consuming.
Catalyst Blockchain Manager introduces a peer set, a unique entity in the blockchain network developed using Catalyst Blockchain Manager. The primary reason behind this entity is to enhance peer management and configuration setup.
Essentially, by creating a peer set, the user can standardize the desired configurations, and simply by adding a new peer to this peer set, quickly create any number of peers with the pre-defined set of configurations.
What is a peer?
Peers are the nodes or participants in a blockchain network that host a copy of the Blockchain ledger and smart contracts. In other words, peers maintain the Blockchain network. Specifically to Hyperledger Fabric, a peer is a gateway for applications and users to interact with the Hyperledger Fabric Blockchain. Any transactions completed by the users are executed on a peer by initiating a smart contract (contained in a chaincode). The transaction data is then stored in the Blockchain ledger on concerned peers.
The process of executing a chaincode or accessing the ledger of a Hyperledger Fabric blockchain network requires connecting to a peer on the network, invoking a chaincode on the peer to initiate a transaction, submitting the transaction to the network, and receiving the status of the transaction on the peer.
Creating and managing peers on the Hyperledger Fabric blockchain network requires substantial knowledge of how to use Docker, Docker Compose, and a programming language depending on the Hyperledger Fabric SDK used (among Python, Node, or Go).
Therefore, creating and managing peers can be overwhelming for people without technical expertise, which is why Catalyst Blockchain Manager provides a seamless user interface where a user can easily manage the peers in their blockchain network.
A user’s prerequisite to start using Catalyst Blockchain Manager and develop their Hyperledger Fabric Blockchain network is understanding how Hyperledger Fabric works.
How to Create a Peer Set?
In your Catalyst Blockchain Manager interface, go to the “Peers” tab present in the left menu. Then click the “Create peer set” button in the upper right-hand section of this screen.
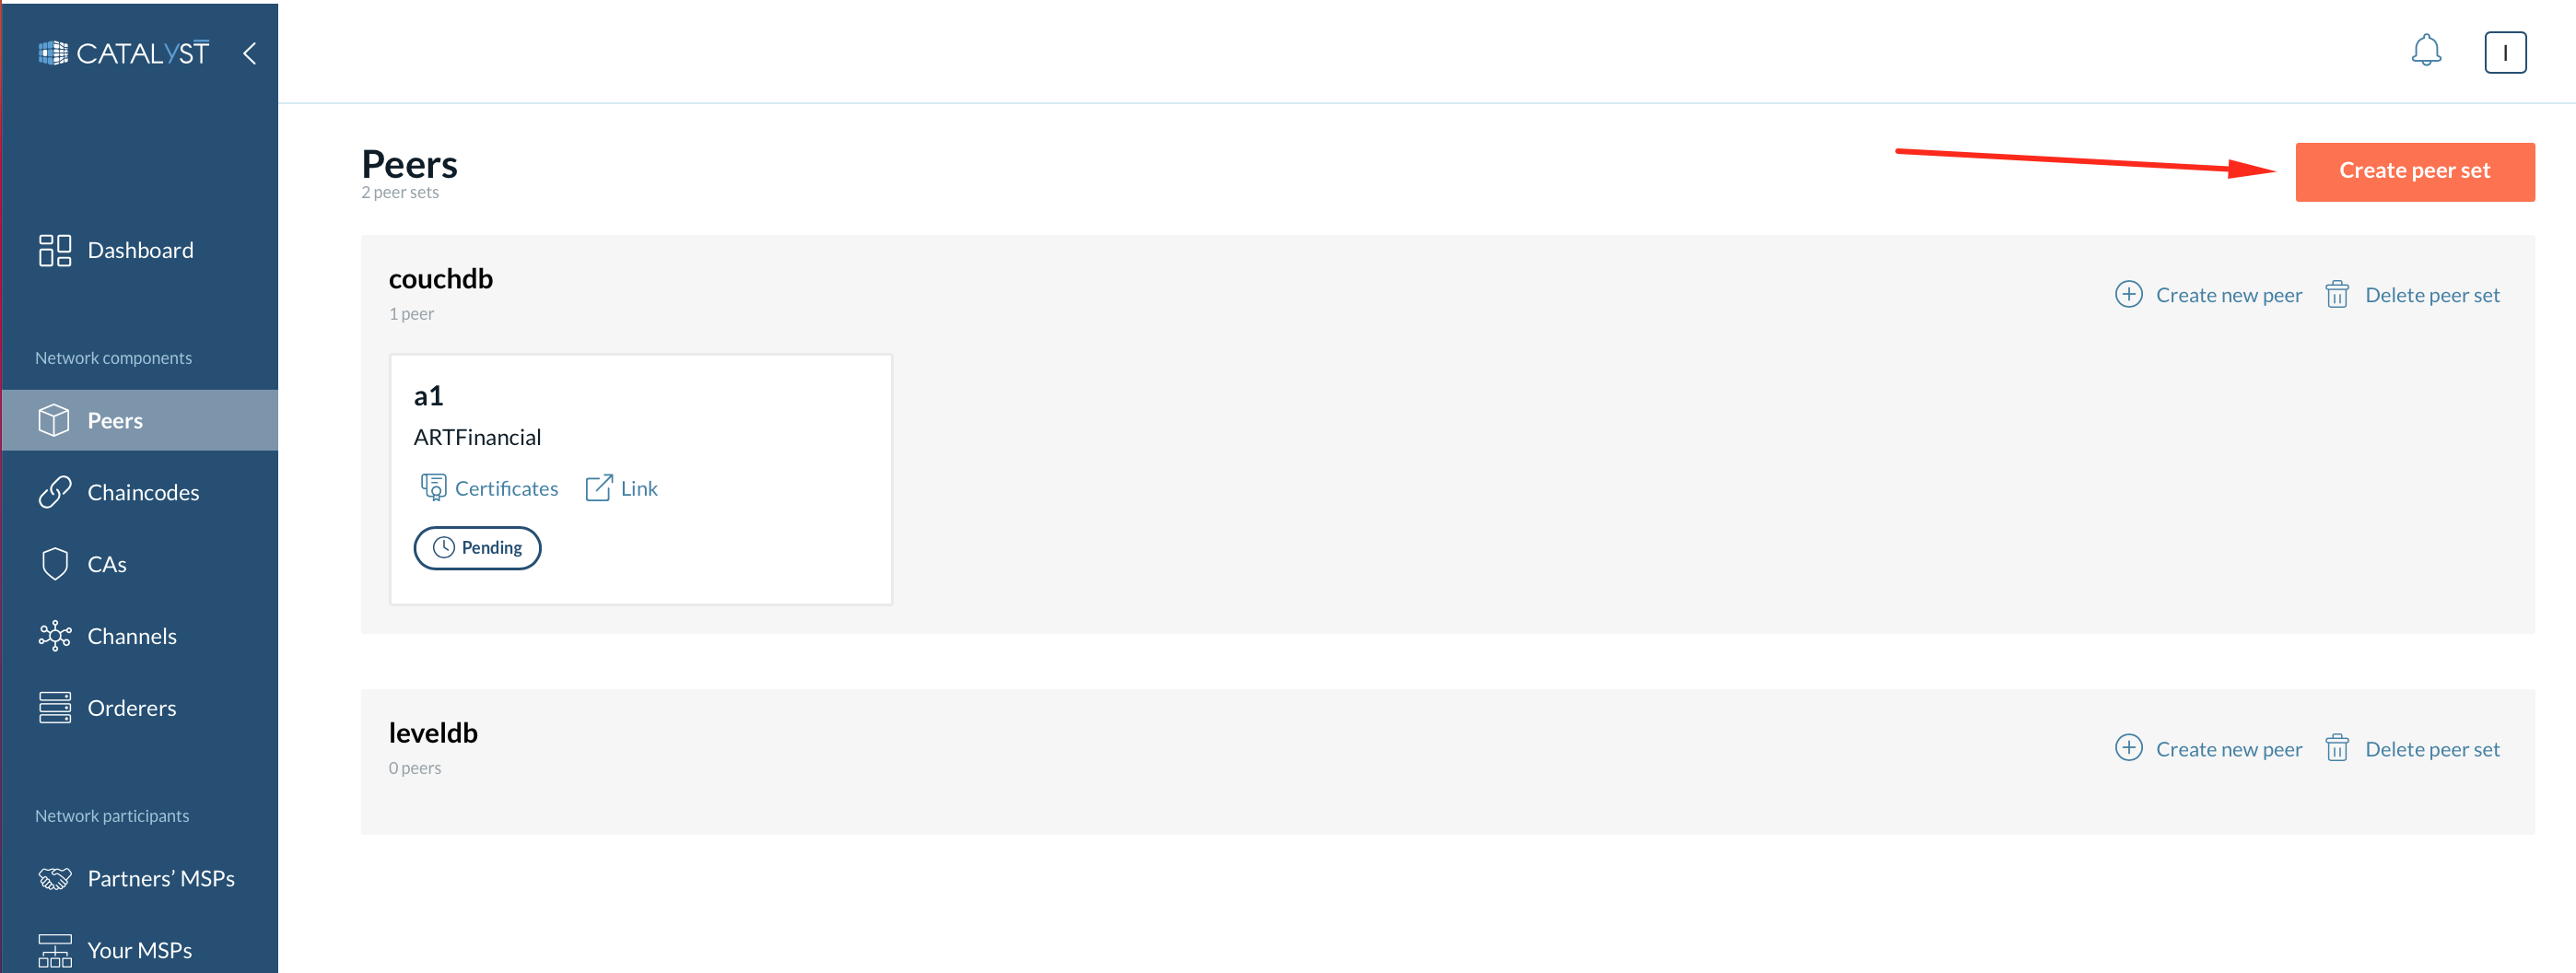
Upon clicking this button, a form will appear, which requires the user to fill in certain attributes such as:
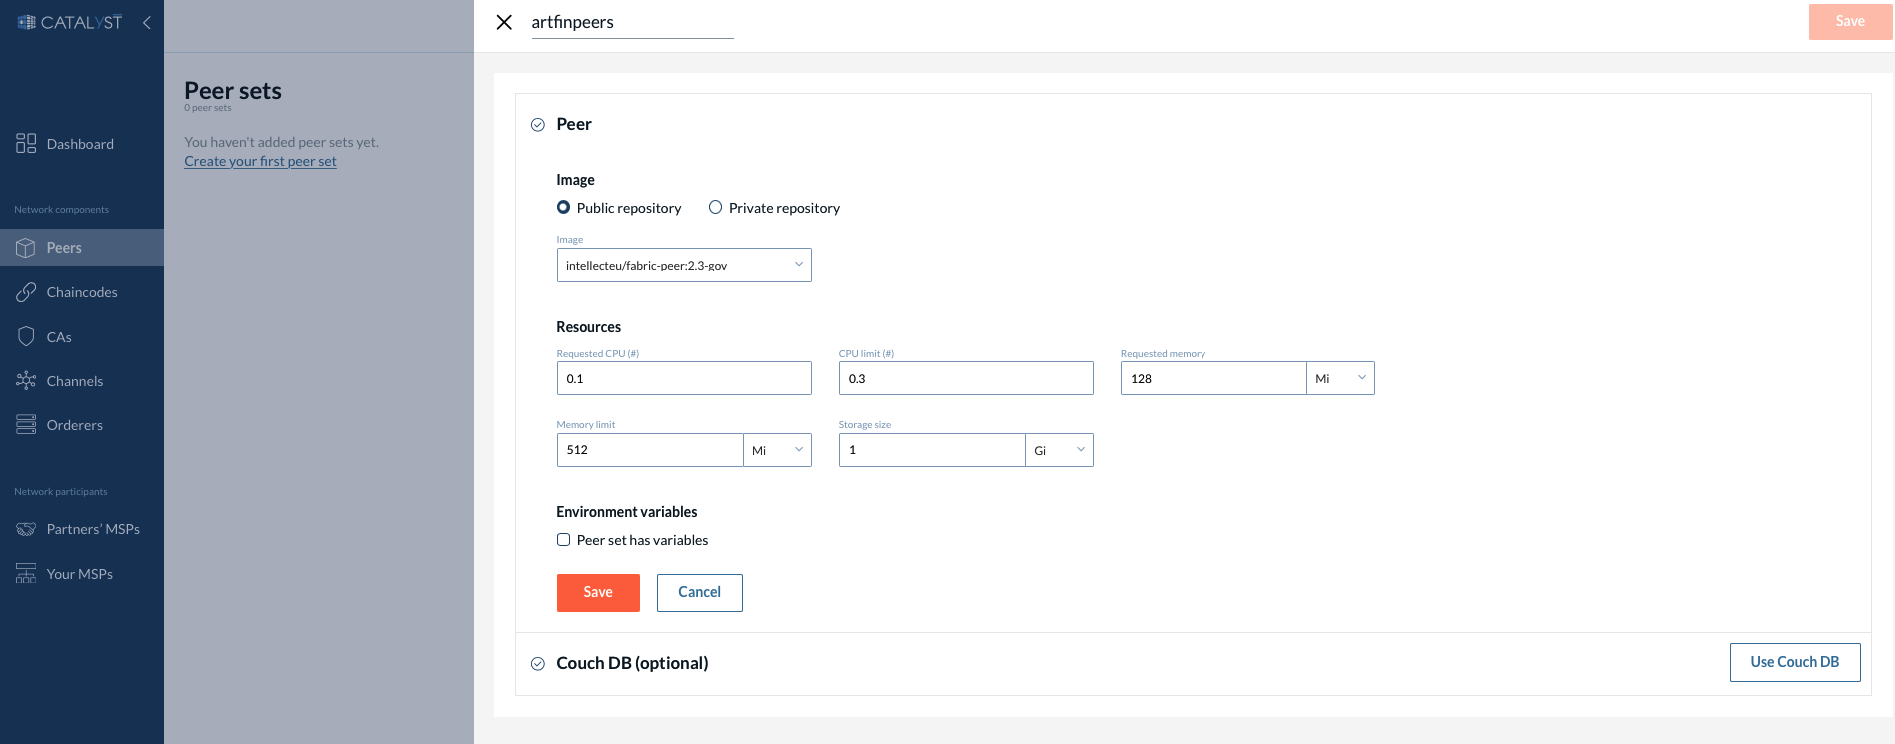
-
Peer set name - Setting a peer set name will help identify peers under unique settings and allow you to club different peers under one standard.
-
Image - Refers to the Docker image to be used for the network setup. This image is responsible for creating the Docker container with a specific version and network configuration, creating a suitable environment for your Hyperledger Fabric blockchain application.
|
The use of a custom peer image available at “intellecteu/fabric-peer” is highly recommended because of the voting system chaincode (see details about voting functionality here in the "Proposals" section) integrated into the image. The latest available version is2.3-gov. However, you can select your image if needed. If you want to use an image from a private repository you should specify an imagePullSecret (a server name, your login, and your password). You need to specify a secret only once and then select the secret from a drop-down list. You can create an imagePullSecret in your Kubernetes cluster and add the label "app.kubernetes.io/name": "image-pull-secret". After that the secret will be available in the drop-down list. Note that after removing your secret from the list Catalyst Blockchain Manager won’t be able to use an image with this secret. In this case, you need to change the image/repository or create a new secret naming it the same. |
-
Resources
-
Requested CPU - Guaranteed CPU resource that will be allocated to the peer node.
-
CPU limit - Maximum CPU resource that will be allocated to the peer node.
-
Requested memory (MB) - Guaranteed amount of RAM that will be allocated to the peer node.
-
Memory limit (MB) - The maximum amount of RAM that can be allocated to the peer node.
-
Storage size
-
-
Add CouchDB
|
The Hyperledger Fabric blockchain has a provision for two types of databases: LevelDB and CouchDB. On the Catalyst Blockchain Manager, you can easily select the type of database for your peers rather than exploring the “core.yaml” file of your network setup and then searching for the “state Database” variable to set the database type. The choice of the database depends on the requirements of the network. The default database configuration is set to LevelDB, which is a key-value state database. If your use case involves basic interaction with the ledger, then LevelDB can be used. On the other hand, CouchDB stores the JSON format data, which allows it to facilitate rich queries. CouchDB uses indexes to support such complex queries on large databases. Therefore, for a use case that prioritizes speed, LevelDB is more suitable, whereas a use-case that requires complex yet efficient queries on a large database would be the best fit for CouchDB. |
As these attributes are necessary for a user to define, they are present in the form. Apart from these, Catalyst Blockchain Manager also provides a certain level of flexibility, so that you can add other environment variables and set them as custom configurations for a peer set.
|
To ensure that your Hyperledger Fabric Blockchain runs seamlessly, the following list of environment variables cannot be customized by the user.
|
Peer Set Details
When you click on the peer set name, the screen displays all of the information and actions available for that particular peer set.
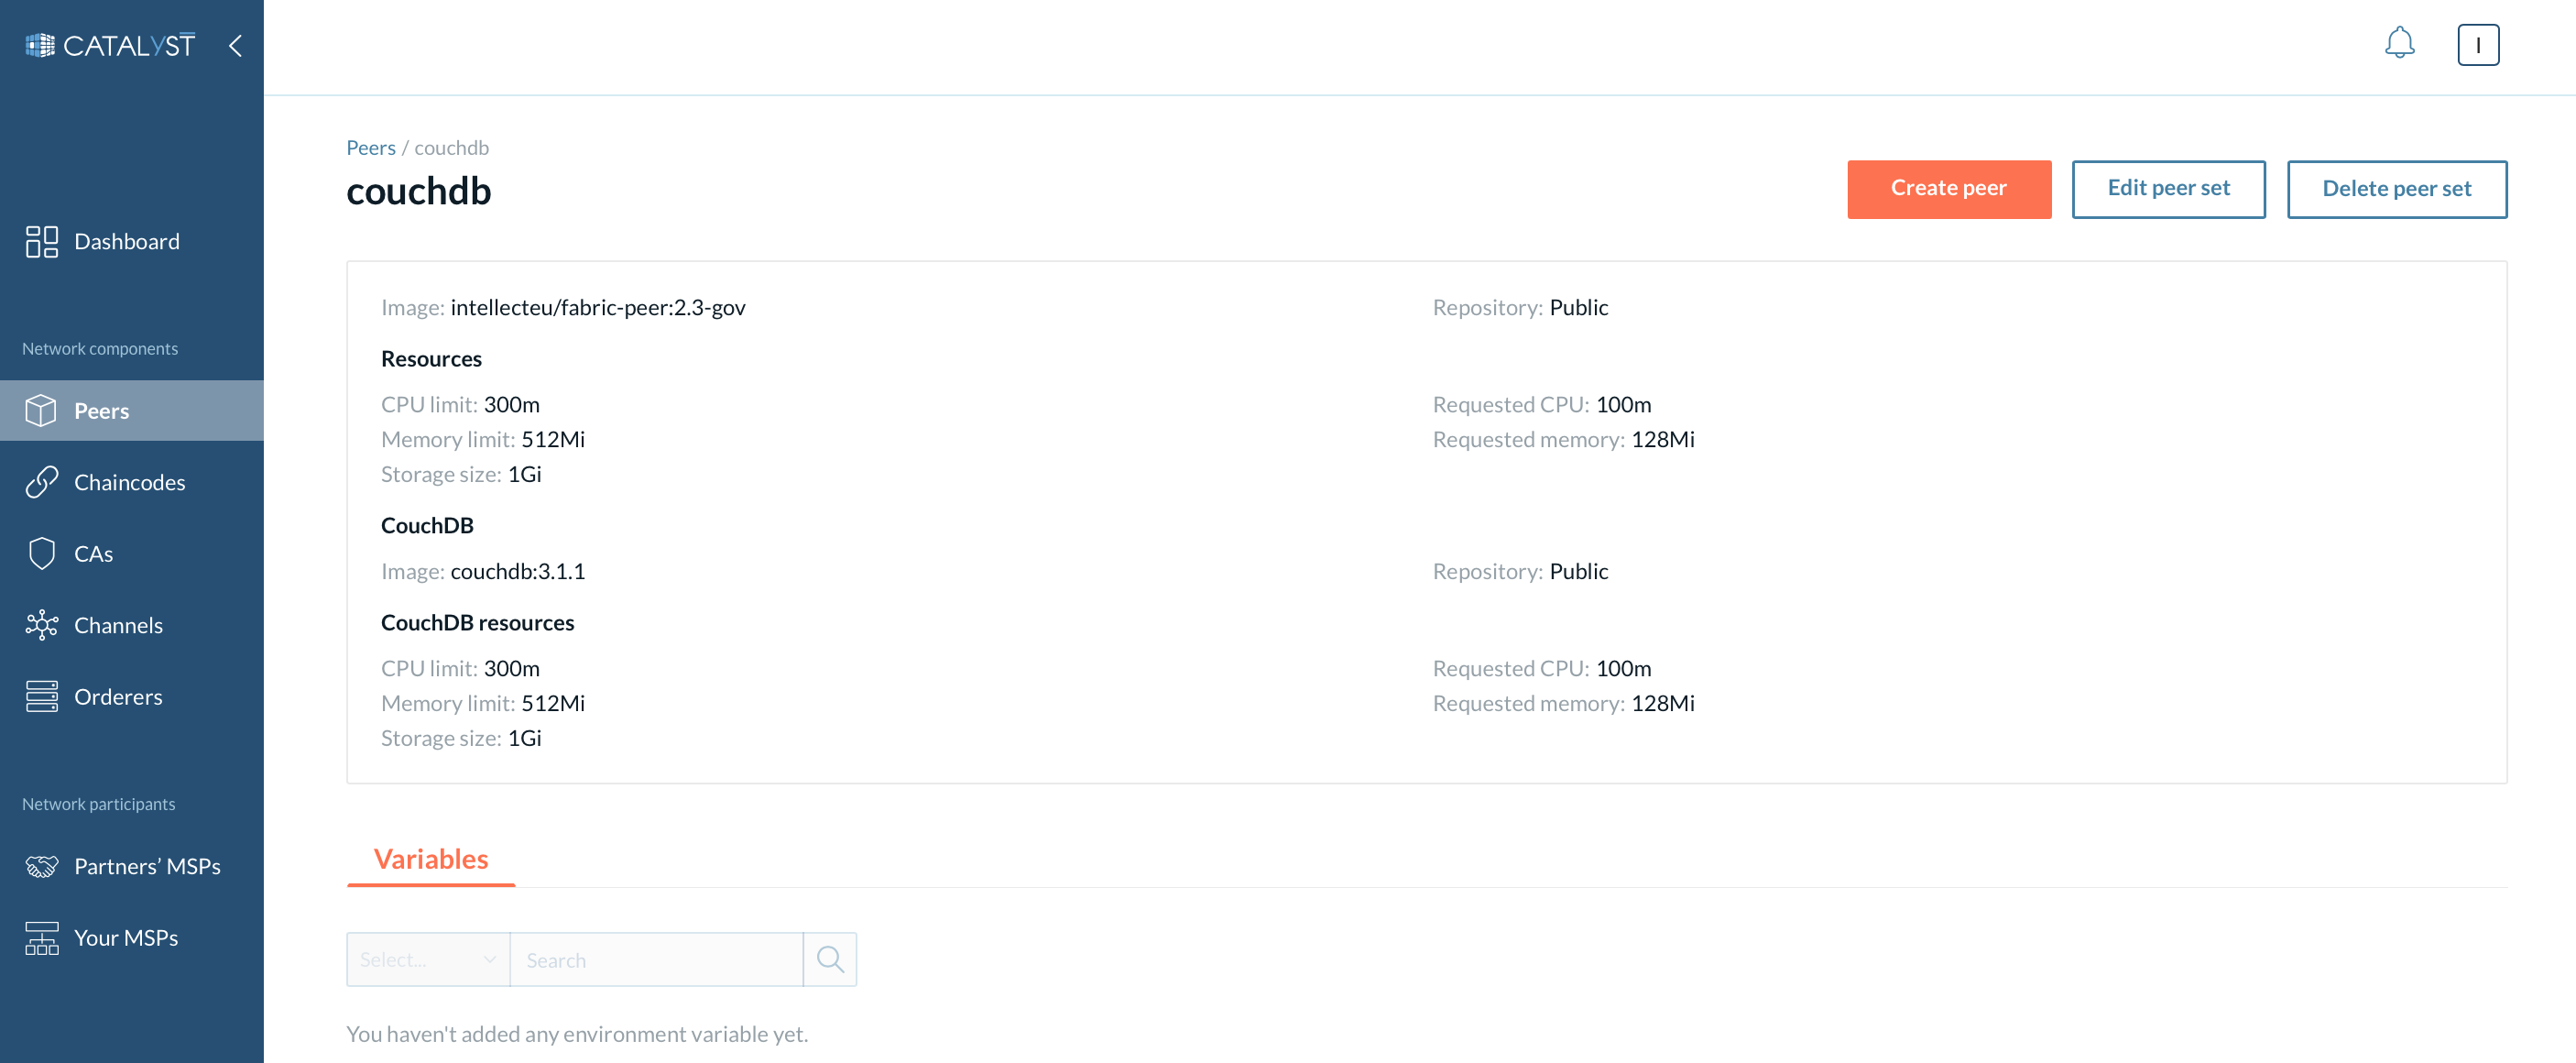
In the upper part of this screen, you can see the information related to the peer set, such as resources allocated to a peer or the image selected at the time of creation along with CouchDB information if the CouchDB is chosen. The following section is the “Variables”, which shows the name and value of the environment variables associated with that particular peer set.
Actions available on this screen include the ability to create a peer, edit or *delete*the entire peer set.
| You can edit all the peer set details except for the peer set name and a database type. |
How to Create a Peer?
On Catalyst Blockchain Manager, you can create a peer in two steps:
-
Creating a peer set to specify standard configurations for a peer.
-
Adding a peer to this peer set.
We have covered the first step in the previous section. For the second step, the successful creation of a peer set is followed by a new peer set appearing on the peer screen with the name specified by the user.
There is the “Create new peer” button on the right side of this peer set.
This button allows the creation of a new peer inside the selected peer set. With a single click of this button, the user can now create a peer with the configurations defined in the peer set rather than repeatedly defining the same configurations for multiple peers.
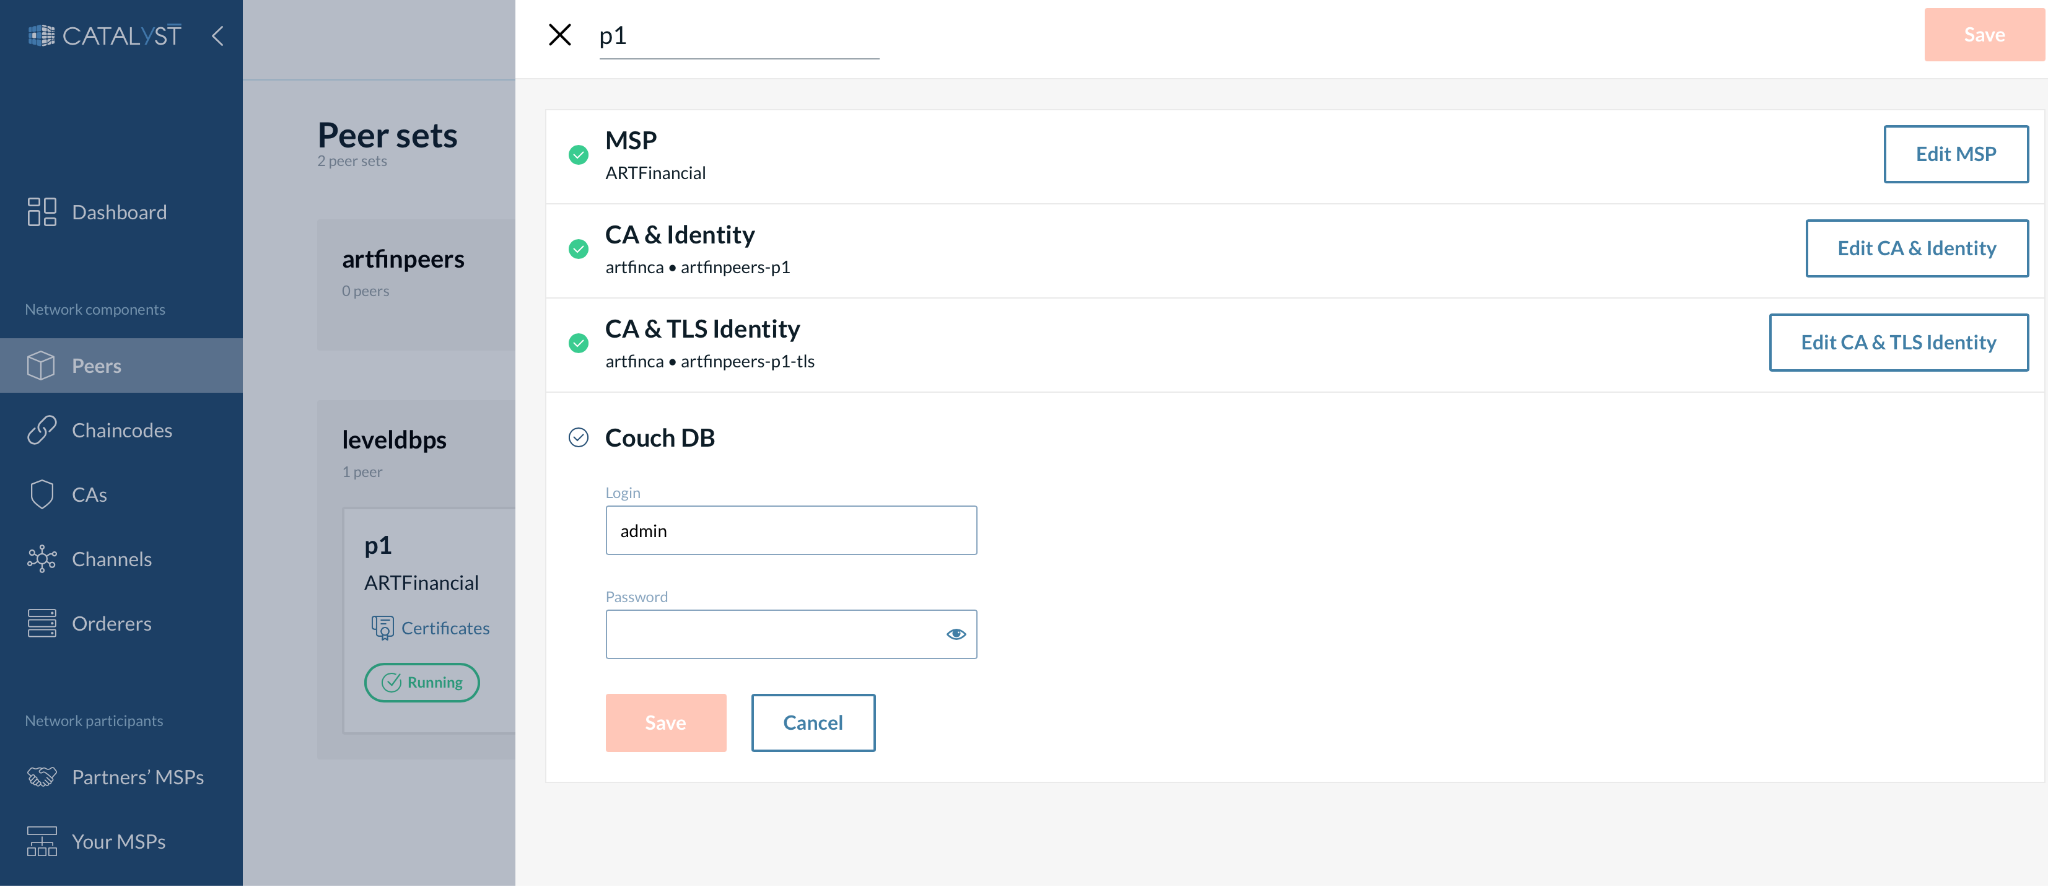
You need to provide the following details and click the “Create” button afterward:
-
Peer name - Cannot be the same as any other peer in the organization.
-
Select MSP - The selected MSP is responsible for providing identity to the peer on the network.
-
Select a CA and the signing identity for the peer.
-
There are two options for defining the identity of the peer node. You can choose the “Select identity” option and choose the identity created before from the dropdown menu. You can choose the “New identity” option and define the new identity for the peer node along with a new password.
-
-
While the third step is quite similar to the second step, the fundamental difference between them is that step two is for enrolling the signing identity, and step three is for enrolling a TLS certificate for the peer node.
-
Provide credentials to CouchDB - These credentials will be used for the CouchDB instance running along with the peer. This option is available if only the CouchDB option is chosen for the peer set.
Peer Details
If you click on the block of a specific peer, it will take you to the peer details page. This page consists of two sections.
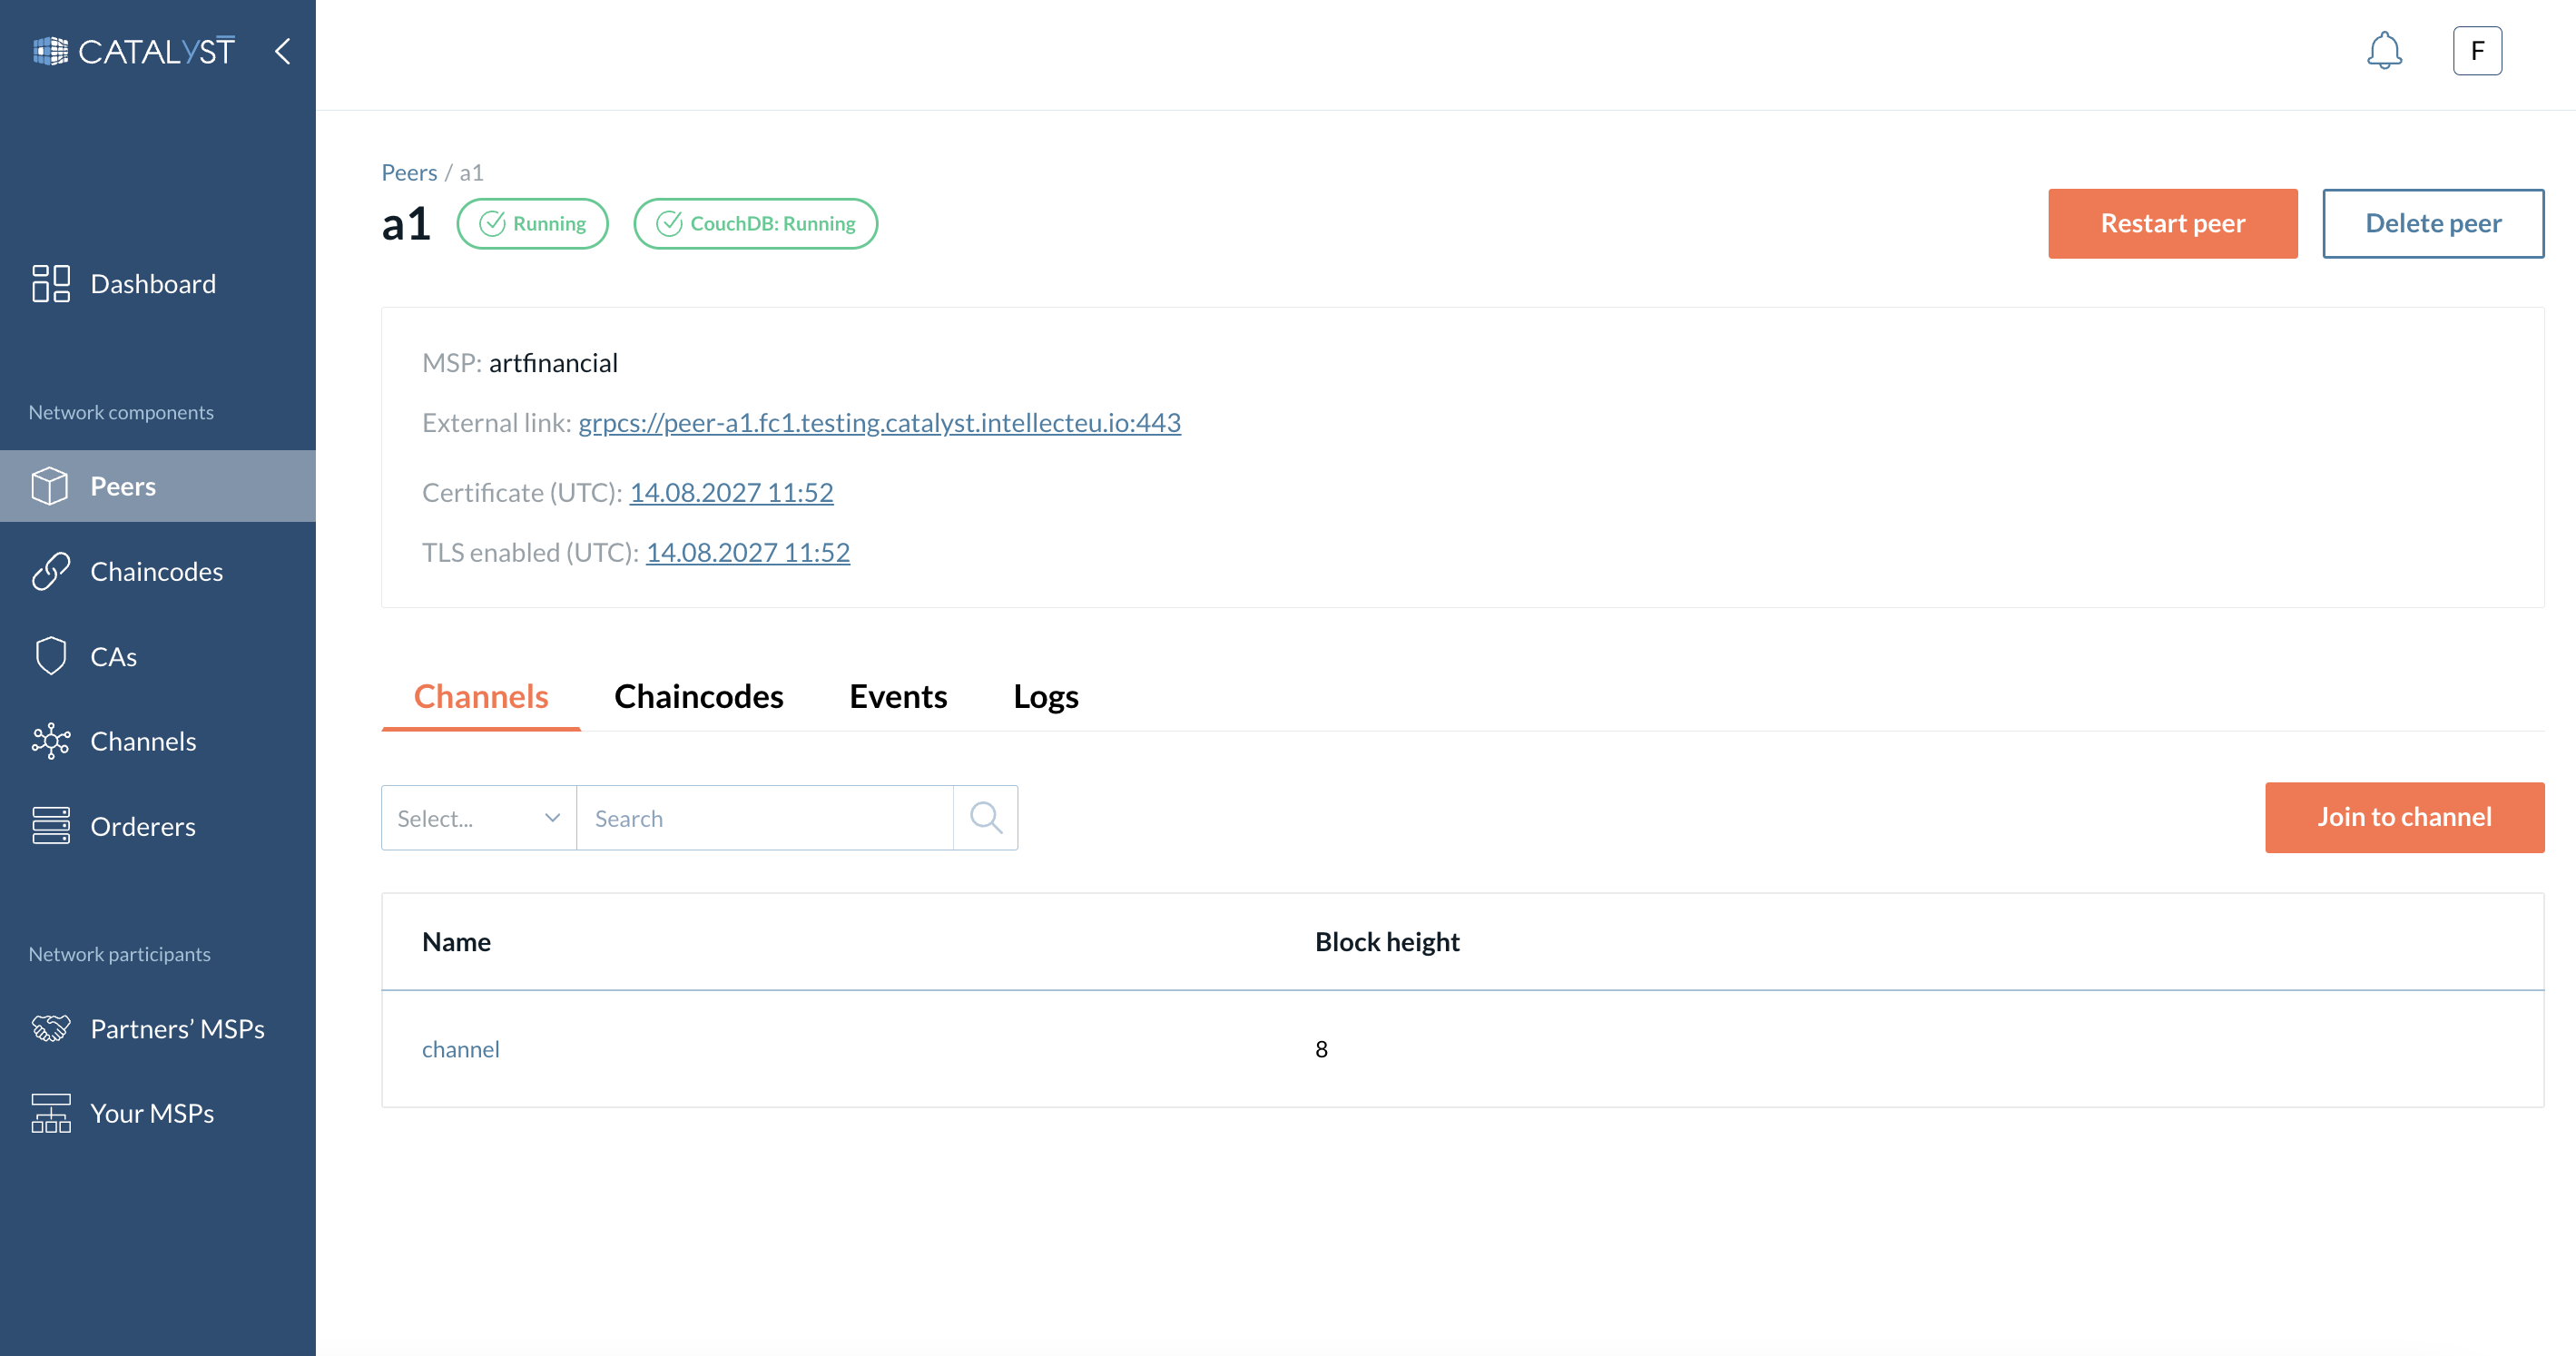
The first section contains the peer name, MSP name, general peer information, certificates links to view certificates, and the external link to the peer.
Every peer has a status attribute associated with it. A peer, at any instance, can exist in one of the five possible statuses:
-
Pending - A node is in the process of starting, or it is awaiting the expansion of the Kubernetes cluster. Usually, when there are insufficient nodes to support the Hyperledger Fabric blockchain network, the Kubernetes cluster needs to expand and the peers have to wait in the process.
-
Running - A node has been successfully created, and it is ready to be used on the network.
-
Terminating - When the user initiates the process of removal of a node.
-
Failed - In case a node is unable to start due to some reason. This usually happens when the existing allocated resources have been exhausted, such as memory or storage.
-
Unknown - For some reason, a node status was not obtained.
| You can see a CouchDB status along with a peer status. |
You can also see some actions that can be performed on that peer. These are:
-
Delete - Deletes the node.
-
Restart - Restarts the corresponding node.
| Delete your peers carefully. If you delete a peer where chaincode is installed and a chaincode definition is committed to some channel, you will need to install the chaincode to the new peer, approve, and commit the chaincode definition again with a new peer. You will also lose access to the channels the peer joined in case it is a single peer of your organization in the channel. |
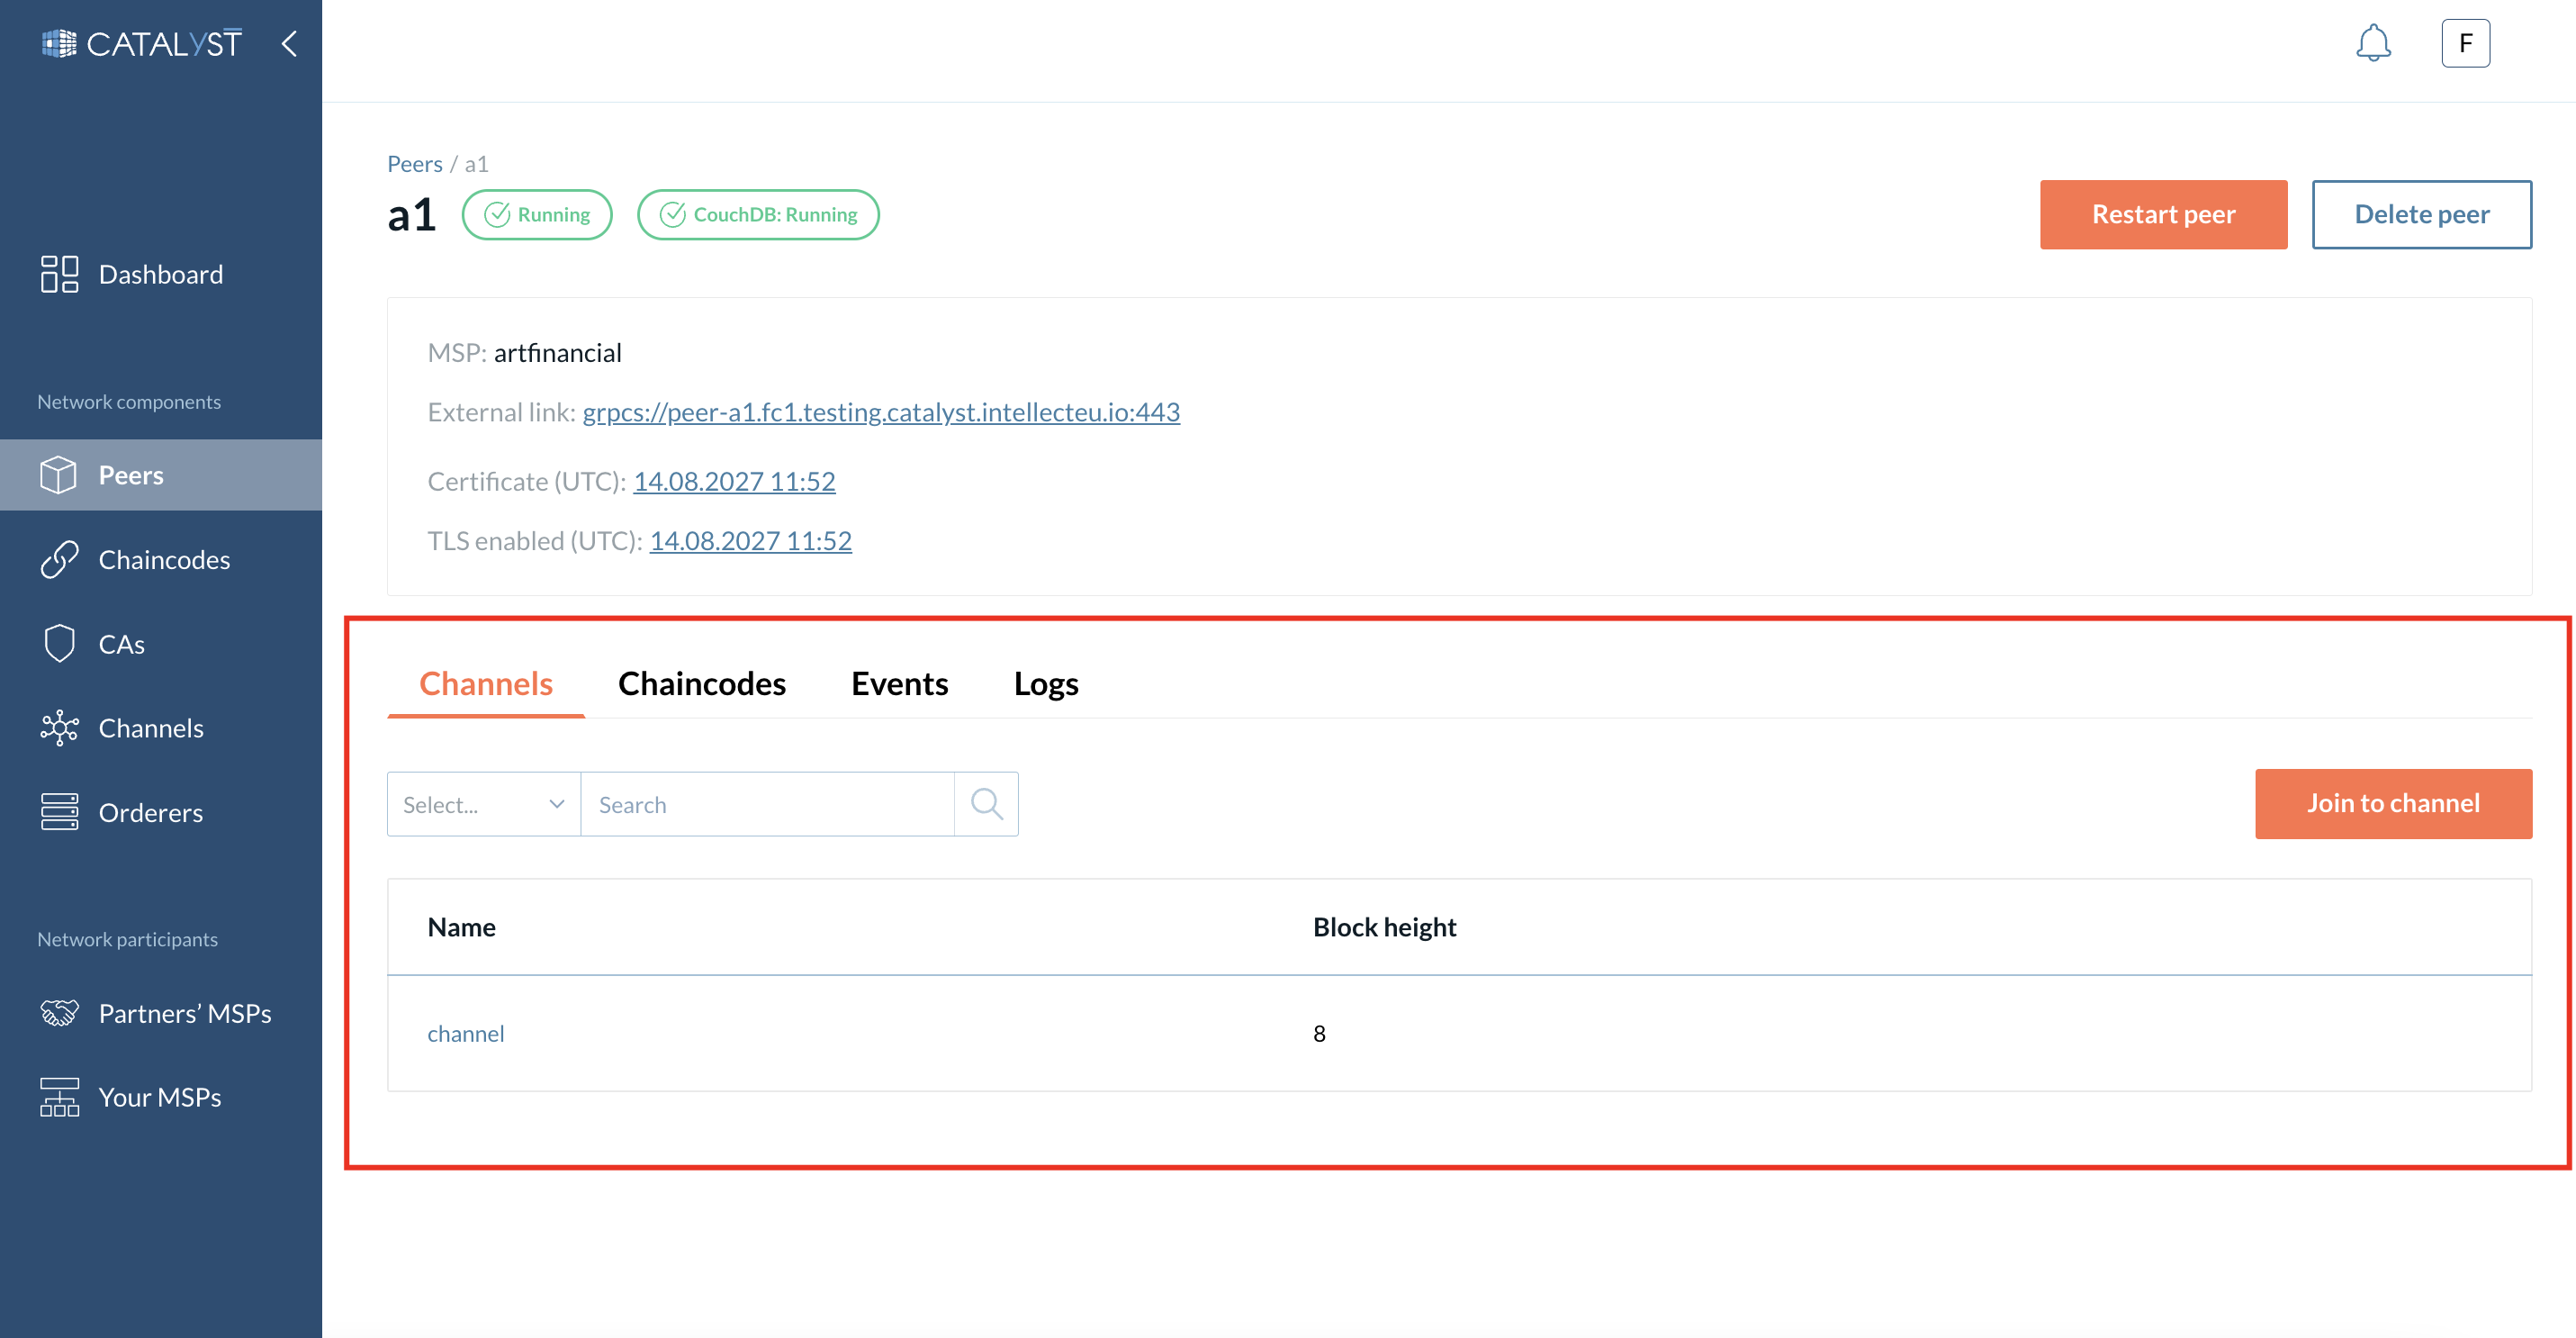
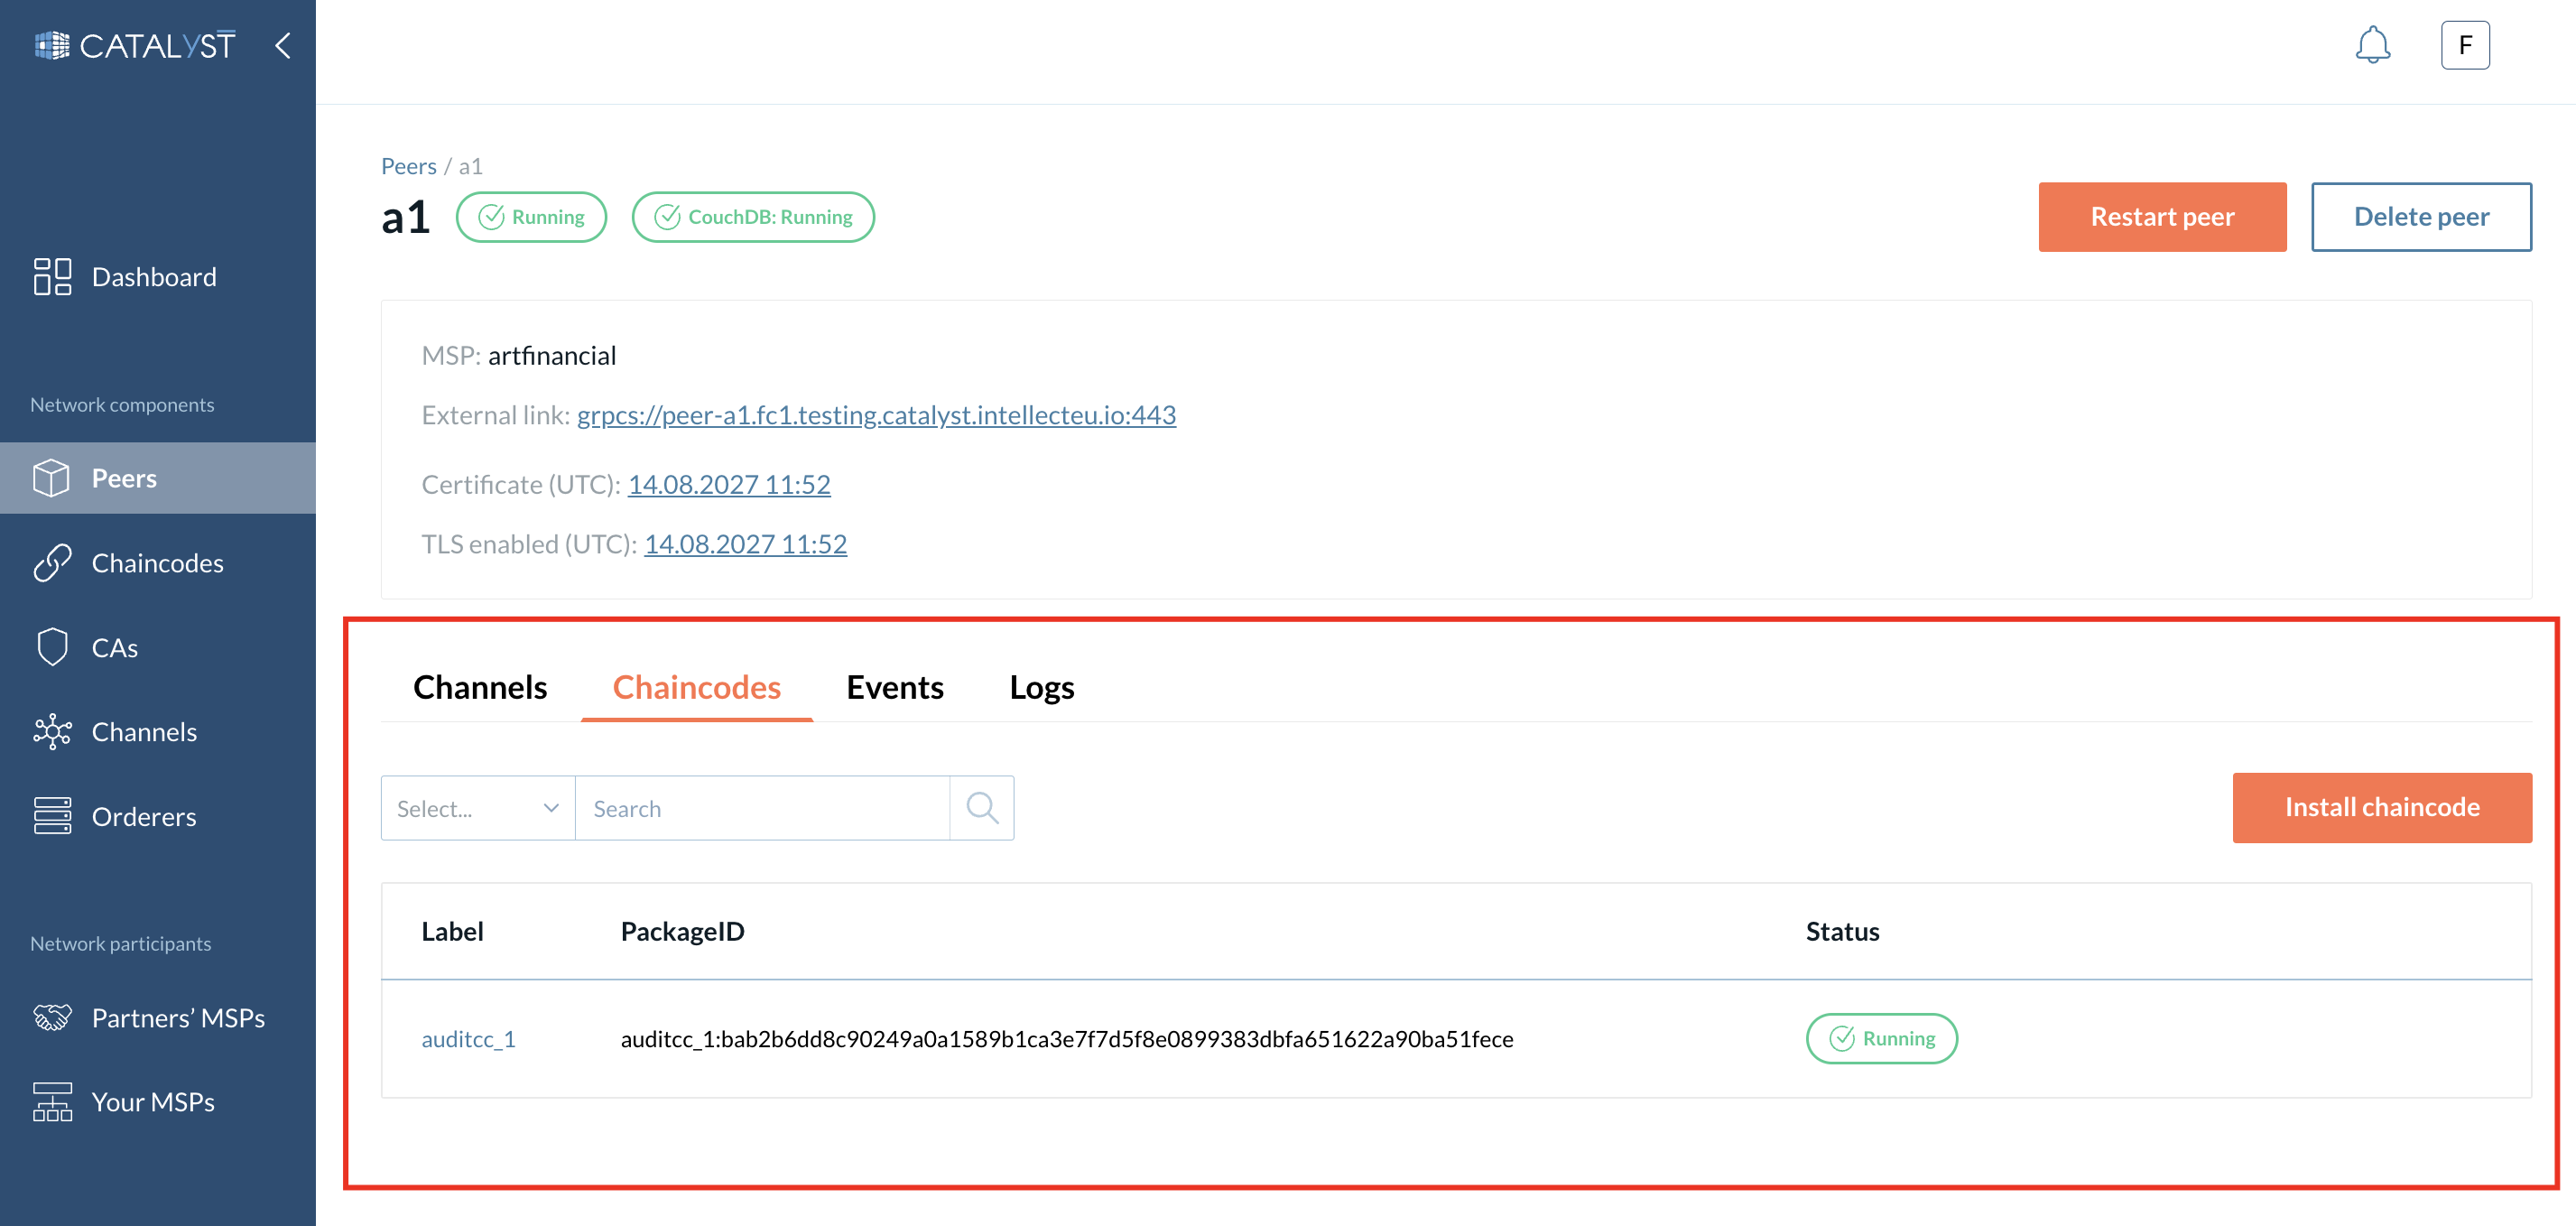
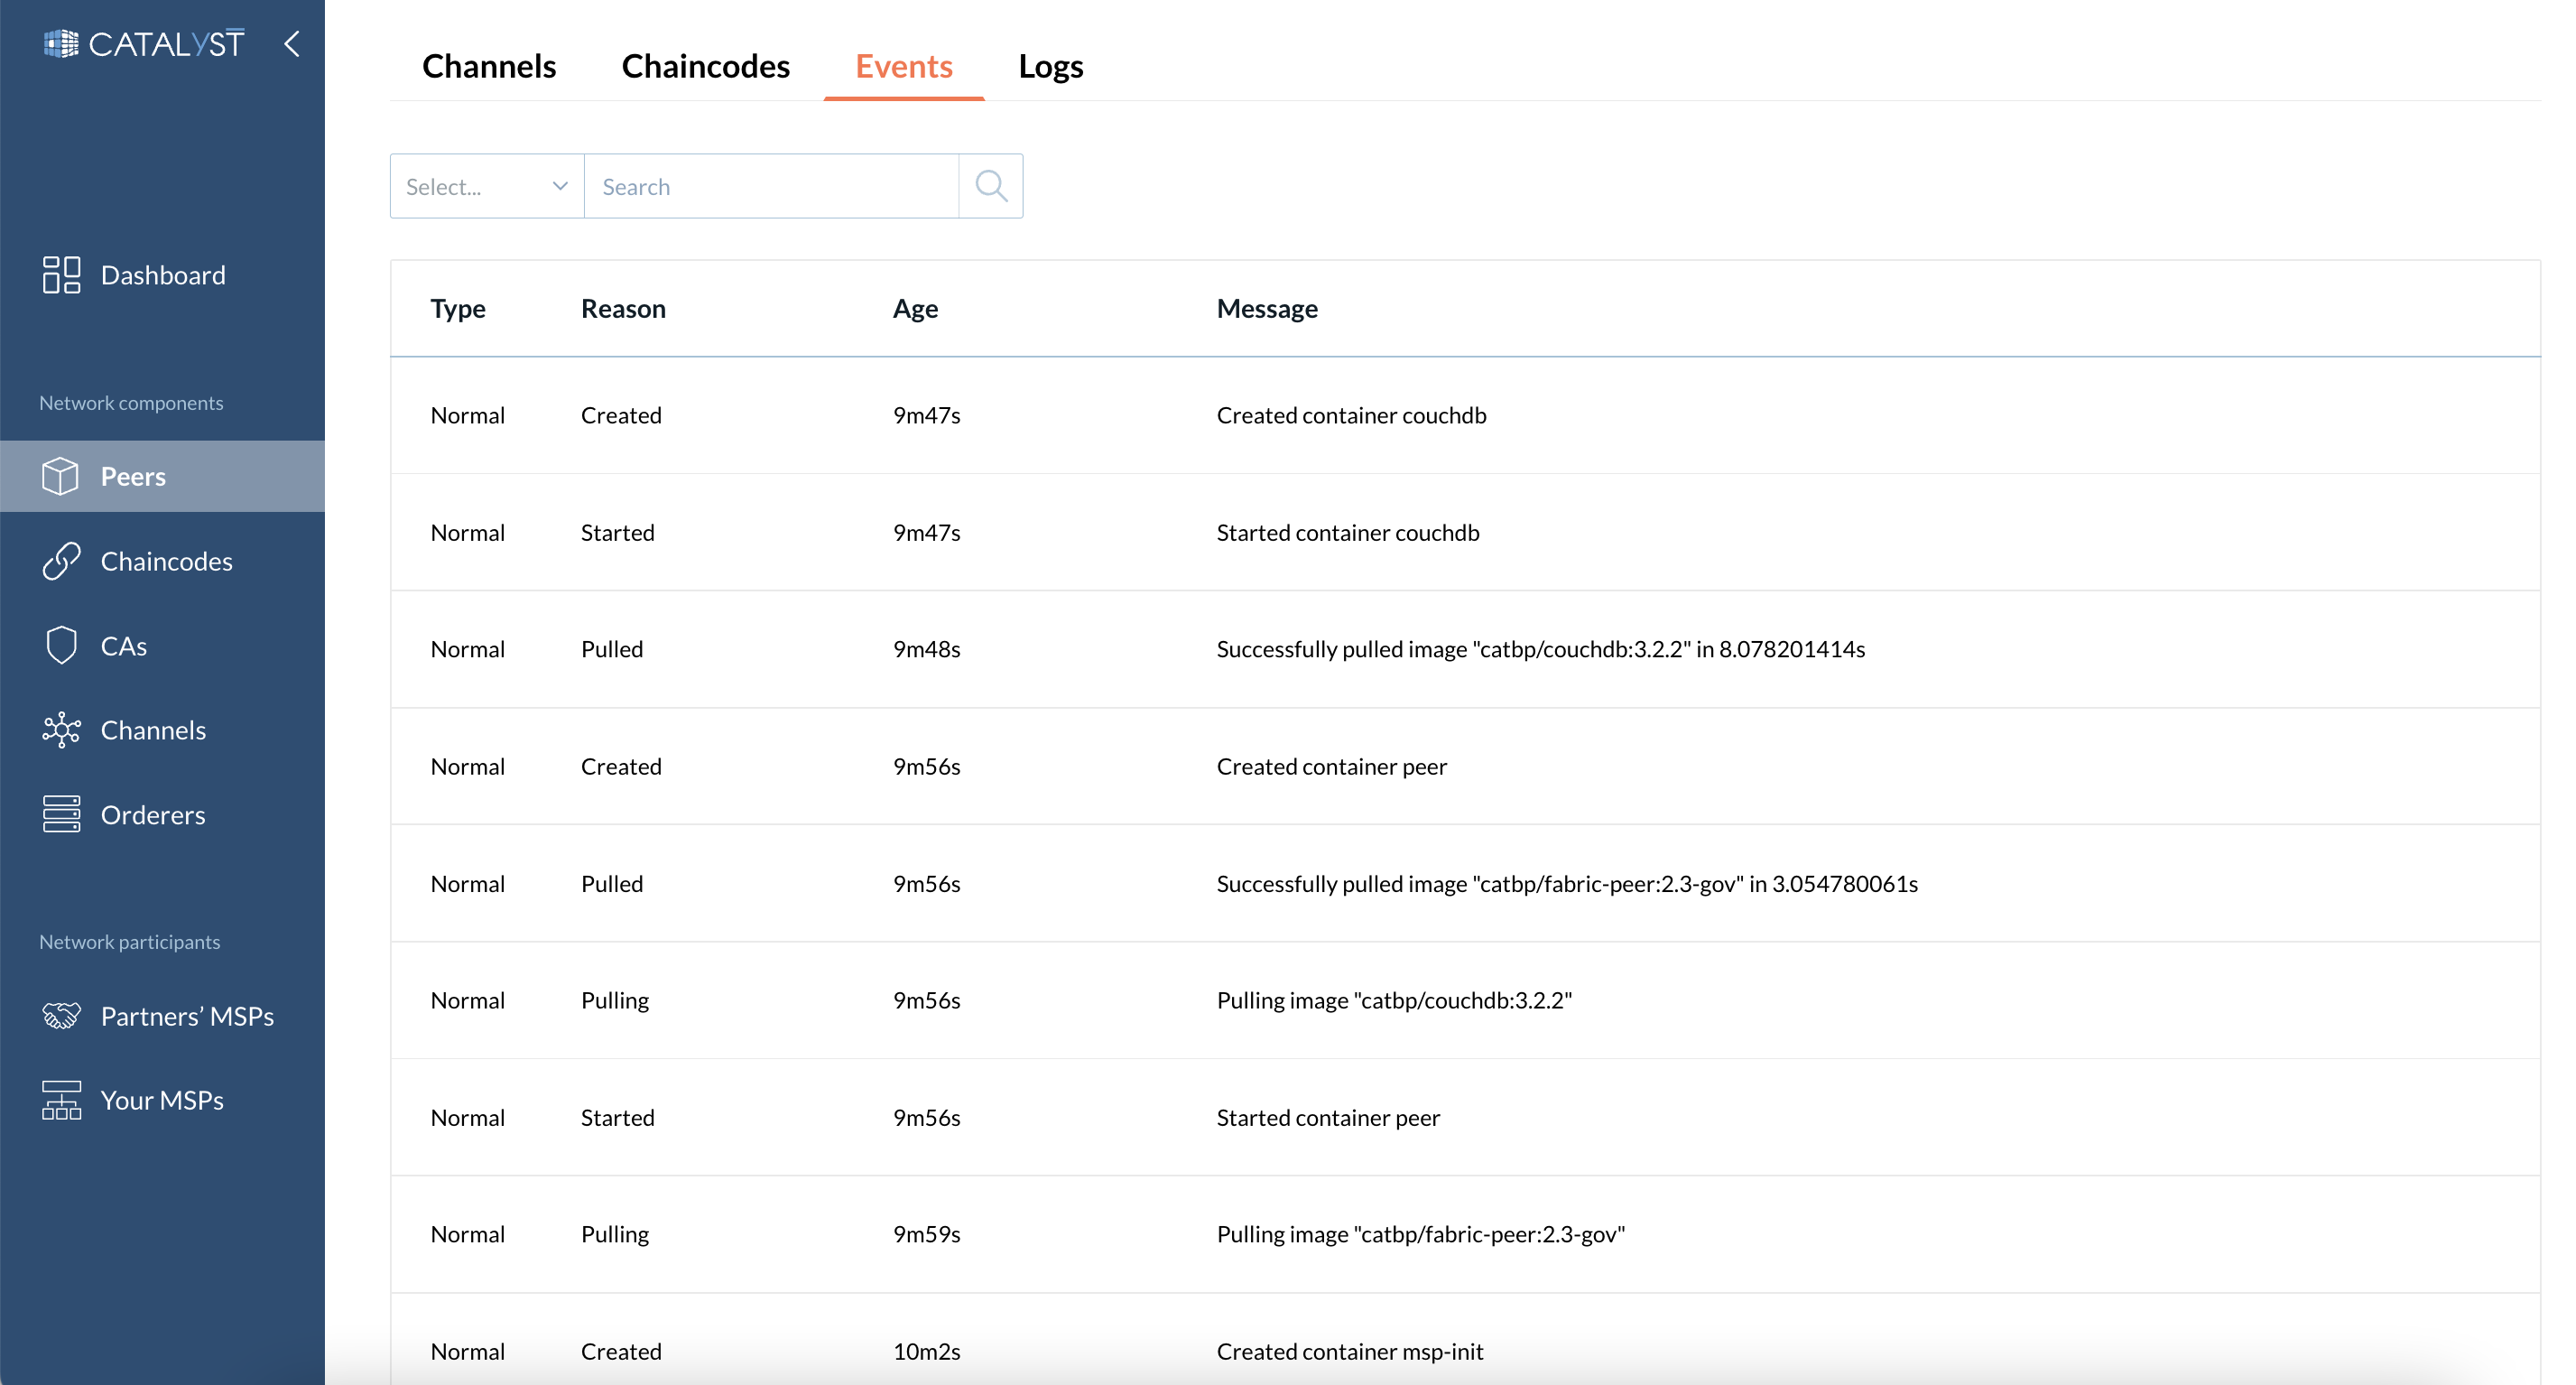
The second section consists of four tabs.
Channels
The “Channels” tab displays a list of channels that the peer joined with the Channel ID and block height. You can also join your peer to a channel by clicking the “Join to channel” button. Please find details about joining a channel here.
Chaincodes
The Chaicodes section displays the information related to the chaincodes installed on a peer. You can also install a chaincode on the peer by clicking the “Install chaincode” button. The process of installing chaincode is explained in this section
Events
This tab displays events with a particular peer’s node.
Logs
This tab displays logs of the containers related to a particular peer node.
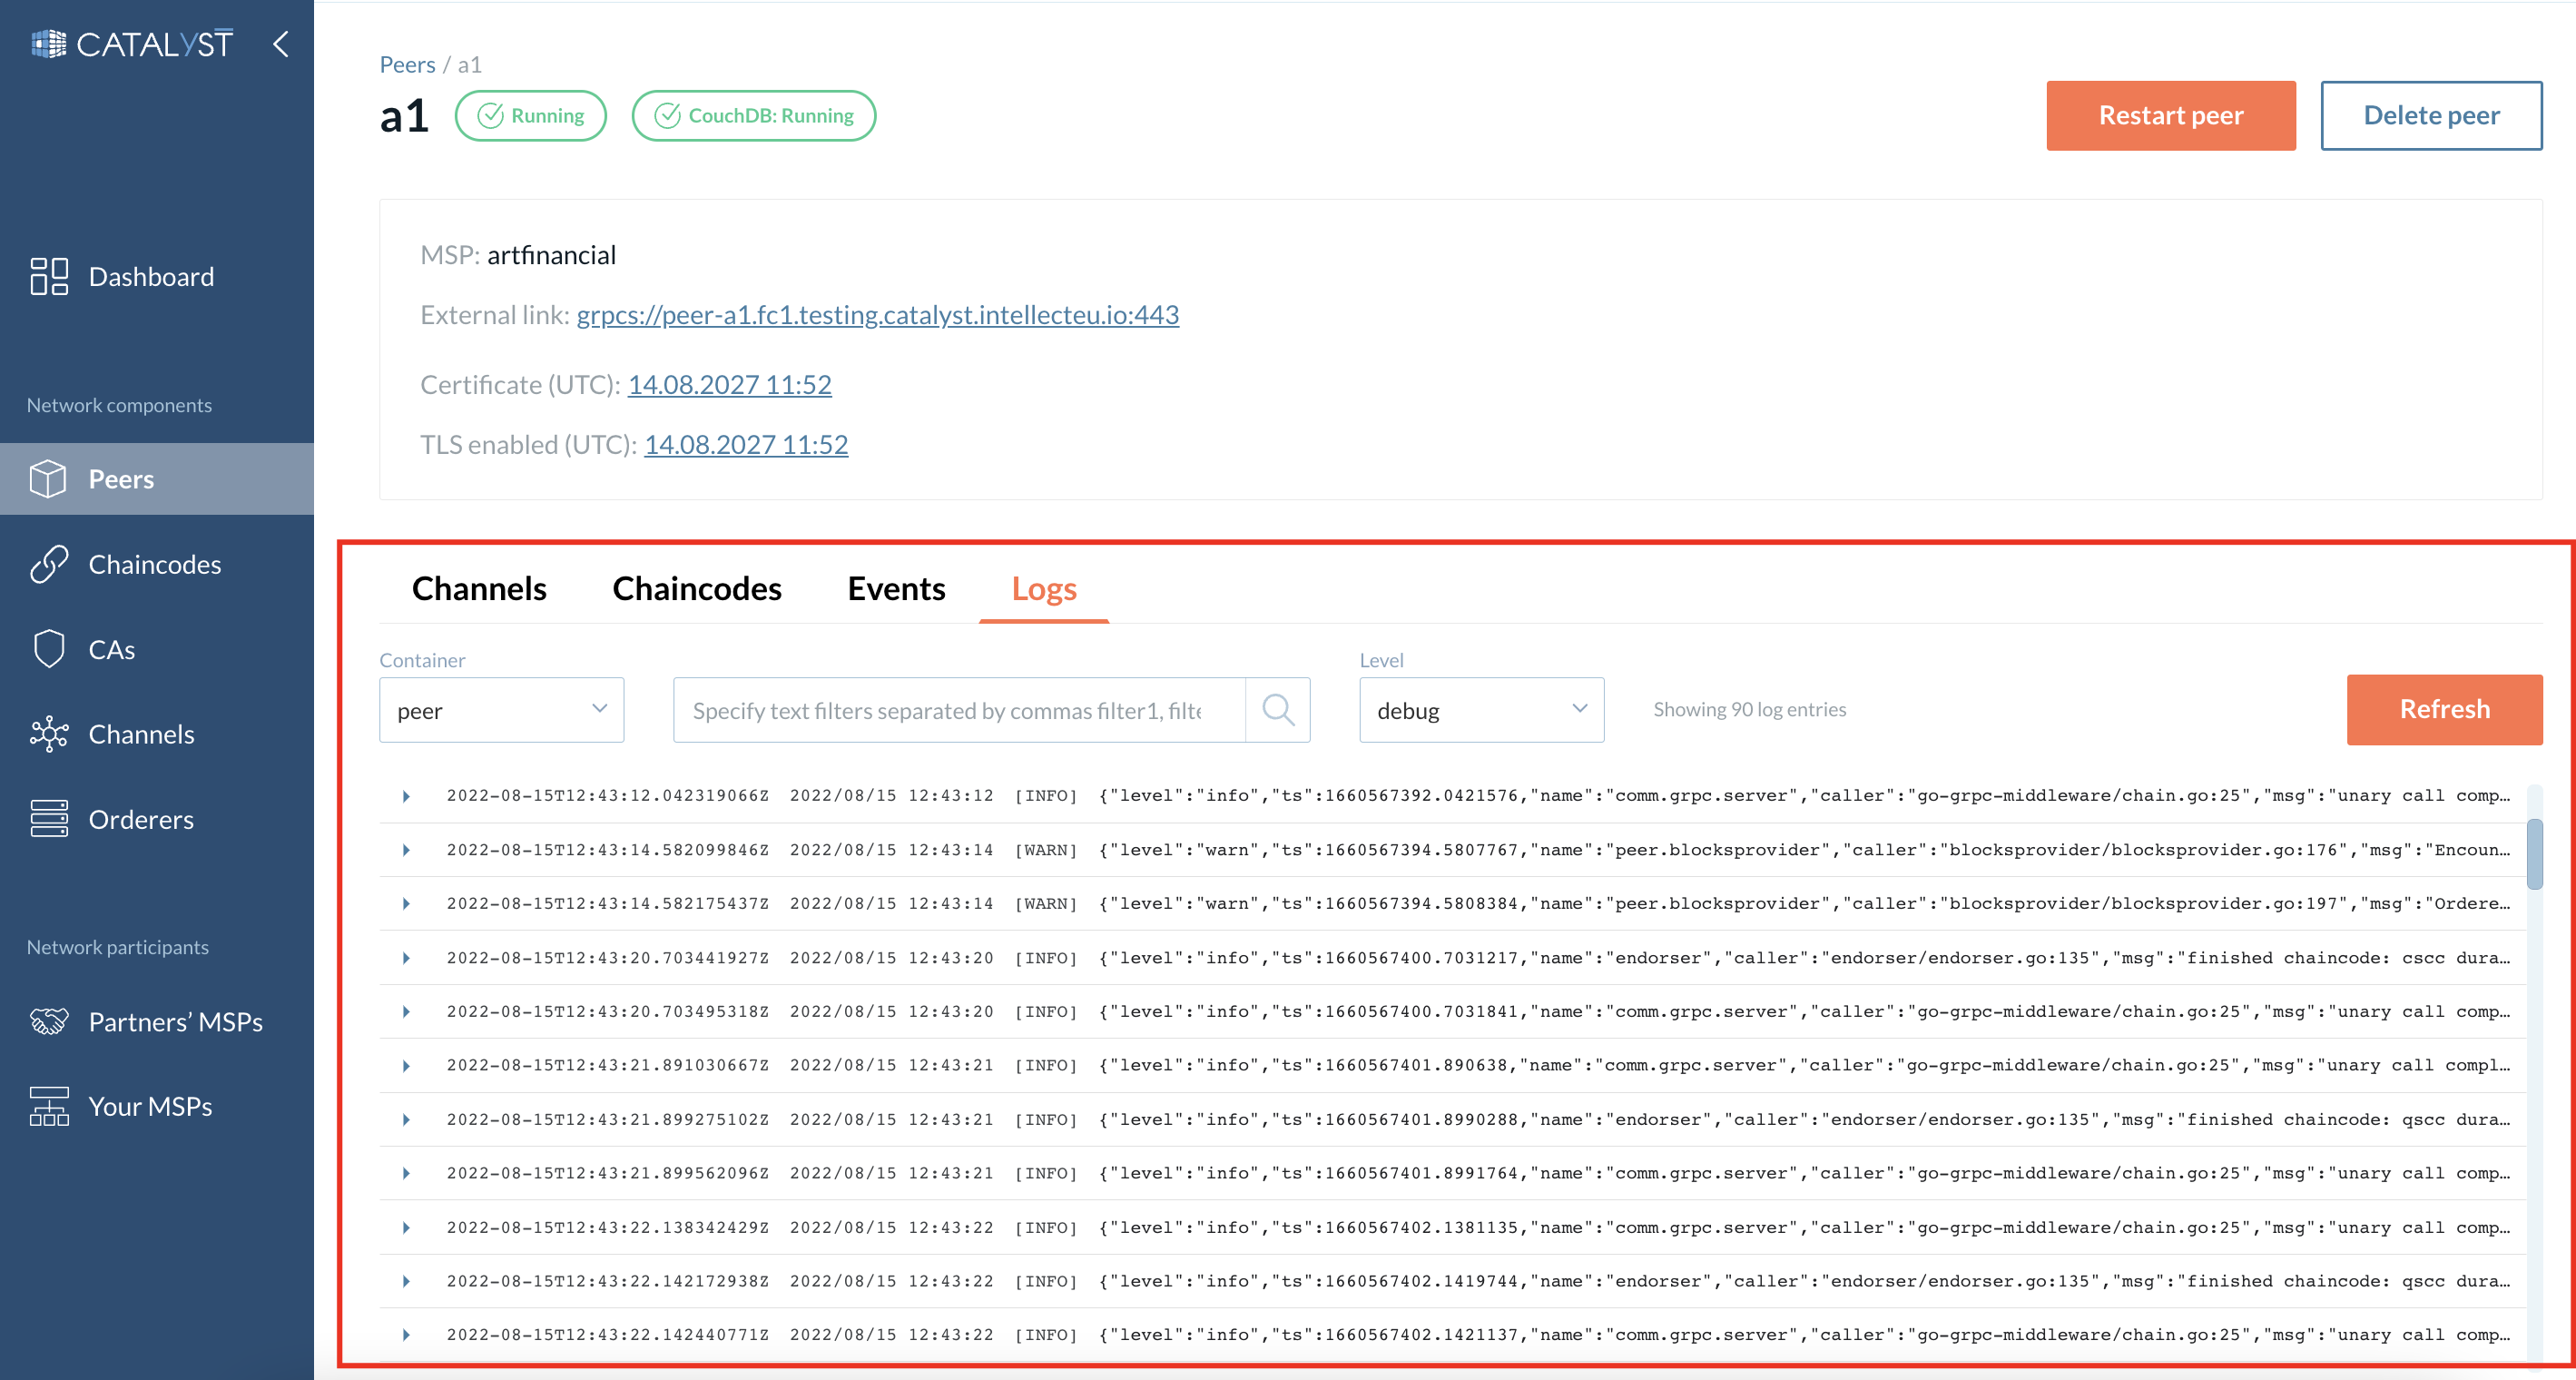
You can filter logs by text and/or level.
| Scroll down to see the newest logs. |