Create a node and join an internal network
Joining a R3 Corda network requires the proper configuration of your node, including the use of a truststore.jks file and the network and doorman URL. In this guide, we will walk through the steps to join an external corda network using these components.
First, let’s start by understanding the purpose of the truststore.jks file. A truststore is a repository of trusted certificates that your node will use to verify the identity of other nodes in the network. It ensures secure communication and prevents unauthorized access. Before joining a corda network, you need to obtain the truststore.jks file from the network operator or administrator. Once you have the truststore.jks file, follow these steps:
Locate the truststore.jks file: The truststore.jks file is typically provided as a Java KeyStore (JKS) file. Ensure you have the file available on your local machine.
Next, let’s proceed to the network and doorman URL configuration. The network URL specifies the address of the network map service, which provides information about the network’s participants and their identities. The doorman URL is used for initial registration and obtaining the necessary network parameters. Follow these steps to configure these URLs:
Obtain the network and doorman URLs: Contact the network operator or administrator to obtain the network and doorman URLs. These details are specific to the corda network you wish to join.
Simply provide these three parameters when creating a new node either through the UI or though the API.
How to Create a Node and join an external network
1. Provide a node name - the name, which will be displayed on the user interface.
(You can give any considering the following restrictions: the name must contain only alphanumeric characters, "-", "_" or ".").
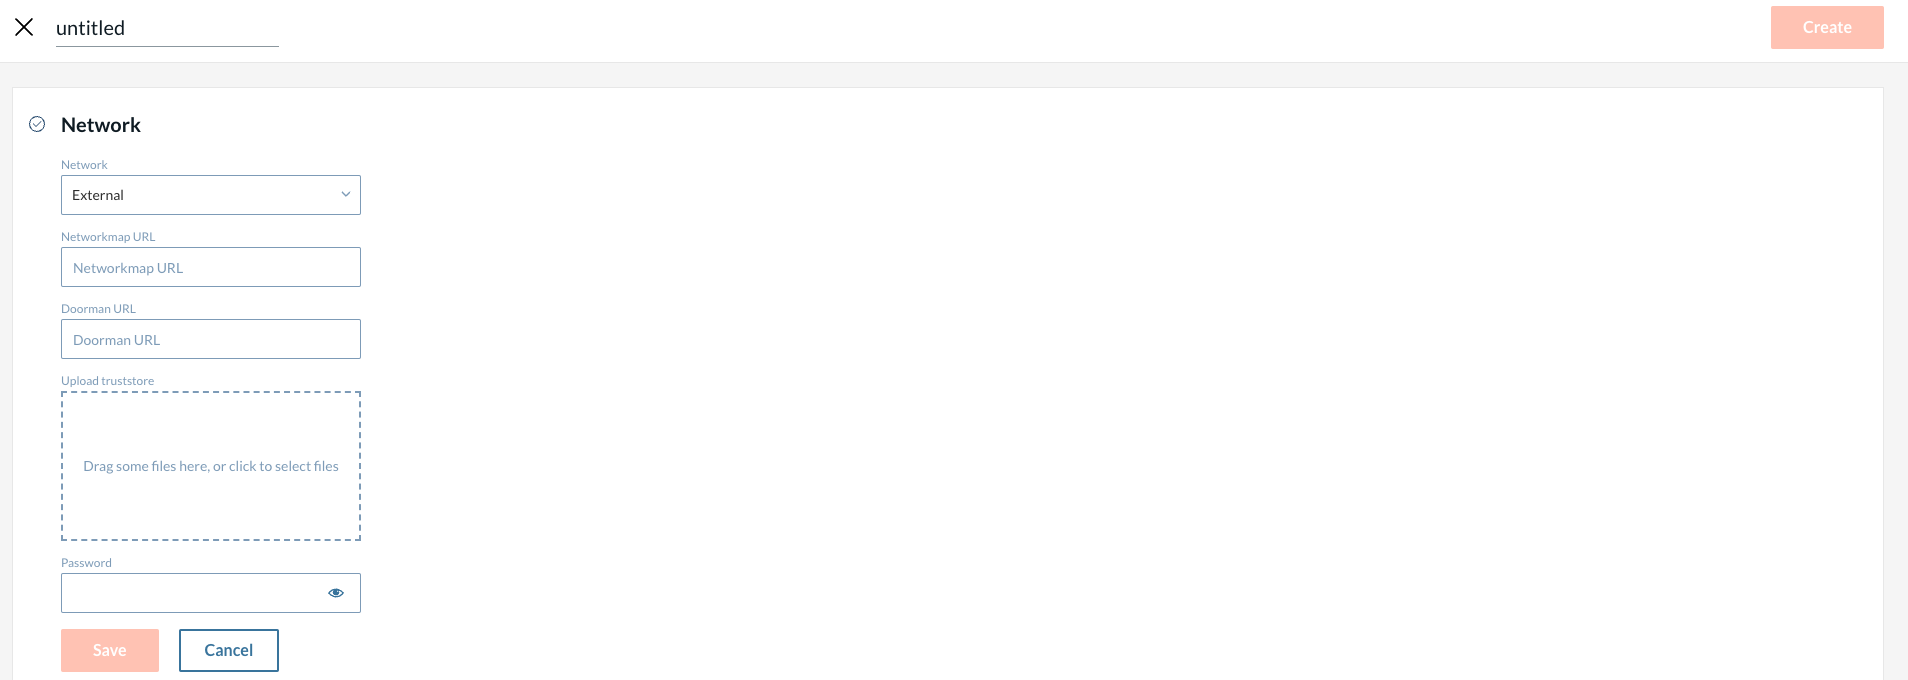
2. Fill in the network information.
-
Network - A compatibility zone, where a node will be deployed. You can choose one of three options:
-
Corda production - a publicly available internet of Corda nodes operated by network participants.
-
Corda pre-production - also known as the User Acceptance Testing/UAT environment, seeks to provide a test environment that is as close as possible to Corda Network in its make-up and operation.
-
Other - a private network operating and being governed entirely independently. Note: To deploy a node to the private network, this network needs to be first bootstrapped by the network provider.
-
|
Corda production and pre-production will be supported in future releases. |
-
Networkmap URL - Root address of a network map service.
-
Doorman URL - Root address of a network registration service.
-
Upload truststore - A network/zone operator’s root CA certificate. Should be generated before the node installation.
-
Password - Password to the truststore.
|
You can get all the data related to the network from your network operator. |
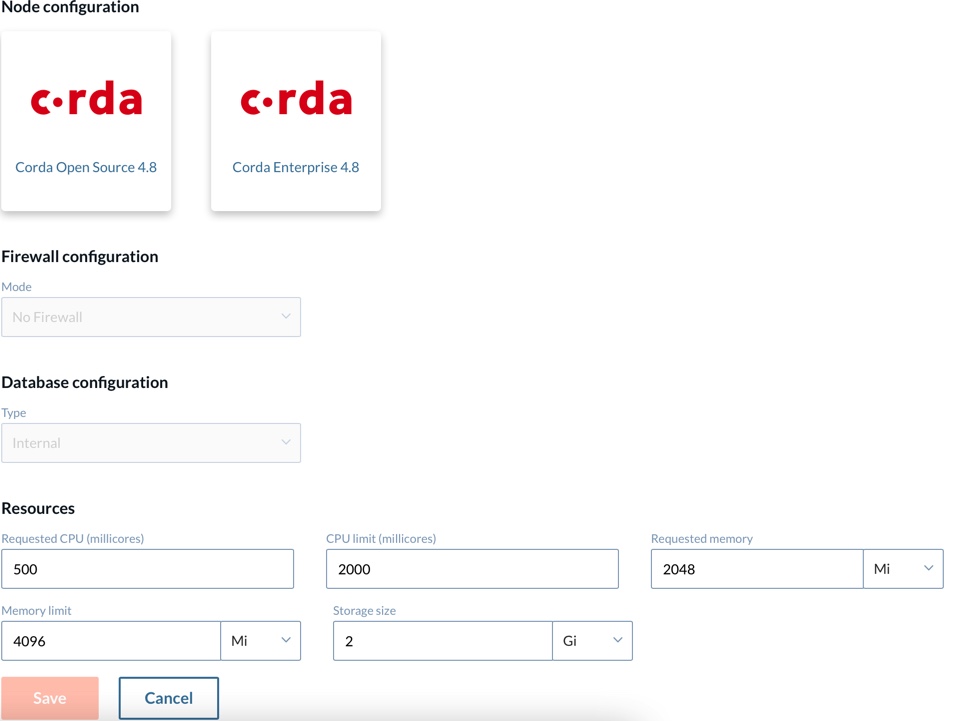
3. Configure a node.
-
Version. You can choose one of two possible Corda node versions: Open Source 4.8 or Enterprise 4.8. The difference between Corda Open Source and Corda Enterprise is described in this section.
-
Firewall. The current release of Catalyst Blockchain Manager supports a DMZ-ready firewall and a setup without a firewall for a Corda Enterprise node. You can read about firewall configuration in the official Corda documentation.
-
Database. The node’s database includes a vault, where the node stores any relevant current and historic states together with the storage service, where it stores transactions, attachments, and flow checkpoints. Corda uses an internal H2 database by default. Catalyst Blockchain Manager also allows you to connect to an external database.
|
H2 is an in-memory database that runs within the node. It is embedded, fast, and does not require a lot of configuration. On the other hand, the external database connection option gives you more flexibility and control of your data. Catalyst Blockchain Manager allows you to connect your existing database to a node and thereby keep the control of the data of the blockchain application, and at the same time not worry about the deployment and uptime of the Corda node components. |
The following external databases can be used :
-
PostgreSQL, SQLServer, Oracle, and AzureSQL for a Corda Enterprise node.
-
PostgreSQL for a Corda Open Source node.
To connect to an external database you should provide additional information. Fields may differ depending on database type. For example, to connect PostgreSQL the following fields should be filled:
-
Host
-
Port
-
Database
-
Name
-
Schema
-
Name
-
Username
-
Password
|
You need to configure a database before using it for Corda. Please, visit the official Corda documentation with database setup instructions for development and production environments. |
-
Resources:
-
Requested CPU. Guaranteed CPU resources that will be allocated.
-
Requested memory (MB). Guaranteed amount of RAM that will be allocated.
-
Storage size.
-
4. Configure the node’s identity.
Each node in a Corda network should have an identity verified by a network operator. This refers to a real legal identity. This information will be further used in all the node certificates (node identity) so that it takes the form of a distinguished name in X.500 standard.
To read about distinguished name constraints please visit the Corda official documentation.
After clicking the “Create” button, a node’s certificate signing request will be sent to the network operator. The node will be up and running in a few minutes after the request is approved. You can see the node’s details by clicking on any particular node.
Node Details
Under the Nodes tab, you can see the existing nodes you have deployed. All of these nodes are displayed with the following columns representing individual characteristics:
-
Name
-
Architecture (Open Source (OS) or Enterprise)
-
Status (could be "Running" or "Processing")
If you click on any node, you will see a new window where the details of that particular node are displayed. The details window is divided into two sections.
In the first section, you can view the details about the node such as:
-
Name.
-
Addresses. The address for P2P communication between nodes.
-
Client Address. This is a base URL for the REST API endpoints Catalyst Blockchain Manager created automatically for the uploaded CorDapps.
|
By default Corda provides RPC protocol for client-node communication. Catalyst Blockchain Manager automatically generates REST API endpoints for the uploaded CorDapps for that purpose. It is up to a user which protocol to use: RPC or REST API. |
-
RpcAddress. RPC address for communication between the node and the client. To read more about how to interact with a node using RPC see the official Corda documentation.
-
Serial. An arbitrary number incremented each time the NodeInfo is changed.
-
Node Architecture. OS (open source) or Enterprise.
-
LegalIdentities. Legal Identities provided by a user upon the node creation.
-
Version. The version of Corda running on the node.
-
Nodeid. Is used for addressing the node in API calls. The nodeid inherits the node’s name.
-
FirewallMode.
-
DebugAdress. The address exposed for debugging, at which the debugger would listen.
Here you can also see actions that can be performed on that node:
-
Restart node
-
Delete node
-
View CorDapp Client. See more about CorDapps in the CorDapp management section.
The second is the СorDapps section, where you can view all of the CorDapps installed to the node along with the CorDapp’s details:
-
Name
-
Maintainer
-
Date created
-
Version
-
Actions
-
See config file
-
Remove corDapp
-
|
CorDapp’s details display the information which is specified in the CorDapp. When no data is specified a standard value will be displayed (e.g., “Default Date” will be shown in the “Date created” field). |
How to Join an Internal Network
CatBM allows customers to create Corda nodes on their own networks, but we also offer managed networks. We call this an Internal Network as it is bootstrapped internally with a single Notary. Customers may add or delete nodes in this internal network, just as they would on an external network.
The health of an internal network can be checked on the UI, as it is reflective of the status of the notary within the network. A Corda network is considered unhealthy if the notary is not in a functional state, as they play a critical part within the network.