Ordering Service
What is an Ordering Service?
Many distributed blockchains, such as Ethereum and Bitcoin, are not permissioned, which means that any node can participate in the consensus process, wherein transactions are ordered and bundled into blocks. Because of this fact, these systems rely on probabilistic consensus algorithms which eventually guarantee ledger consistency to a high degree of probability, but which are still vulnerable to divergent ledgers (also known as a ledger “fork”), where different participants in the network have a different view of the accepted order of transactions.
Hyperledger Fabric works differently. It features a node called an orderer (it’s also known as an “ordering node”) that does this transaction ordering, which along with other orderer nodes forms an ordering service. Because Hyperledger Fabric’s design relies on deterministic consensus algorithms, any block validated by the peer is guaranteed to be final and correct. Ledgers cannot fork the way they do in many other distributed and permissionless blockchain networks. See more about ordering services in the Hyperledger Fabric documentation
System Channel
Every network begins with an ordering system channel. The policies in the ordering system channel configuration blocks govern the consensus used by the ordering service and define how new blocks are created.
The system channel also contains information about the organizations that are the members of the ordering service (orderer organizations) and those allowed to create new channels (consortium organizations).
| Starting from V.2.3, Hyperledger Fabric provides an orderer channel management without a system channel. However, this is not supported by the current version of Catalyst Blockchain Manager. |
See how to create a system channel here.
Raft
Starting from version 2.0, the Hyperledger Fabric blockchain only supports Raft consensus, therefore, Catalyst Blockchain Manager also only supports the Raft protocol. Raft is a crash fault-tolerant consensus protocol that allows multiple non-trusting organizations to reach a mutual agreement through a leader-follower concept.
You need to achieve the quorum to keep an ordering service functional. The quorum is the minimum number of working orderers (or, using Raft terminology - consenters) required to ensure effective consensus. For every consenter set, this is a majority of nodes. For instance, an ordering service with 5 nodes requires 3 nodes to make a quorum (if 3 nodes out of 5 fail, a quorum won’t be achieved), 2 node service requires 2 nodes available, and so on. To read more about Raft concepts, click here.
| Add and remove consenters carefully. If the nodes' quorum is not available, the ordering service will not work, which eventually means that no new transactions will appear on the channel. If the nodes' quorum at the system channel is not available, no network configurations can be made, and no consenters can be added until a quorum is reached. |
Ordering Set
To create an ordering node, you should first create an ordering set. The ordering set is the entity introduced by Catalyst Blockchain Manager as a template for ordering nodes. Using this feature, configurations that you specify when creating an ordering set will apply to all the orderers within this ordering set.
Ordering Node
An ordering node (or an orderer) is one of the main entities of Hyperledger Fabric. Orderers are responsible for maintaining the system and application channels, ordering transactions, and packaging them into blocks.
How to Create an Ordering Set?
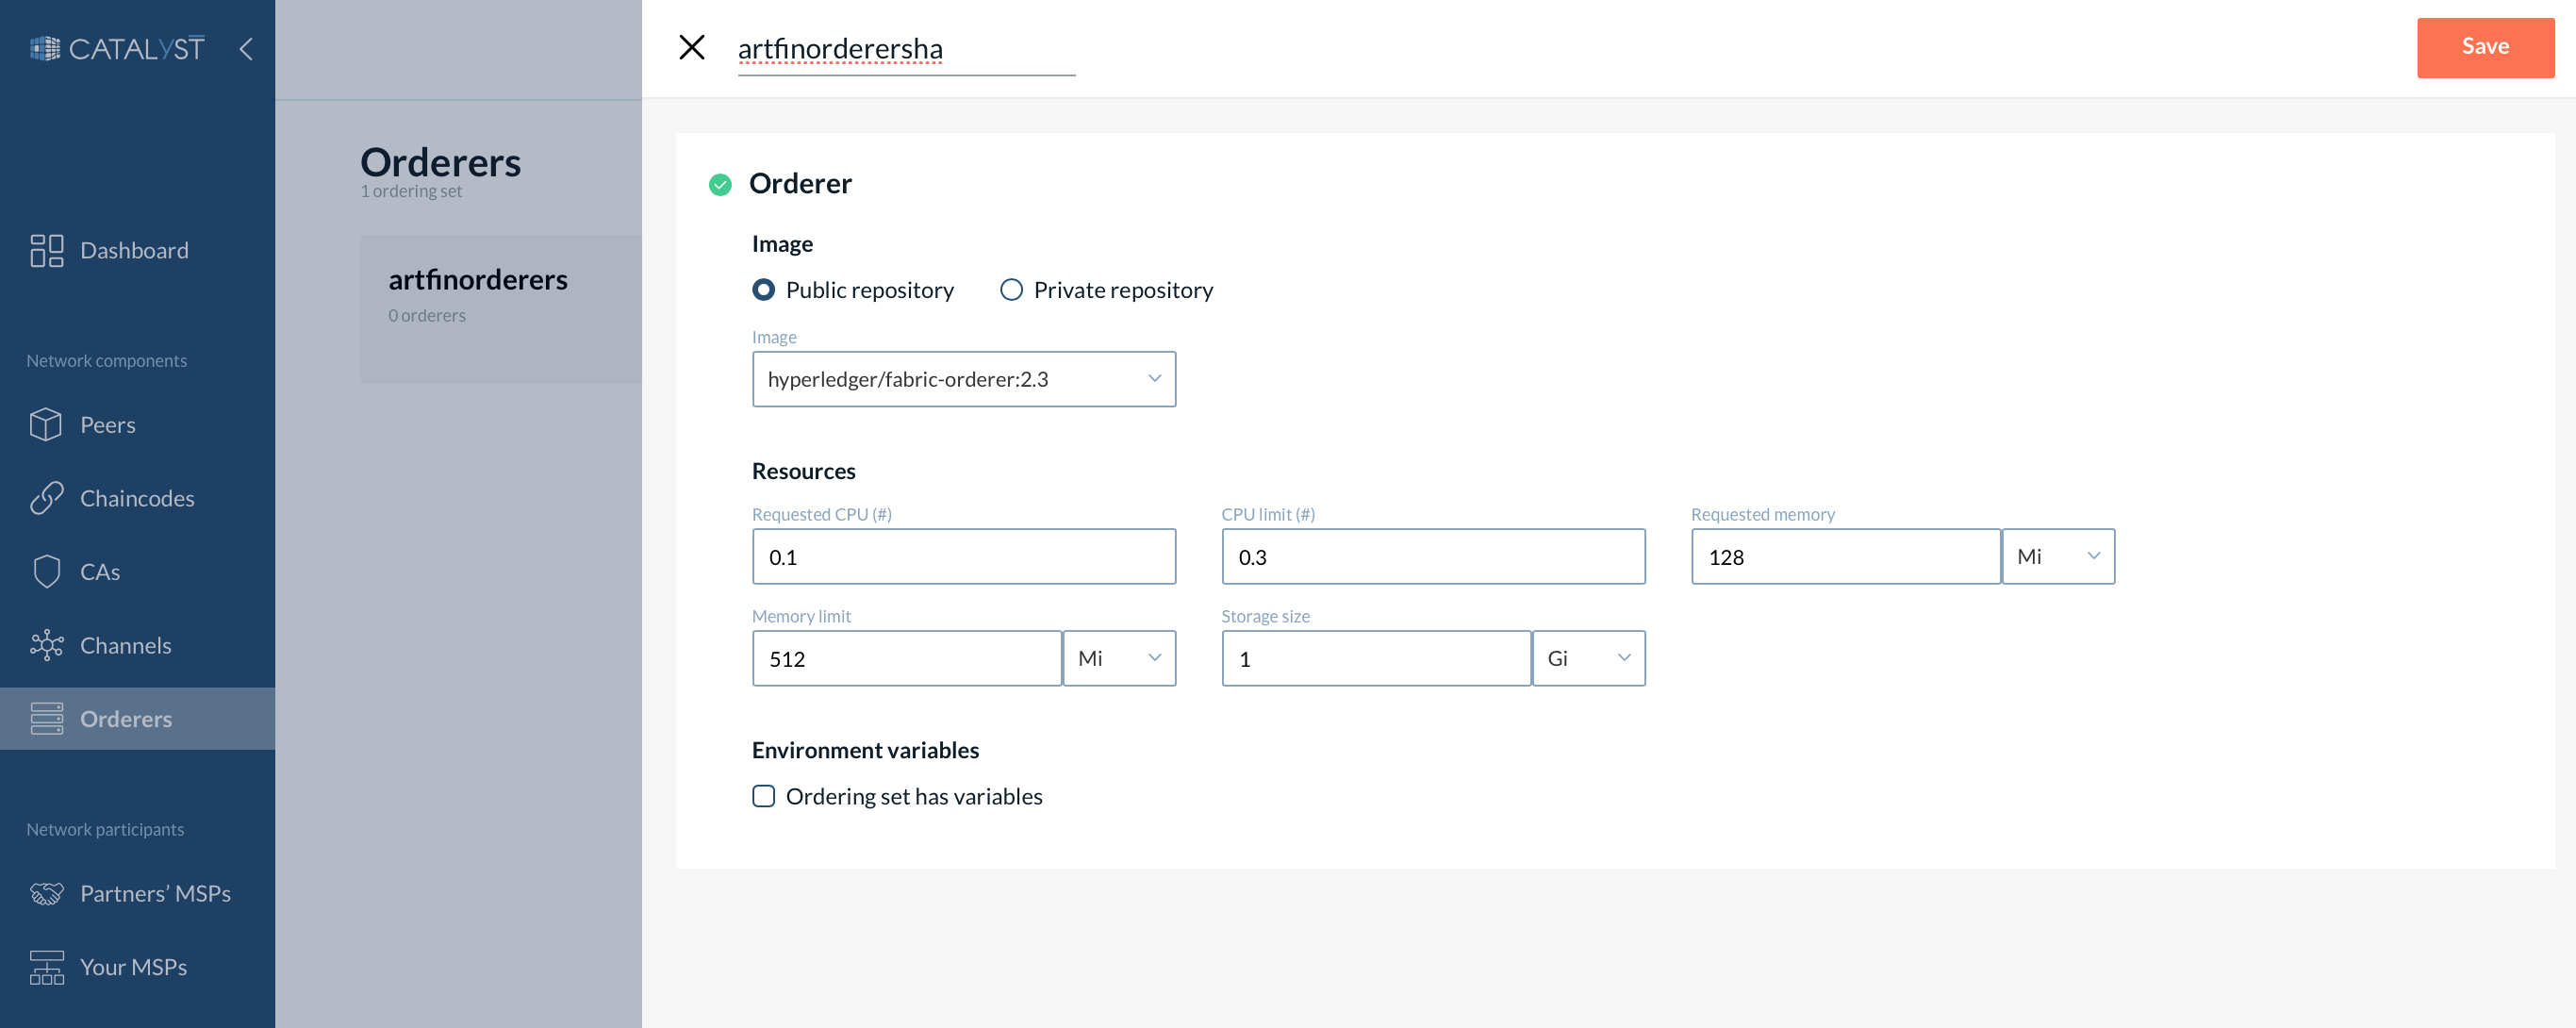
To create an ordering set, go to the Orderers page. Click on the “Create ordering set” button. It will open a menu on the right side of the screen, as shown in the figure below, where you have to provide the following information:
-
Ordering set name
-
Image - This image will be used for creating ordering nodes.
|
Using a predefined image is recommended for compatibility issues. However, you can select your image if needed. If you want to use an image from a private repository you should specify an imagePullSecret (a server name, your login, and your password). You need to specify a secret only once and then select the secret from a drop-down list. Also, you can create an imagePullSecret in your Kubernetes cluster and add the label "app.kubernetes.io/name": "image-pull-secret". After that, the secret will be available in the drop-down list. Note that after removing your secret from the list, Catalyst Blockchain Manager won’t be able to use an image with this secret. In this case, you need to change the image/repository or create a new secret naming it the same. |
-
Resources
-
Requested CPU - Guaranteed CPU resource that will be allocated to the ordering node.
-
CPU limit - Maximum CPU resource that can be allocated to the ordering node.
-
Requested memory (MB) - Guaranteed amount of RAM that will be allocated to the peer node.
-
Memory limit (MB) - Maximum amount of RAM that can be allocated to the peer node.
-
Storage size.
-
-
Add environment variables
|
Note: Please do not customize the following list of environment variables to ensure that your Hyperledger Fabric Blockchain runs seamlessly:
|
After creating an ordering set, you can create ordering nodes. The process of creating an ordering node is explained in the subsequent section.
| You can create as many ordering sets as you need. |
Ordering Set details
Under the Orderers tab, you can see the list of your ordering sets. By clicking on an ordering set’s name, the interface will take you to the ordering set details page.

The page contains two sections. In the upper section three actions are available:
-
Create orderer - Same as a section “Create ordering node.”
-
Edit ordering set - All the changes will be applied to the ordering nodes created within this ordering set. You can edit all the ordering set details except for the ordering set name.
-
Delete ordering set - If you delete an ordering set you also delete all the ordering nodes created within this set.
| You can add or remove environment variables by editing an ordering set. |
How to Create an Orderer?
To create a new ordering node, you can click on the “Add new node” button in the inner screen’s upper right-hand corner.
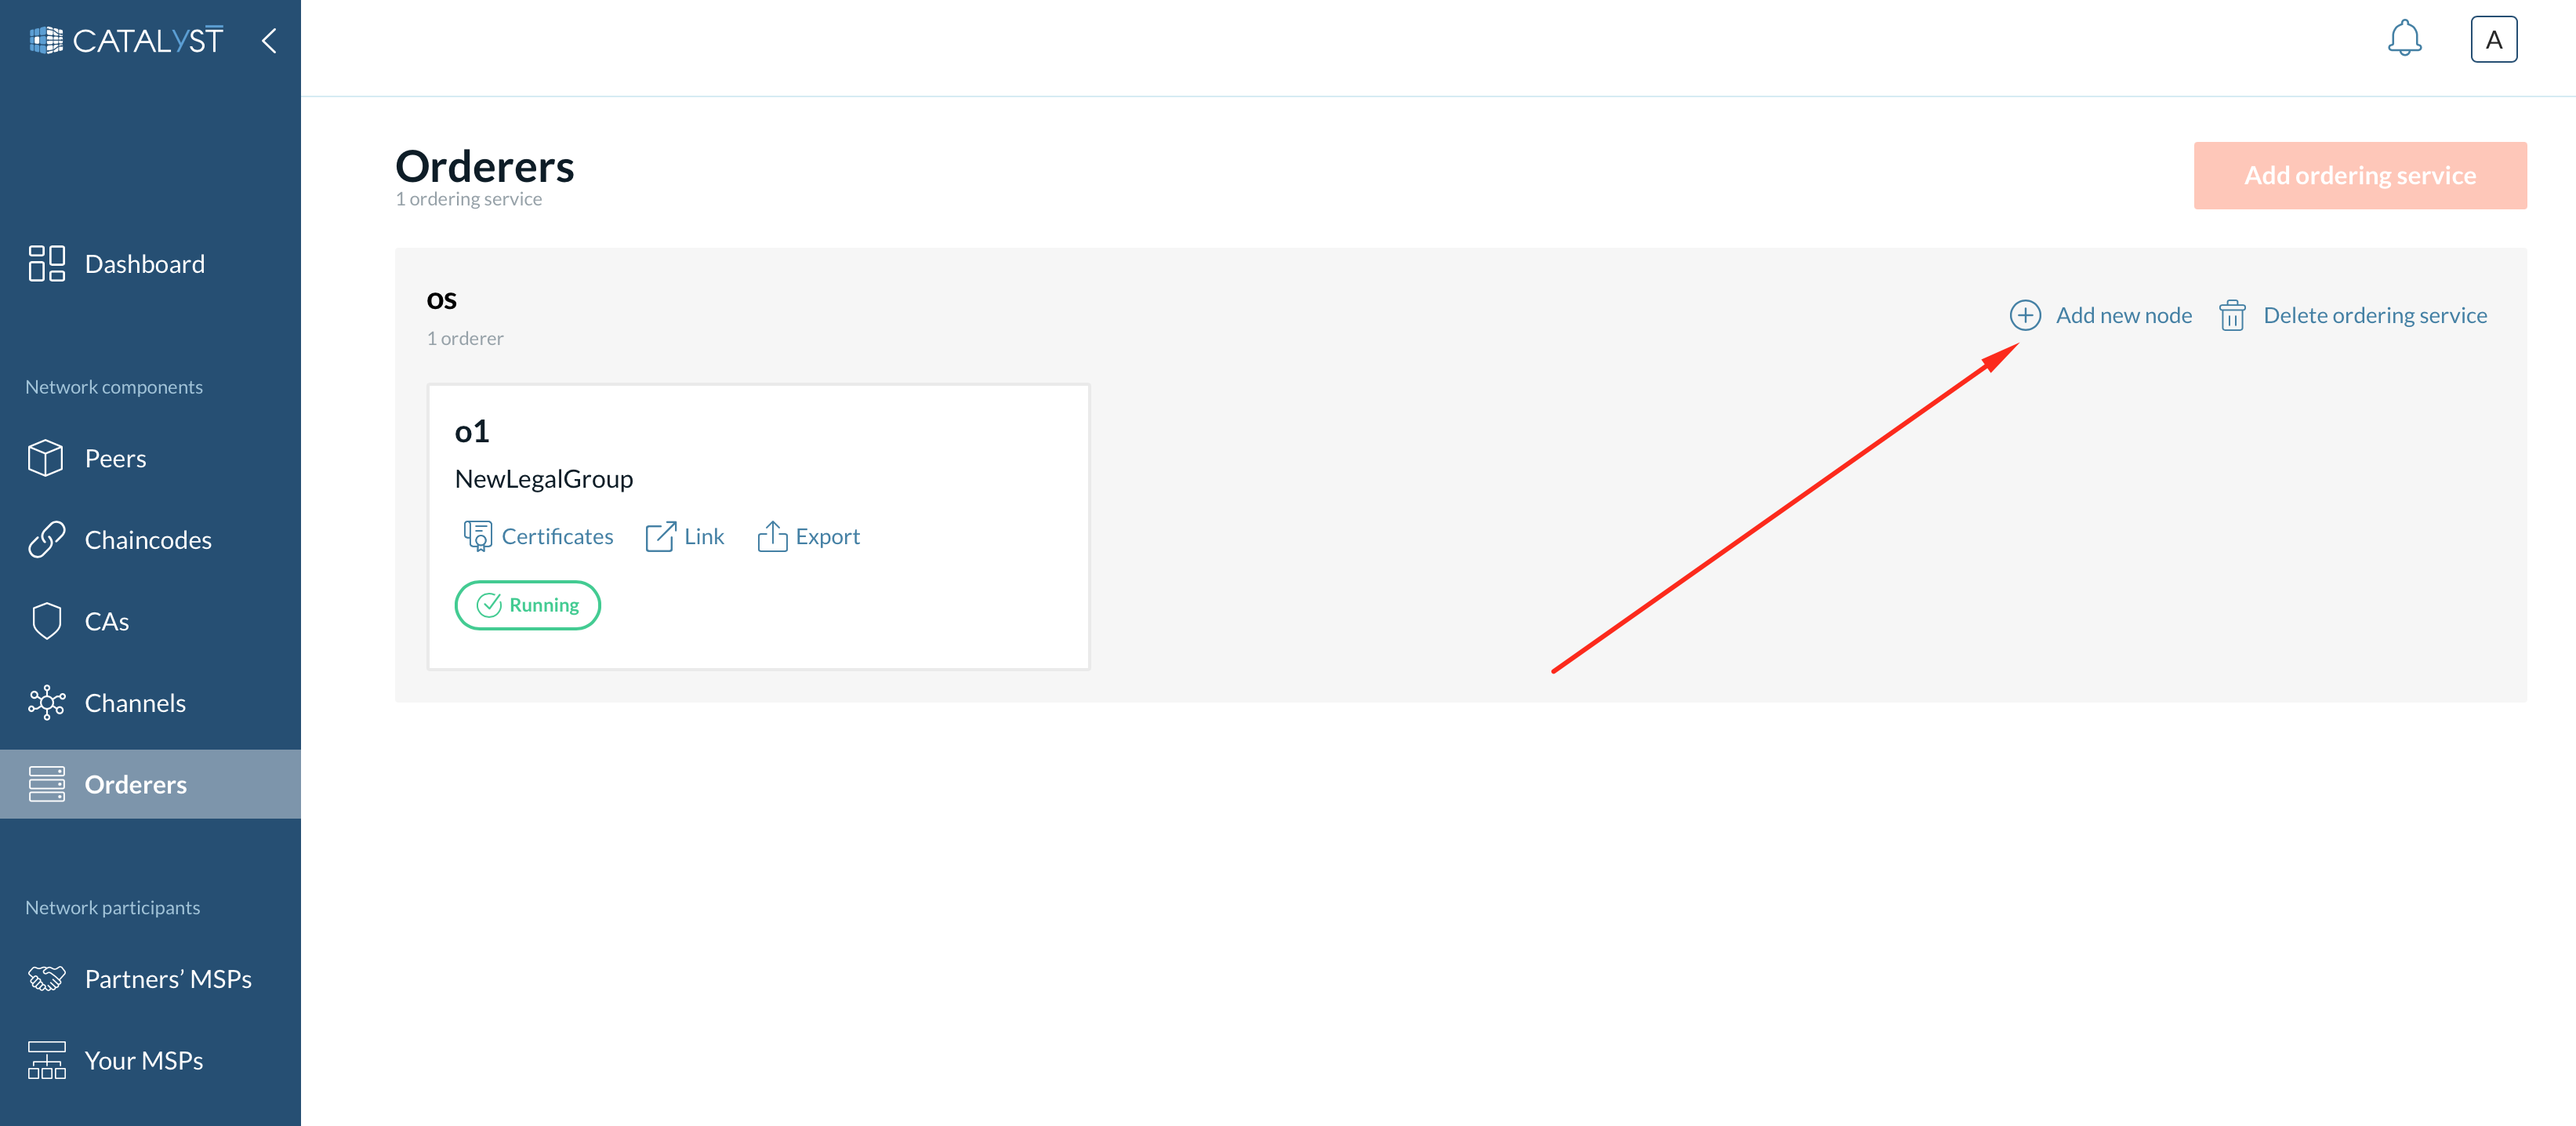
When this button is clicked, a new side window appears.
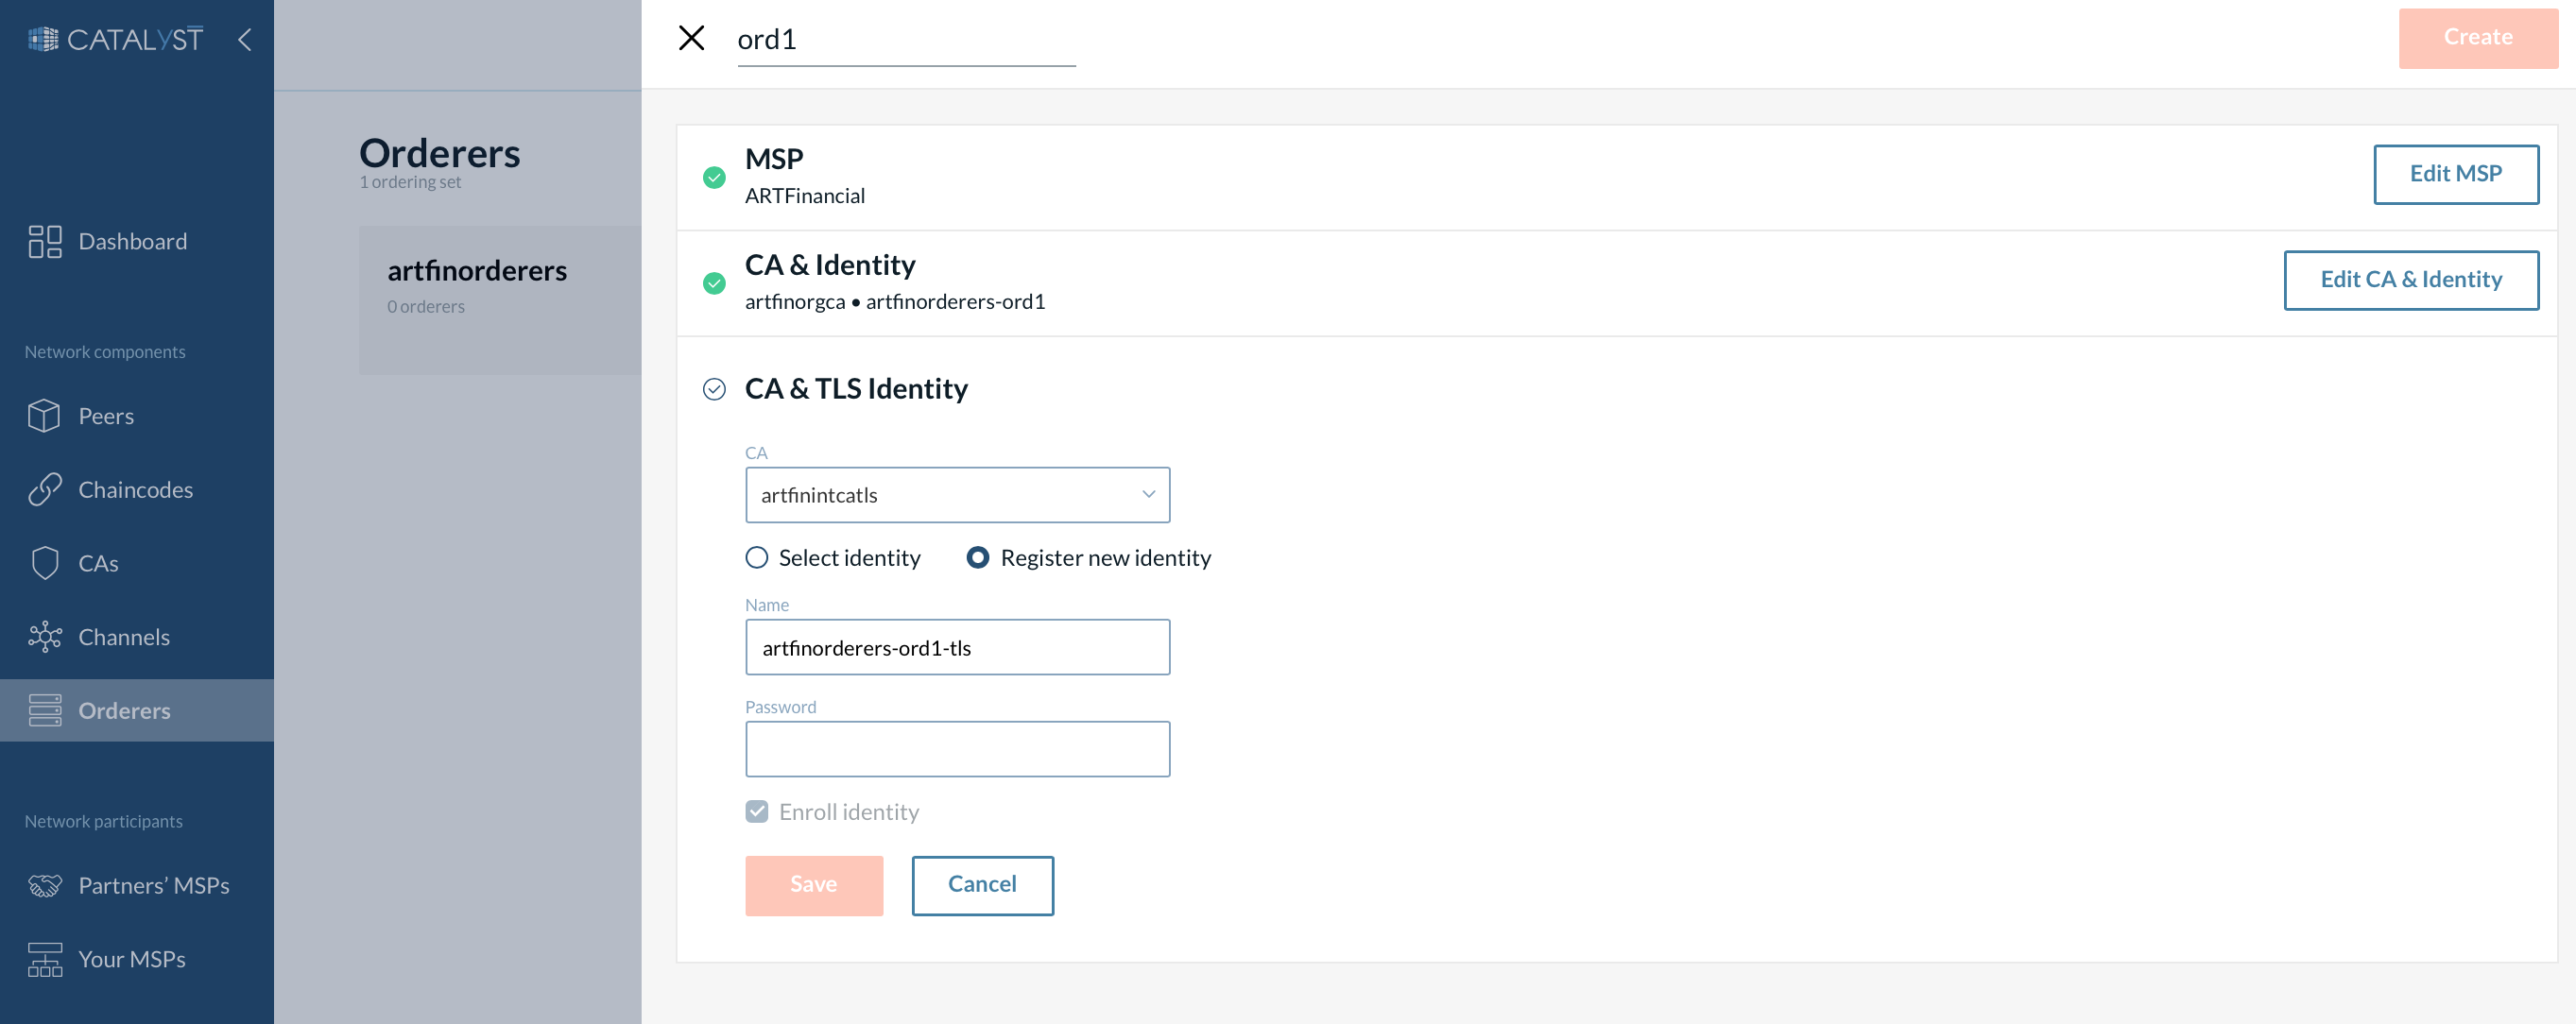
Provide the following details:
-
Provide an orderer name - Cannot be the same as any other orderer in the organization.
-
Select MSP - The selected MSP is responsible for providing identity to the orderer on the network.
-
Add a signing identity.
-
Select a CA from the dropdown menu. There are two options for defining the identity of the ordering node.
-
You can choose the “Select identity” option and choose a predefined identity from the dropdown menu.
-
You can choose the “New identity” option and define the new identity for the ordering node along with a new password.
-
-
Add a TLS identity. While this step is quite similar to the previous step, the fundamental difference between them is that step three is for enrolling identity, and step four is for enrolling a TLS certificate.
You can create a new ordering node (orderer) either through the “Create new node” button on the upper right-hand corner of the ordering set page or when you open the ordering set page (by clicking on the name of the ordering set) and then selecting “Create node.” In either case, you will have to follow the same steps as mentioned in the section above.
After you successfully add a new ordering node, you can see it under the “Orderers” tab. Any new ordering nodes created have the pending status along with the “No genesis block” button. The “pending” status gets changed to “running” within a few minutes. However, the ordering node will not function in the network before the addition of the genesis block. You need to add the genesis block for the new ordering node to be in sync with the network configuration.
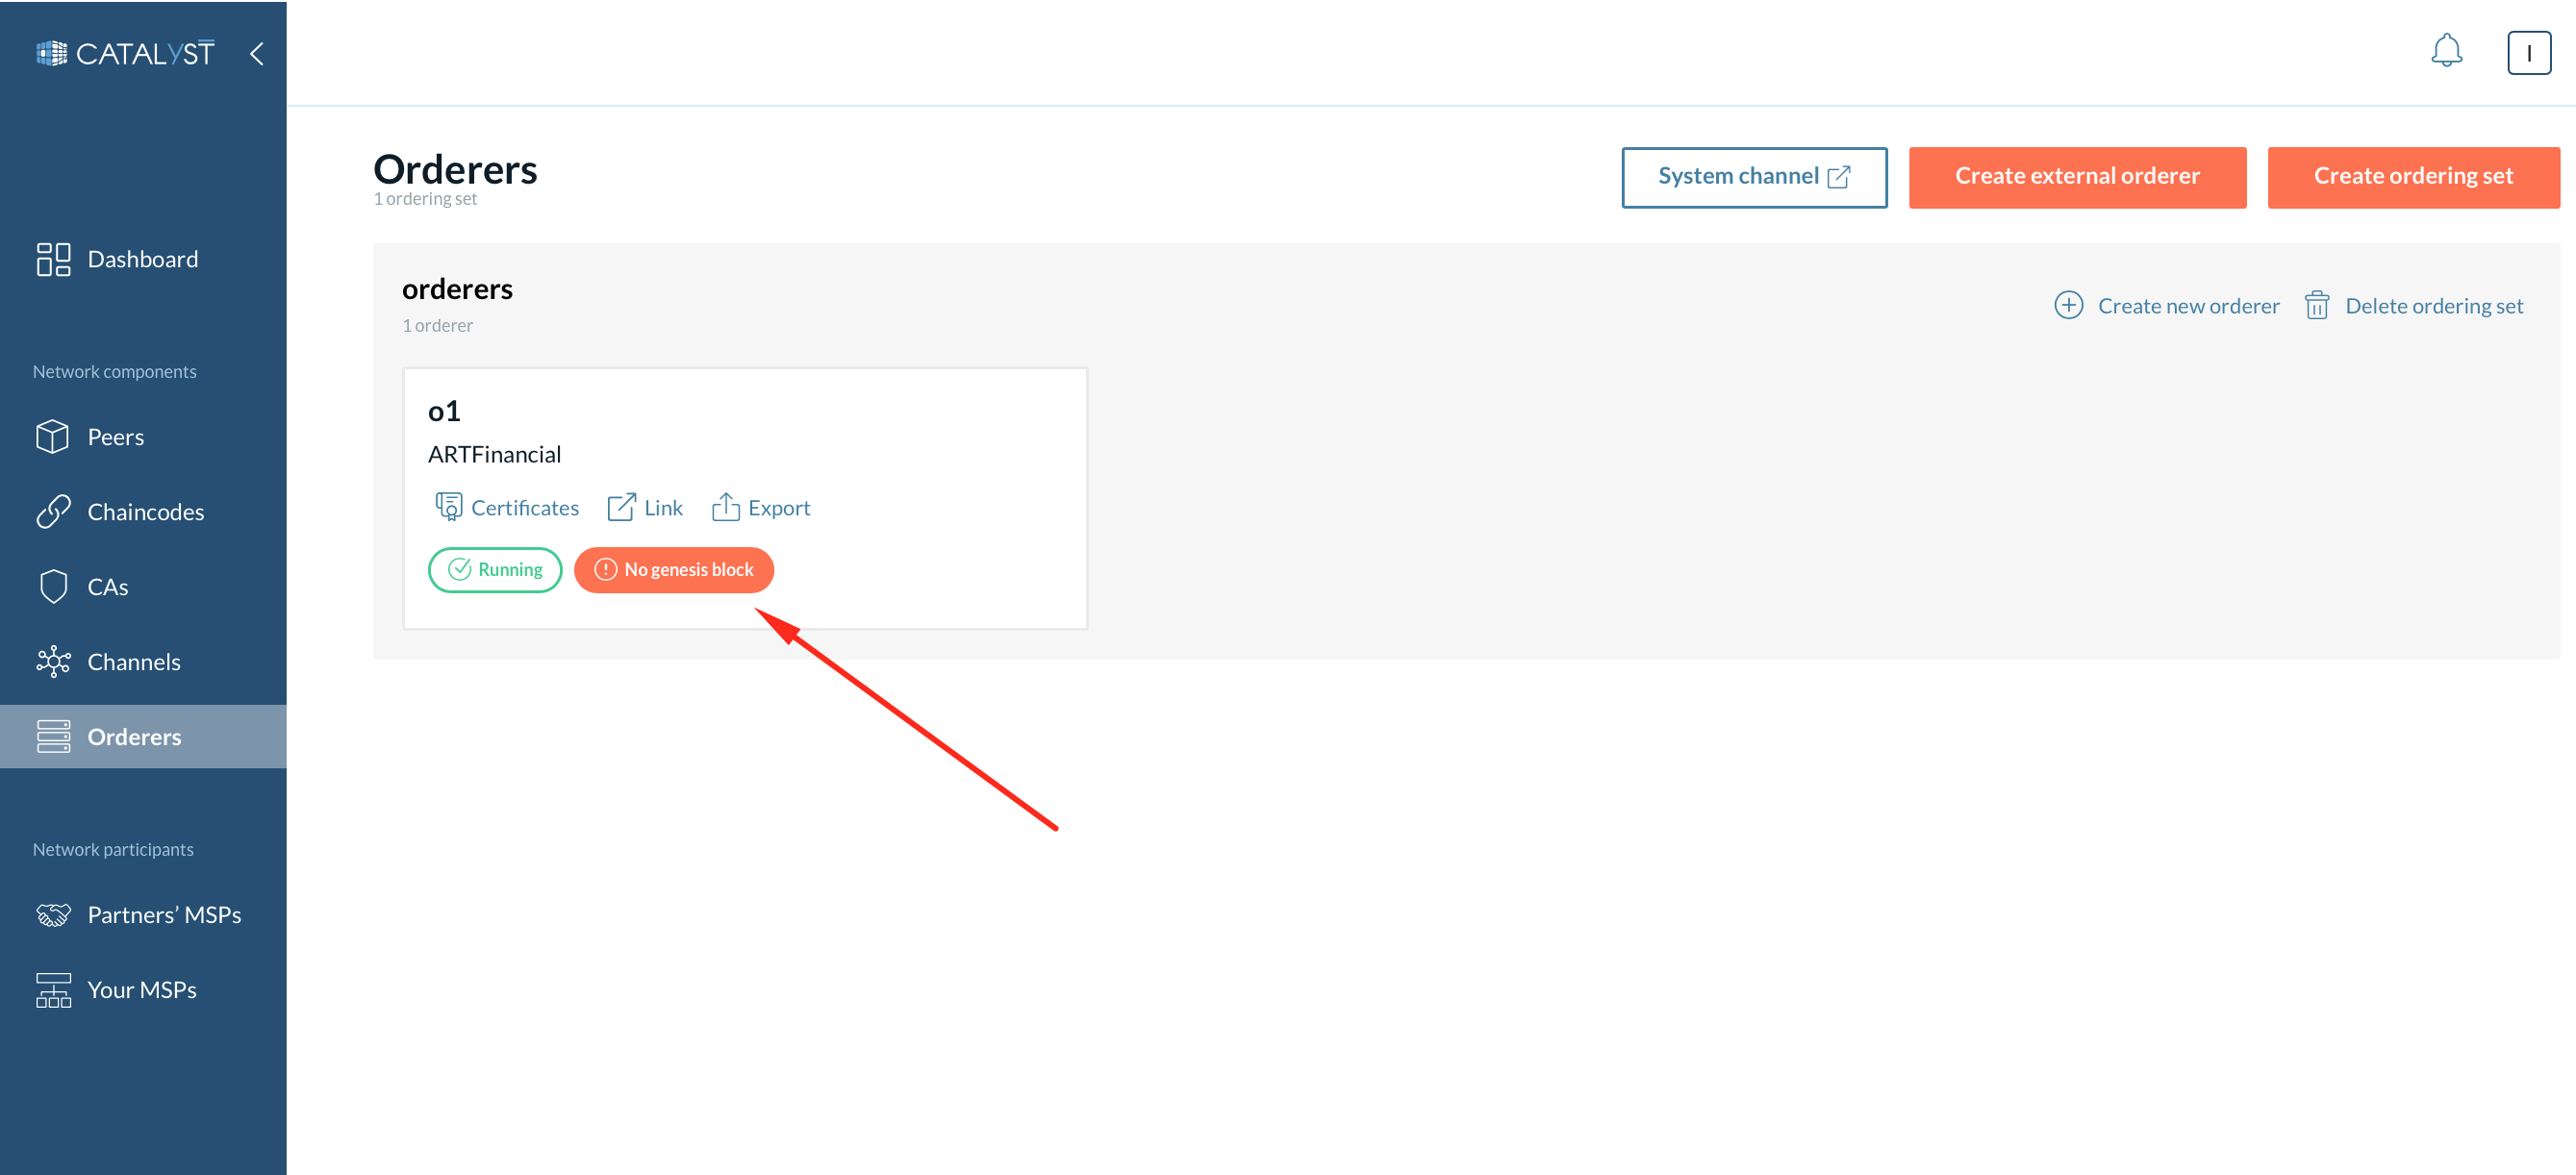
Orderer Details
Every ordering node is represented in a box that contains the following details.
-
The name of the ordering node.
-
Organization MSP name.
-
The certificate button to see certificates details.
-
The link button to view the ordering node external link.
-
Export button to export the JSON file containing information regarding the node.
-
The status symbol in the top right corner representing the state.
|
The ordering node can exist in any of the following five states at any point in time:
|
When you click on the ordering node, the screen is updated to show only that particular node with its relevant information.
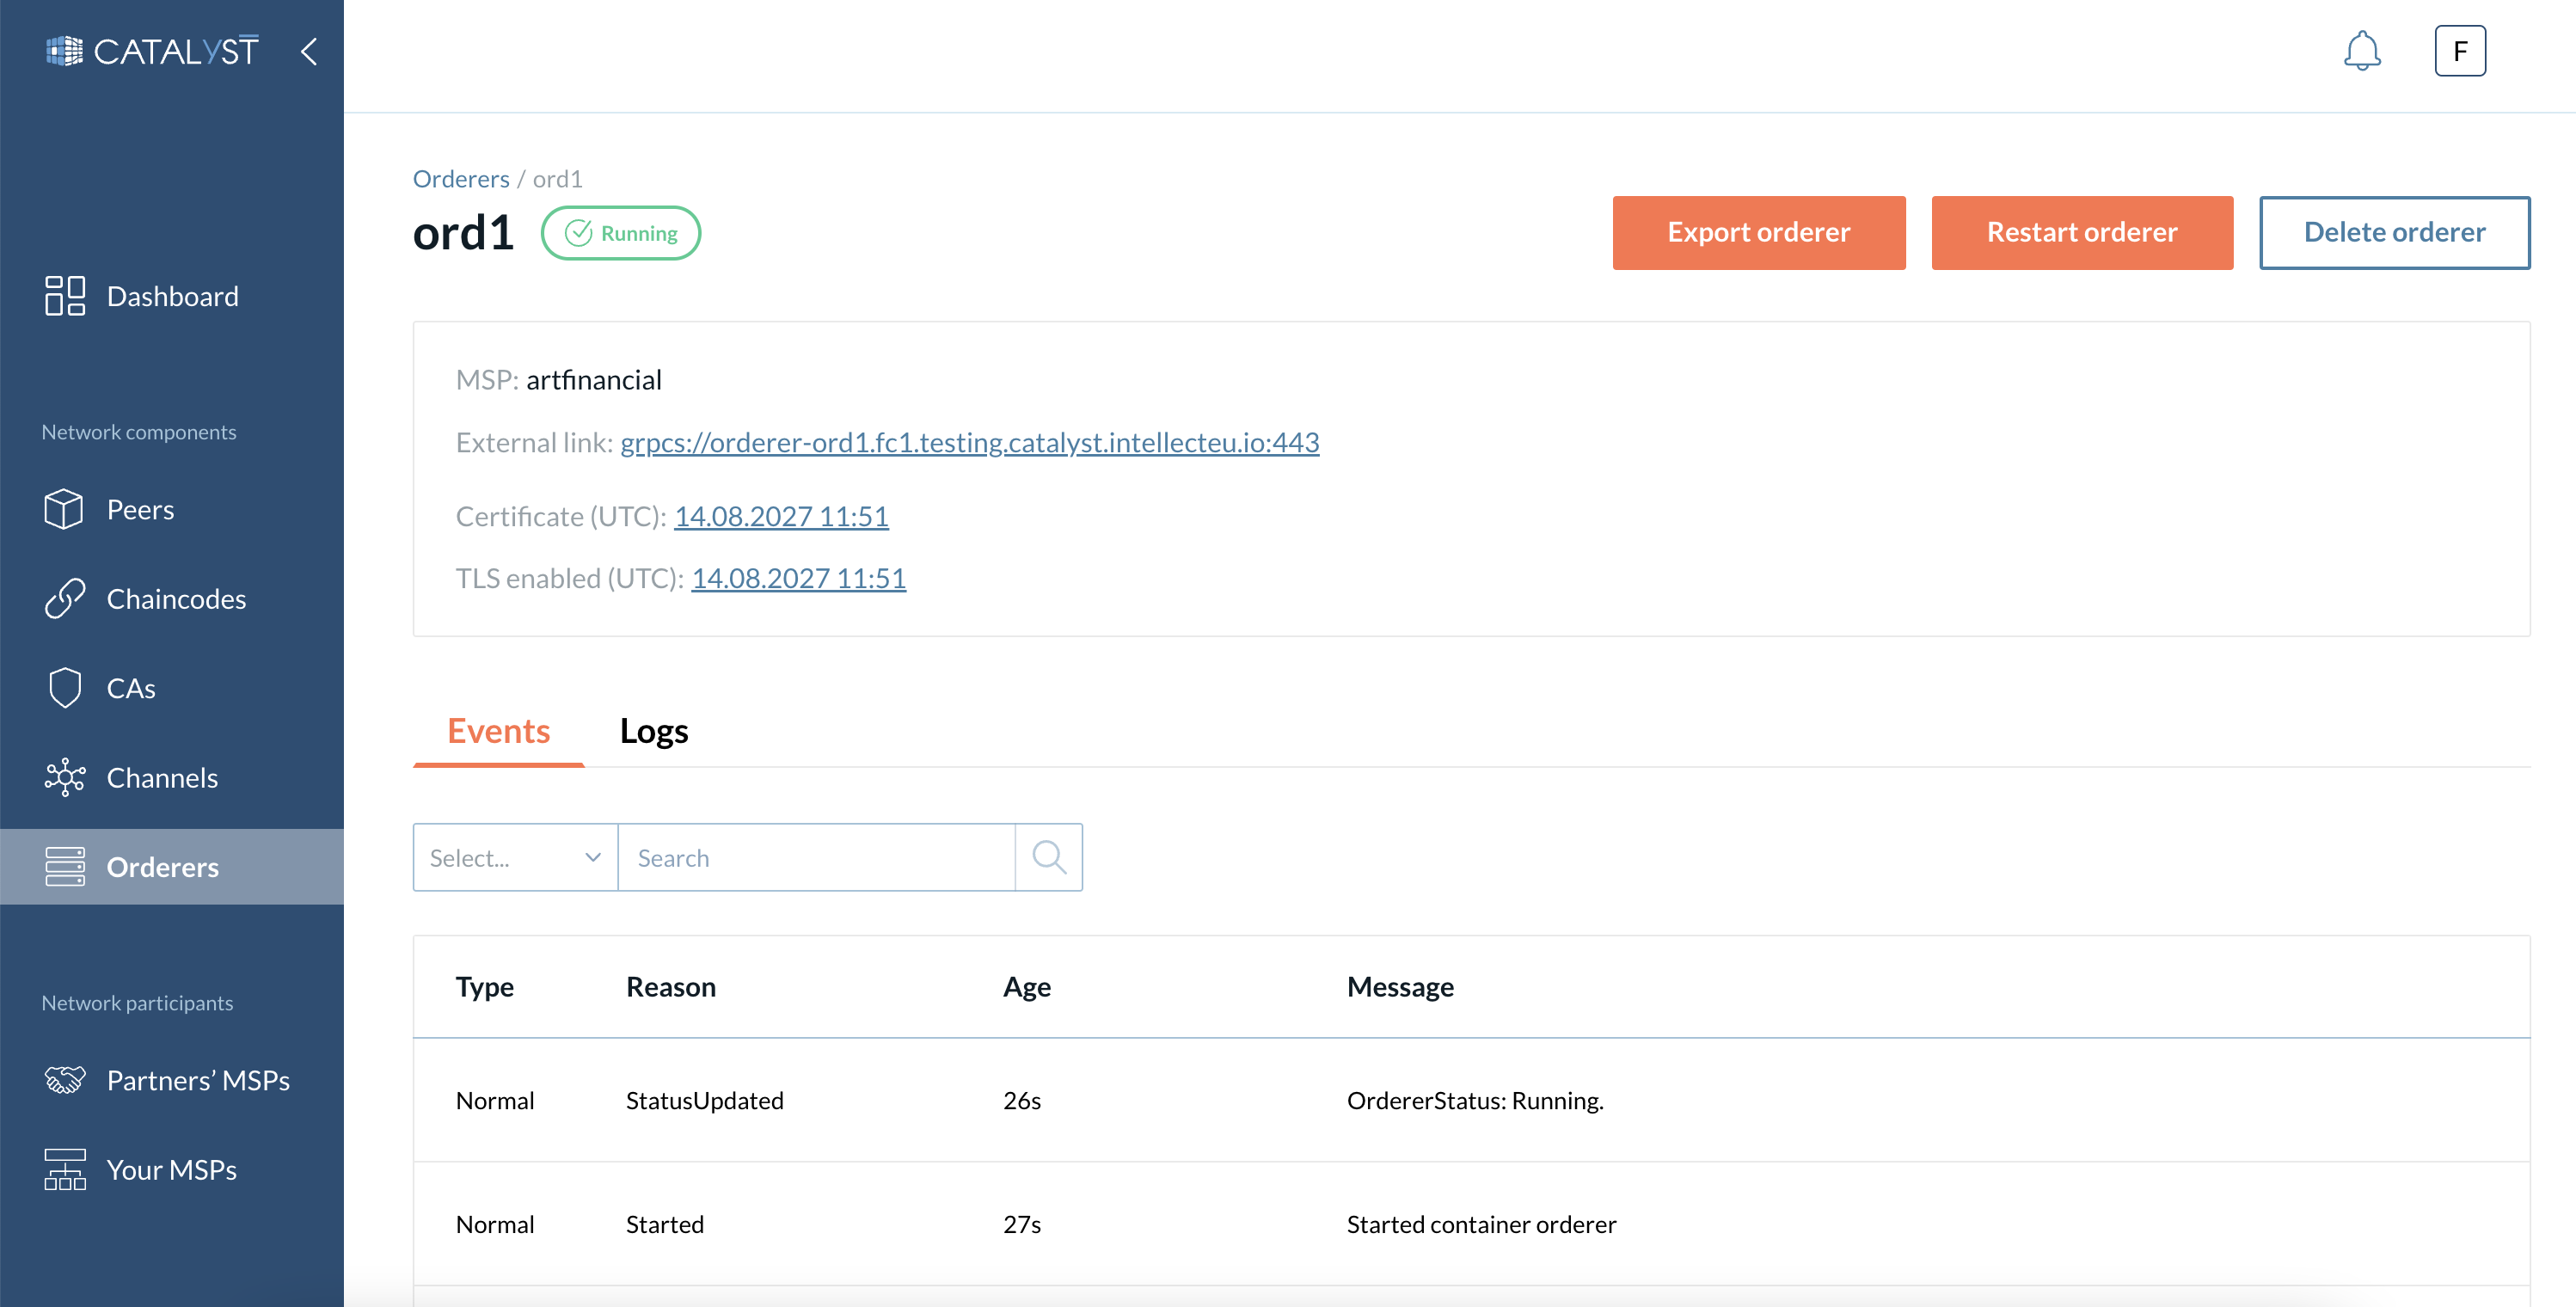
Under this section, you can perform the following actions on the orderer node:
-
Export - Exports the JSON file containing information regarding the node.
-
Restart - Restarts the corresponding node. This action is recommended if there is any issue with the ordering node or configurations are updated.
-
Delete - Deletes the ordering node.
| If you are deleting an ordering node, you have to remove it manually from application channels and then from the Raft page too so that it is no longer a part of the system channel. If this step is not completed, the ordering node will exist in channels, affecting the quantity of the orderers for the quorum. |
In the lower part of the page, you can see all the recent events and logs with a particular node.
Events
This tab displays events with a particular ordering node.

Logs
This tab displays logs of the containers related to a particular ordering node.
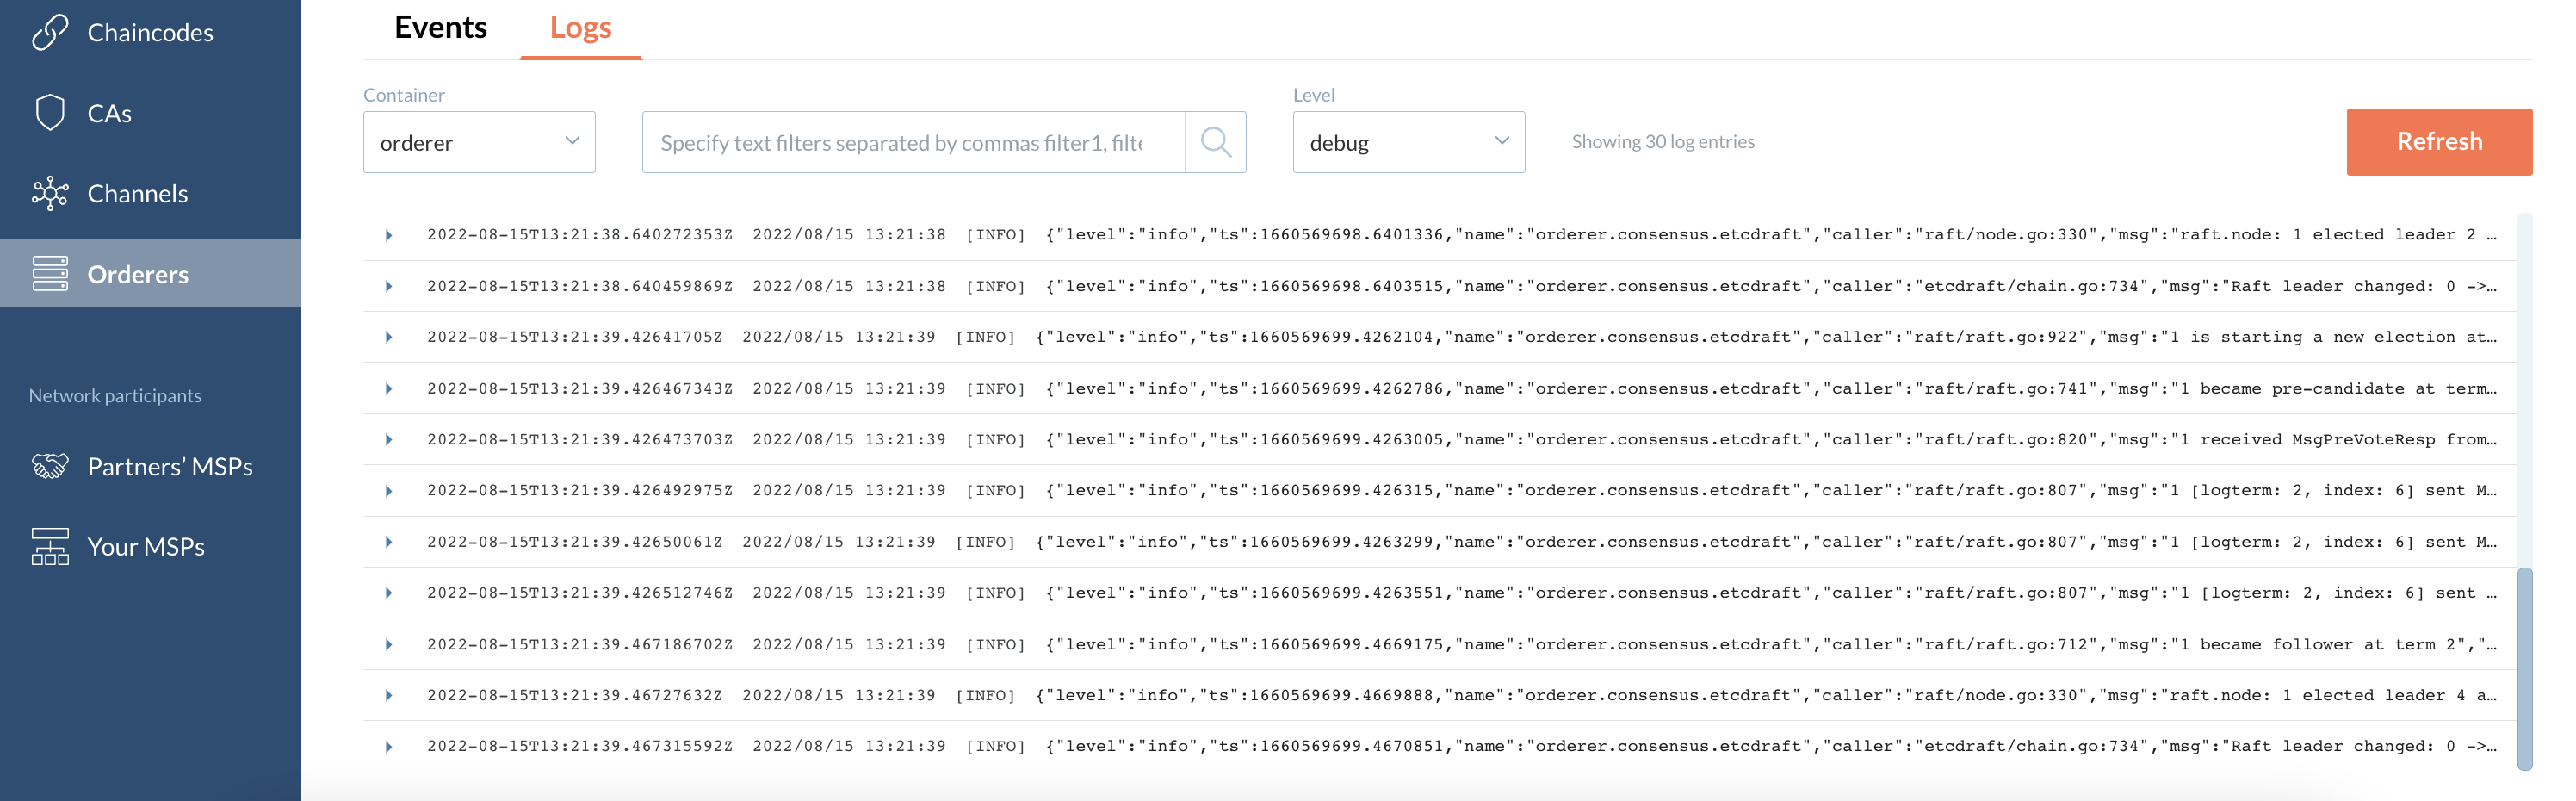
You can filter logs by text and/or level.
| Scroll down to see the newest logs. |
How to Create an External Orderer
If you do not want to host any ordering node by your organization due to your business case, you can add an external orderer instead. An external orderer allows you to connect to another orderer which has been already deployed by another organization.
To create an external orderer go to the Orderer tabs. Click the “Create external orderer” button. Provide the name of an external orderer, choose the MSP of the organization that hosts an orderer you want to connect to, and provide the link to this orderer.
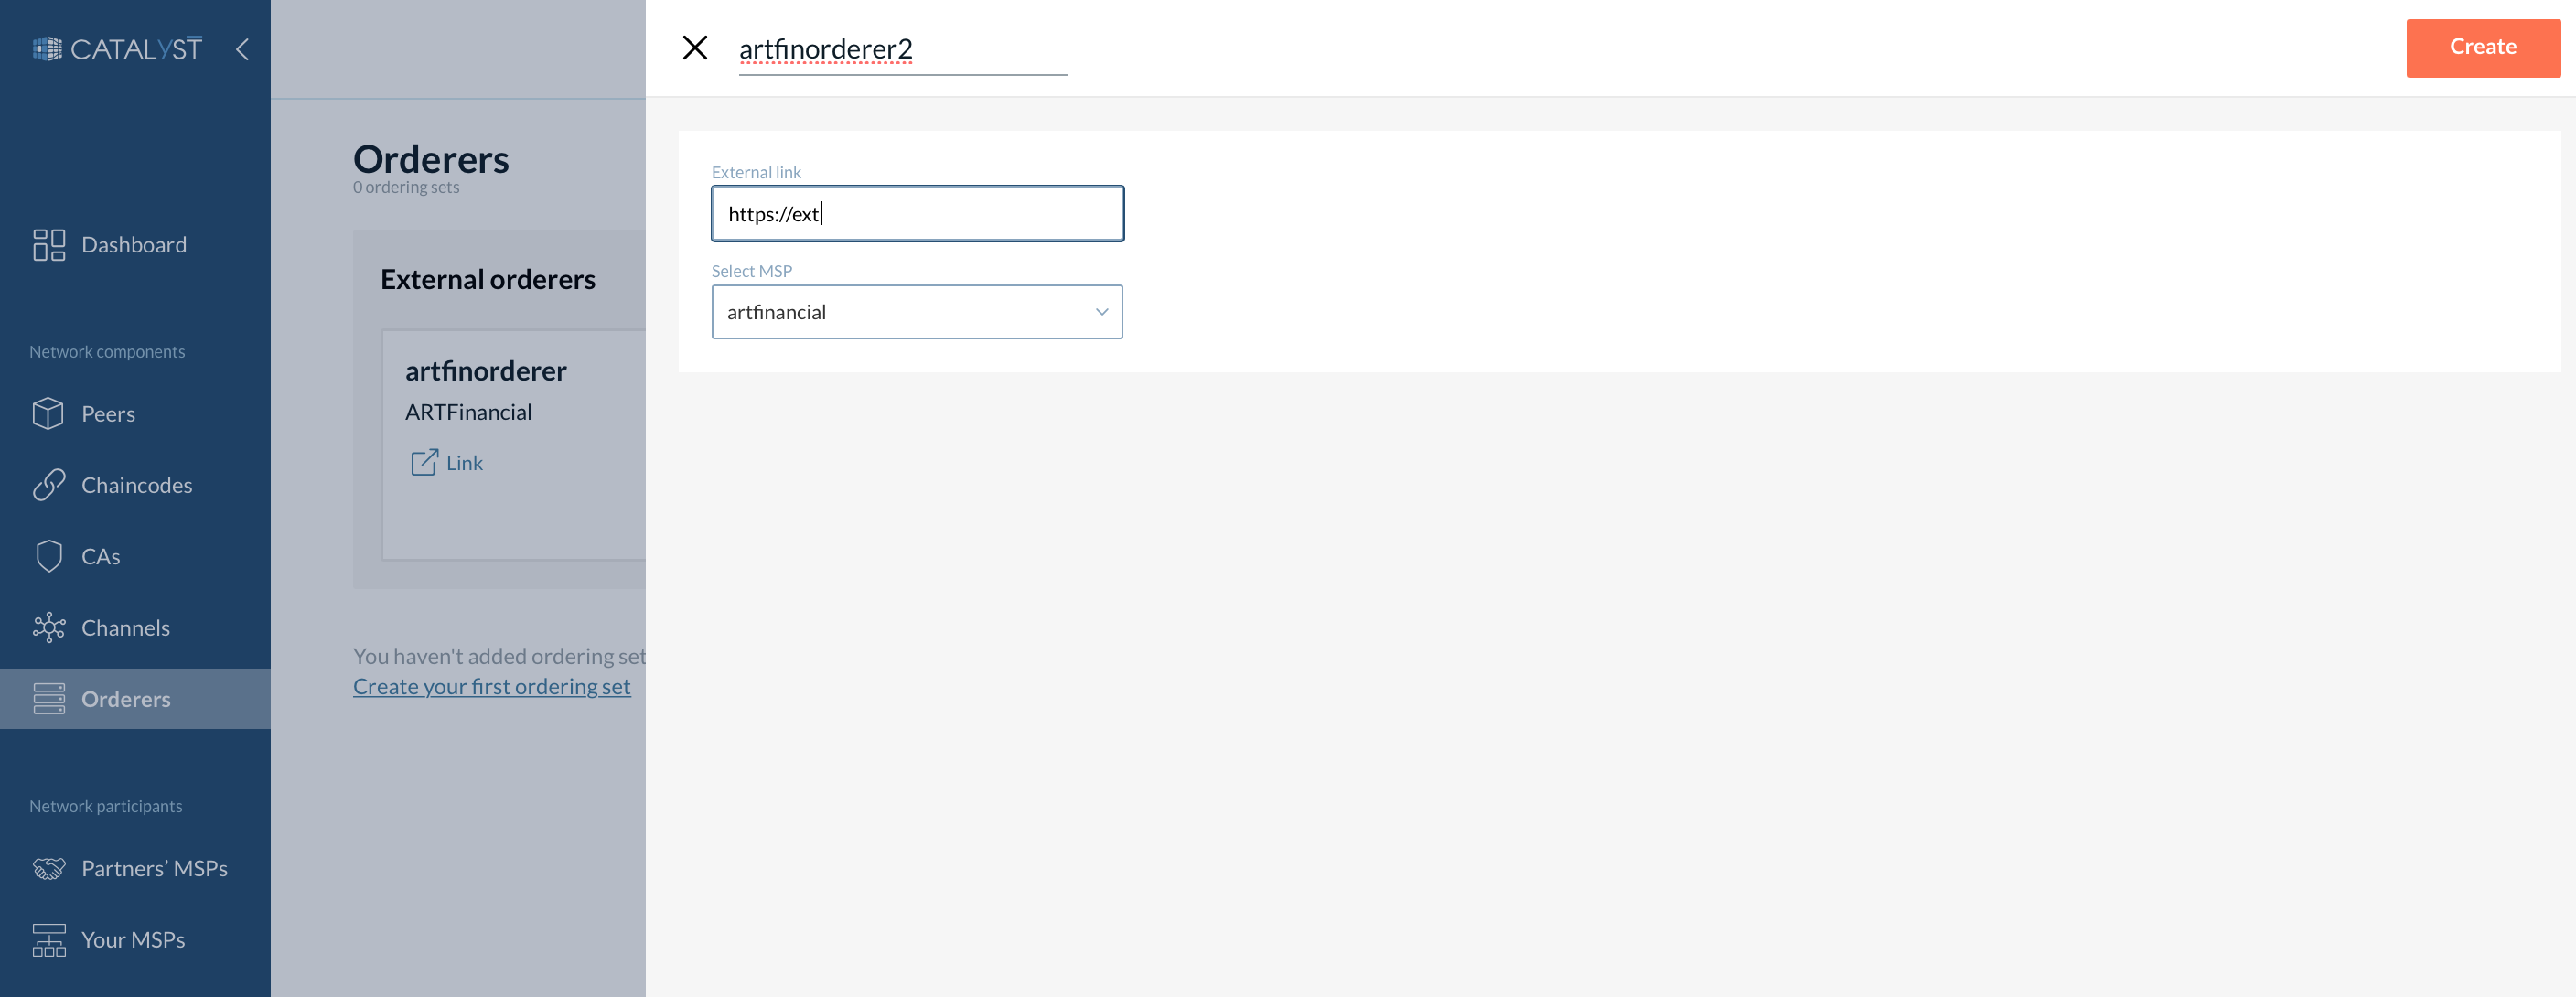
| To be able to add an external orderer both organizations should add each other to partners beforehand. |
How to Add a Genesis Block?
To make an orderer functional within a network, you have to add a genesis block containing a system channel configuration. Three cases are possible:
-
You want to bootstrap a system channel.
-
You want to join an existing system channel (join a network).
-
Your organization has already joined a system channel, and you want to add another orderer to the system channel.
Bootstrap a System Channel
You need to bootstrap a system channel to create a new network.
Join an Existing System Channel (Join a Network)
To join your orderer to an existing network, your organization with this particular orderer has to be added to a system channel beforehand. Please read this section before joining an orderer to a system channel.
To add a genesis block, you can either click on the “No Genesis Block” button at the particular ordering node or click on the “Add genesis block” link from the node’s detailed page.
Two options are available:
-
Fetch a genesis block - In this case, you need to provide a link to any active orderer from a system channel. After that, your ordering node will fetch the last system channel’s block by the provided link.
-
Upload a genesis block - Suppose you cannot fetch a genesis block from another orderer for some reason. In that case, you can ask any orderer organization to download the last system channel’s block and send it to you via a secure channel. After uploading this genesis block to your ordering node, it will sync with other consenters from the system channel.
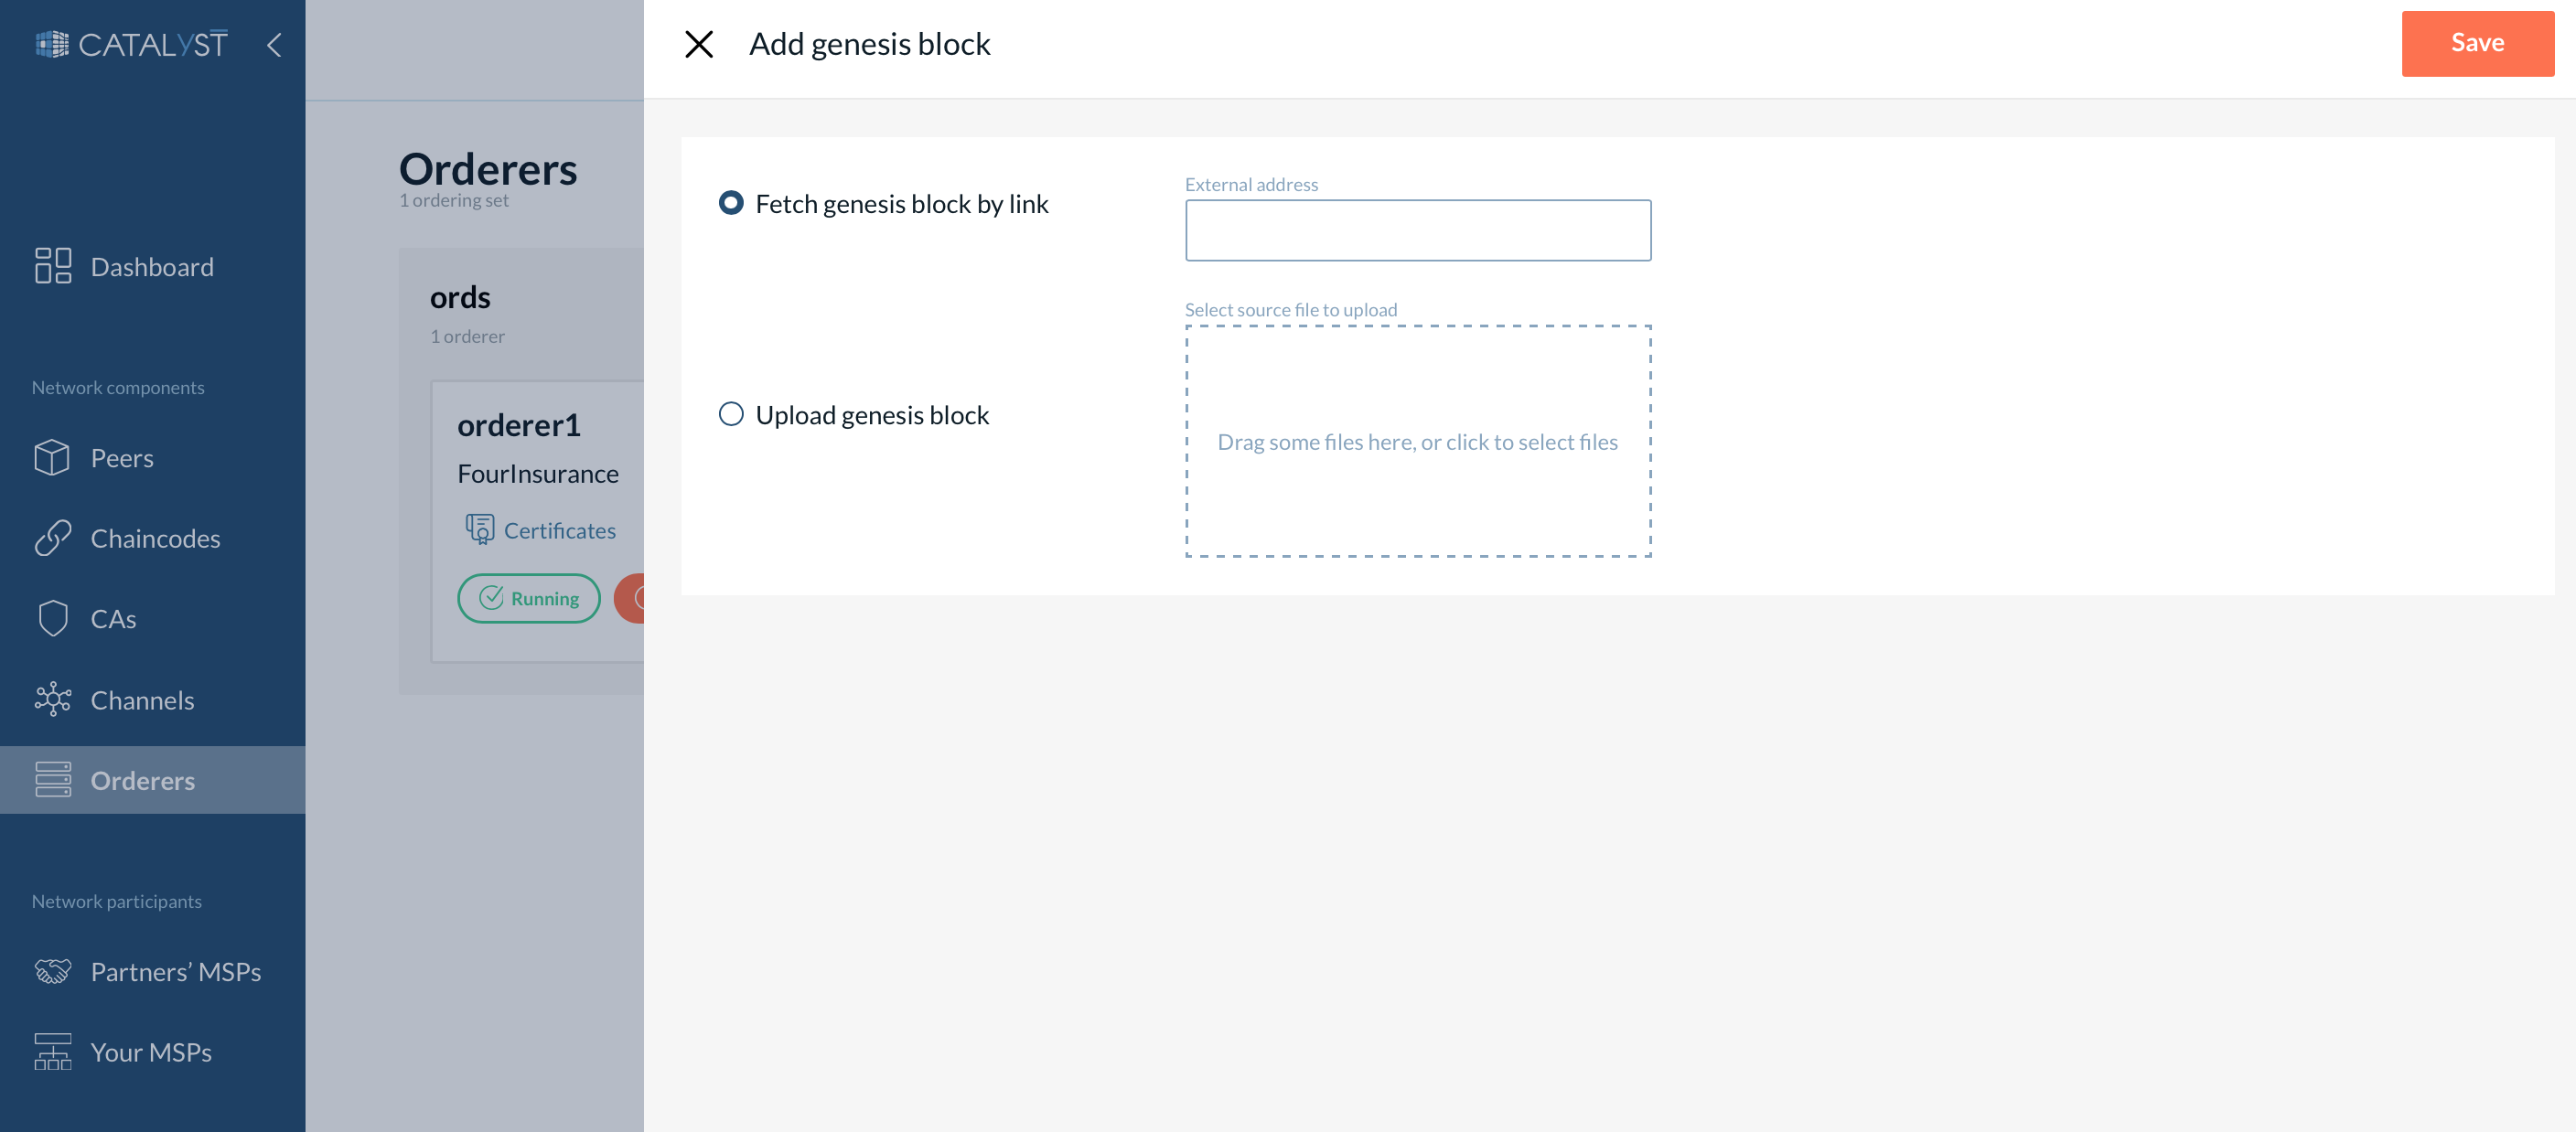
You can choose any of these options according to your use case. In both scenarios, you need to follow the steps described here
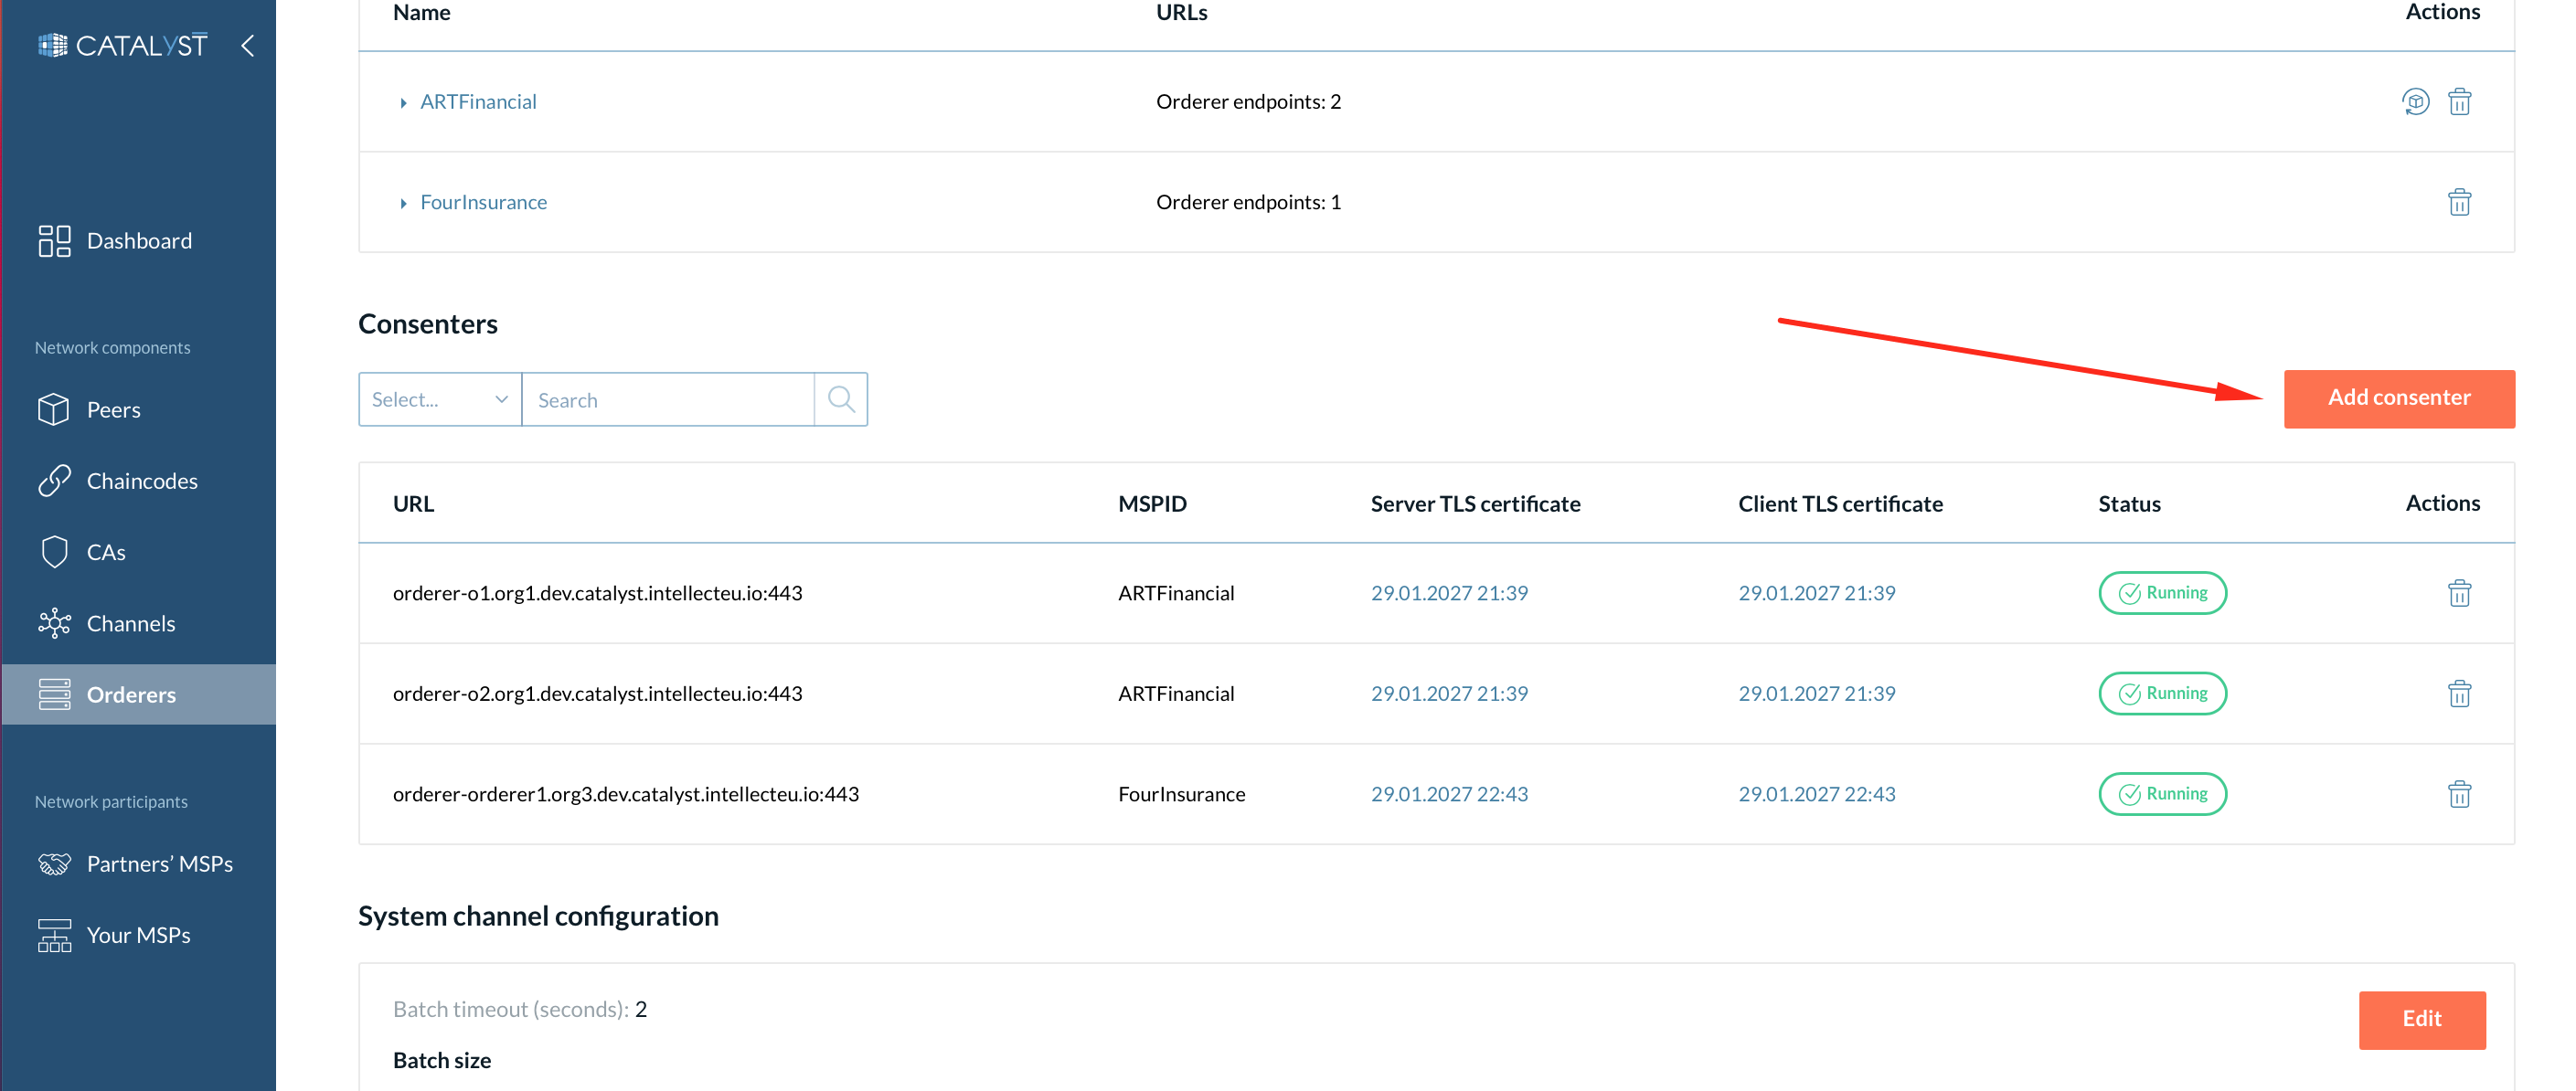
Add Another Consenter to a System Channel
If you are already a network member (an orderer organization) and you want to add another orderer to the system channel, follow these steps:
-
Create an orderer
-
Add a new orderer to the consenter set on the system channel at the Raft page manually (see screenshot below).
-
Note: This action should be performed before adding a genesis block.
-
-
Add a genesis block. Two options are available:
-
Fetch a genesis block. In this case, you need to provide a link to any active orderer from a system channel. After that, your ordering node will fetch the last system channel’s block by the provided link.
-
Upload a genesis block. If you cannot fetch a genesis block from another orderer for any reason, you can download the last system channel’s block and upload it to a new ordering node. After uploading this genesis block to your orderer, it will sync with other consenters from the system channel.
-
| Please ensure that you’ve added your new consenter to the consenter set (step 1) before fetching the genesis block. If you do not add a new orderer to the consenter set, you will be able to fetch the genesis block by this orderer and even add it to the application channel, but it will not be working properly. |
Once the ordering node is added to the system channel and successfully fetches a genesis block, you can add it to the application channel as a consenter.
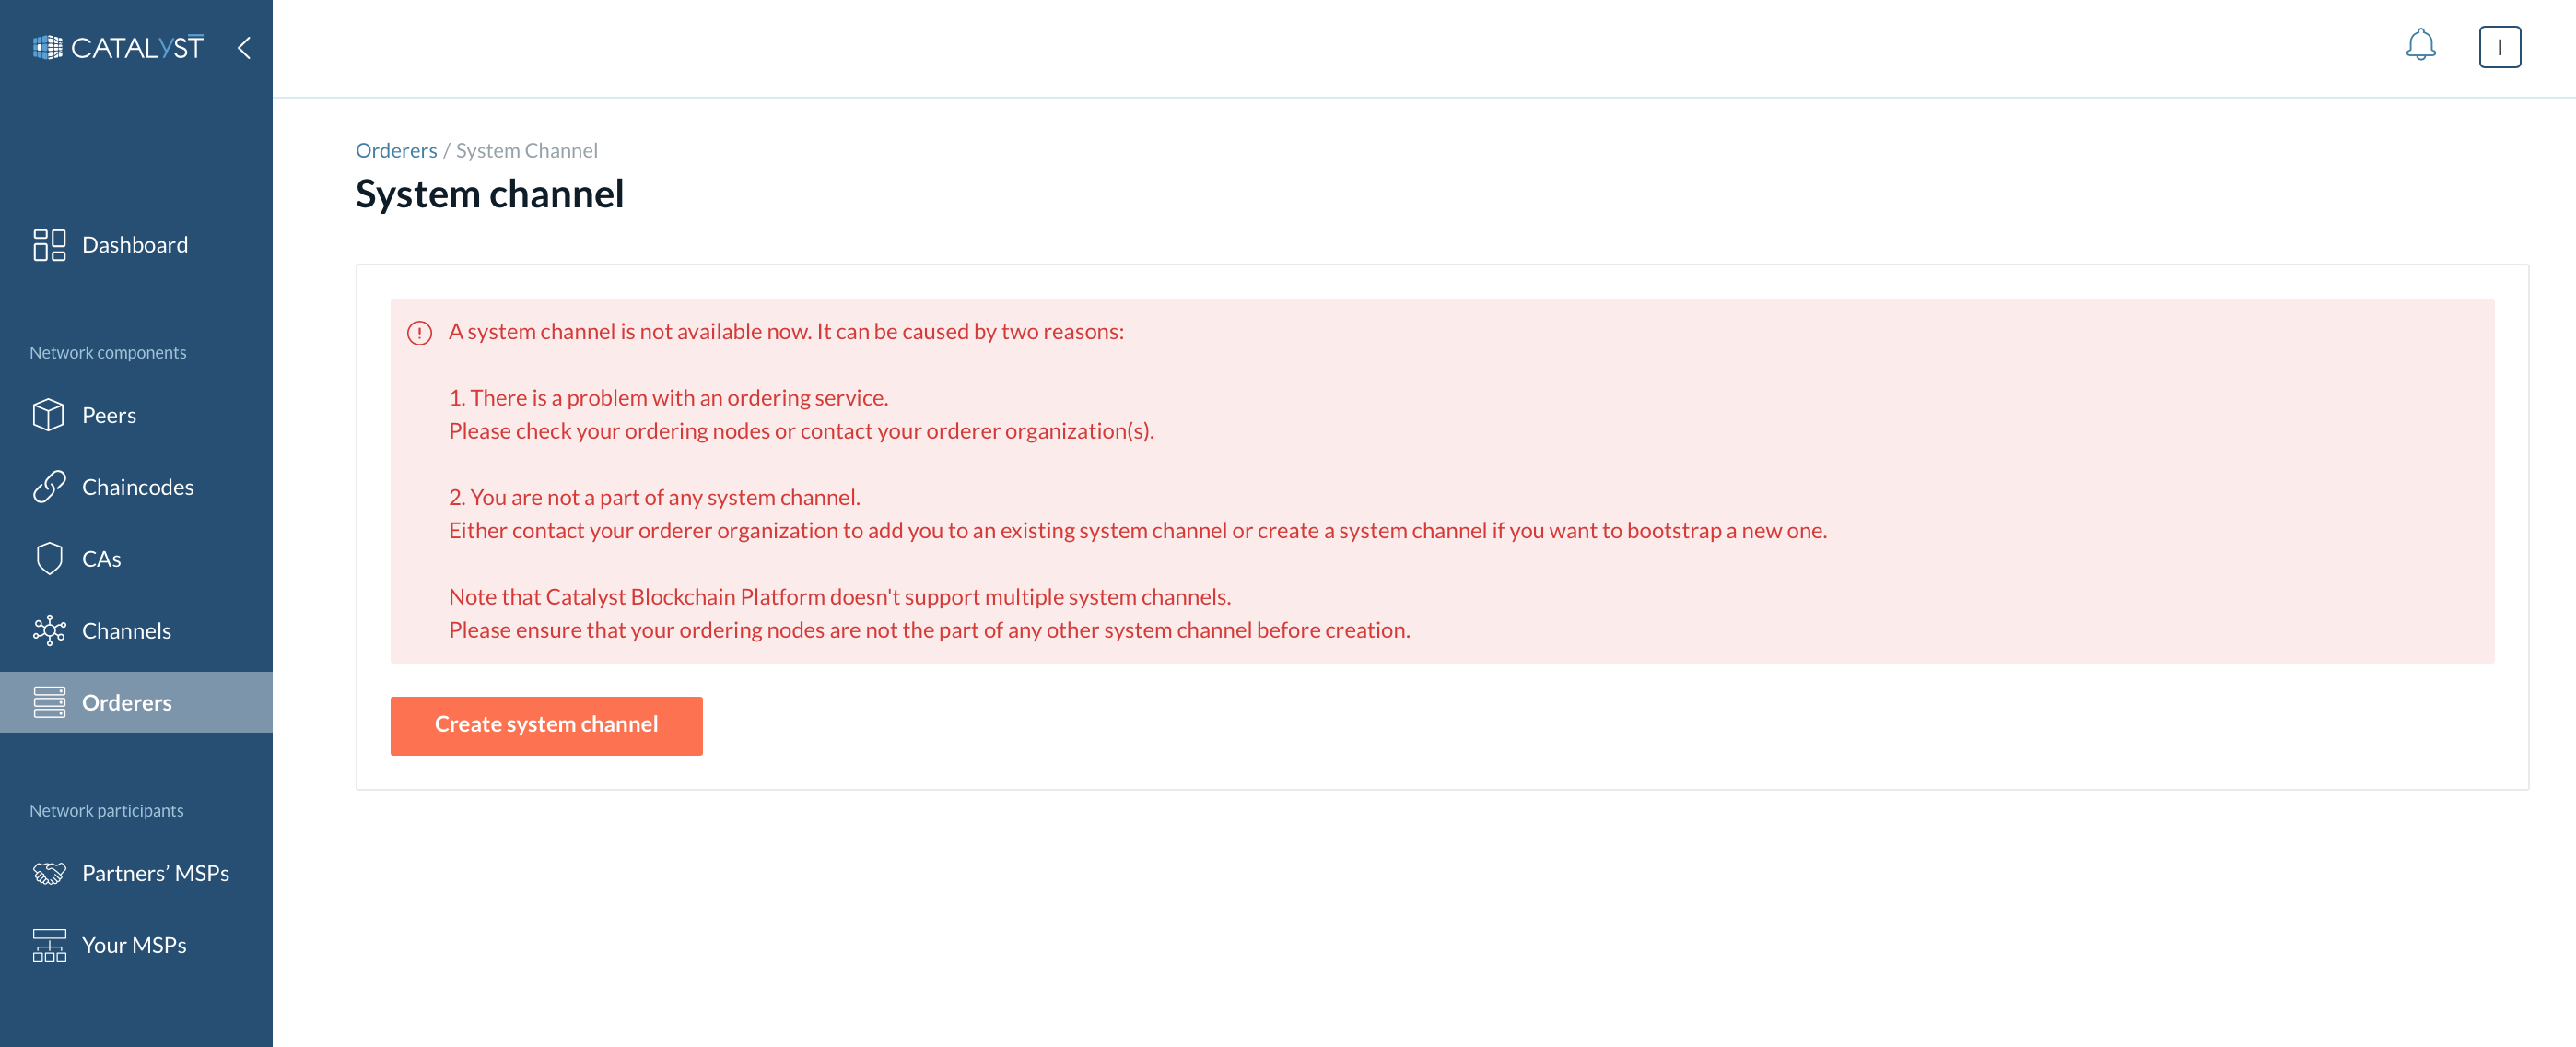
How to Create a System Channel?
| You need to create a system channel only if you bootstrap the network. Please refer to this section. if you want to join an existing one. |
| Catalyst Blockchain Manager supports only one system channel. Your organization cannot be a part of multiple system channels. |
To create a system channel, go to the Orderers page, click the “System channel” button, and click “Create system channel.”
|
Please read the Build a network section before creating a system channel. |
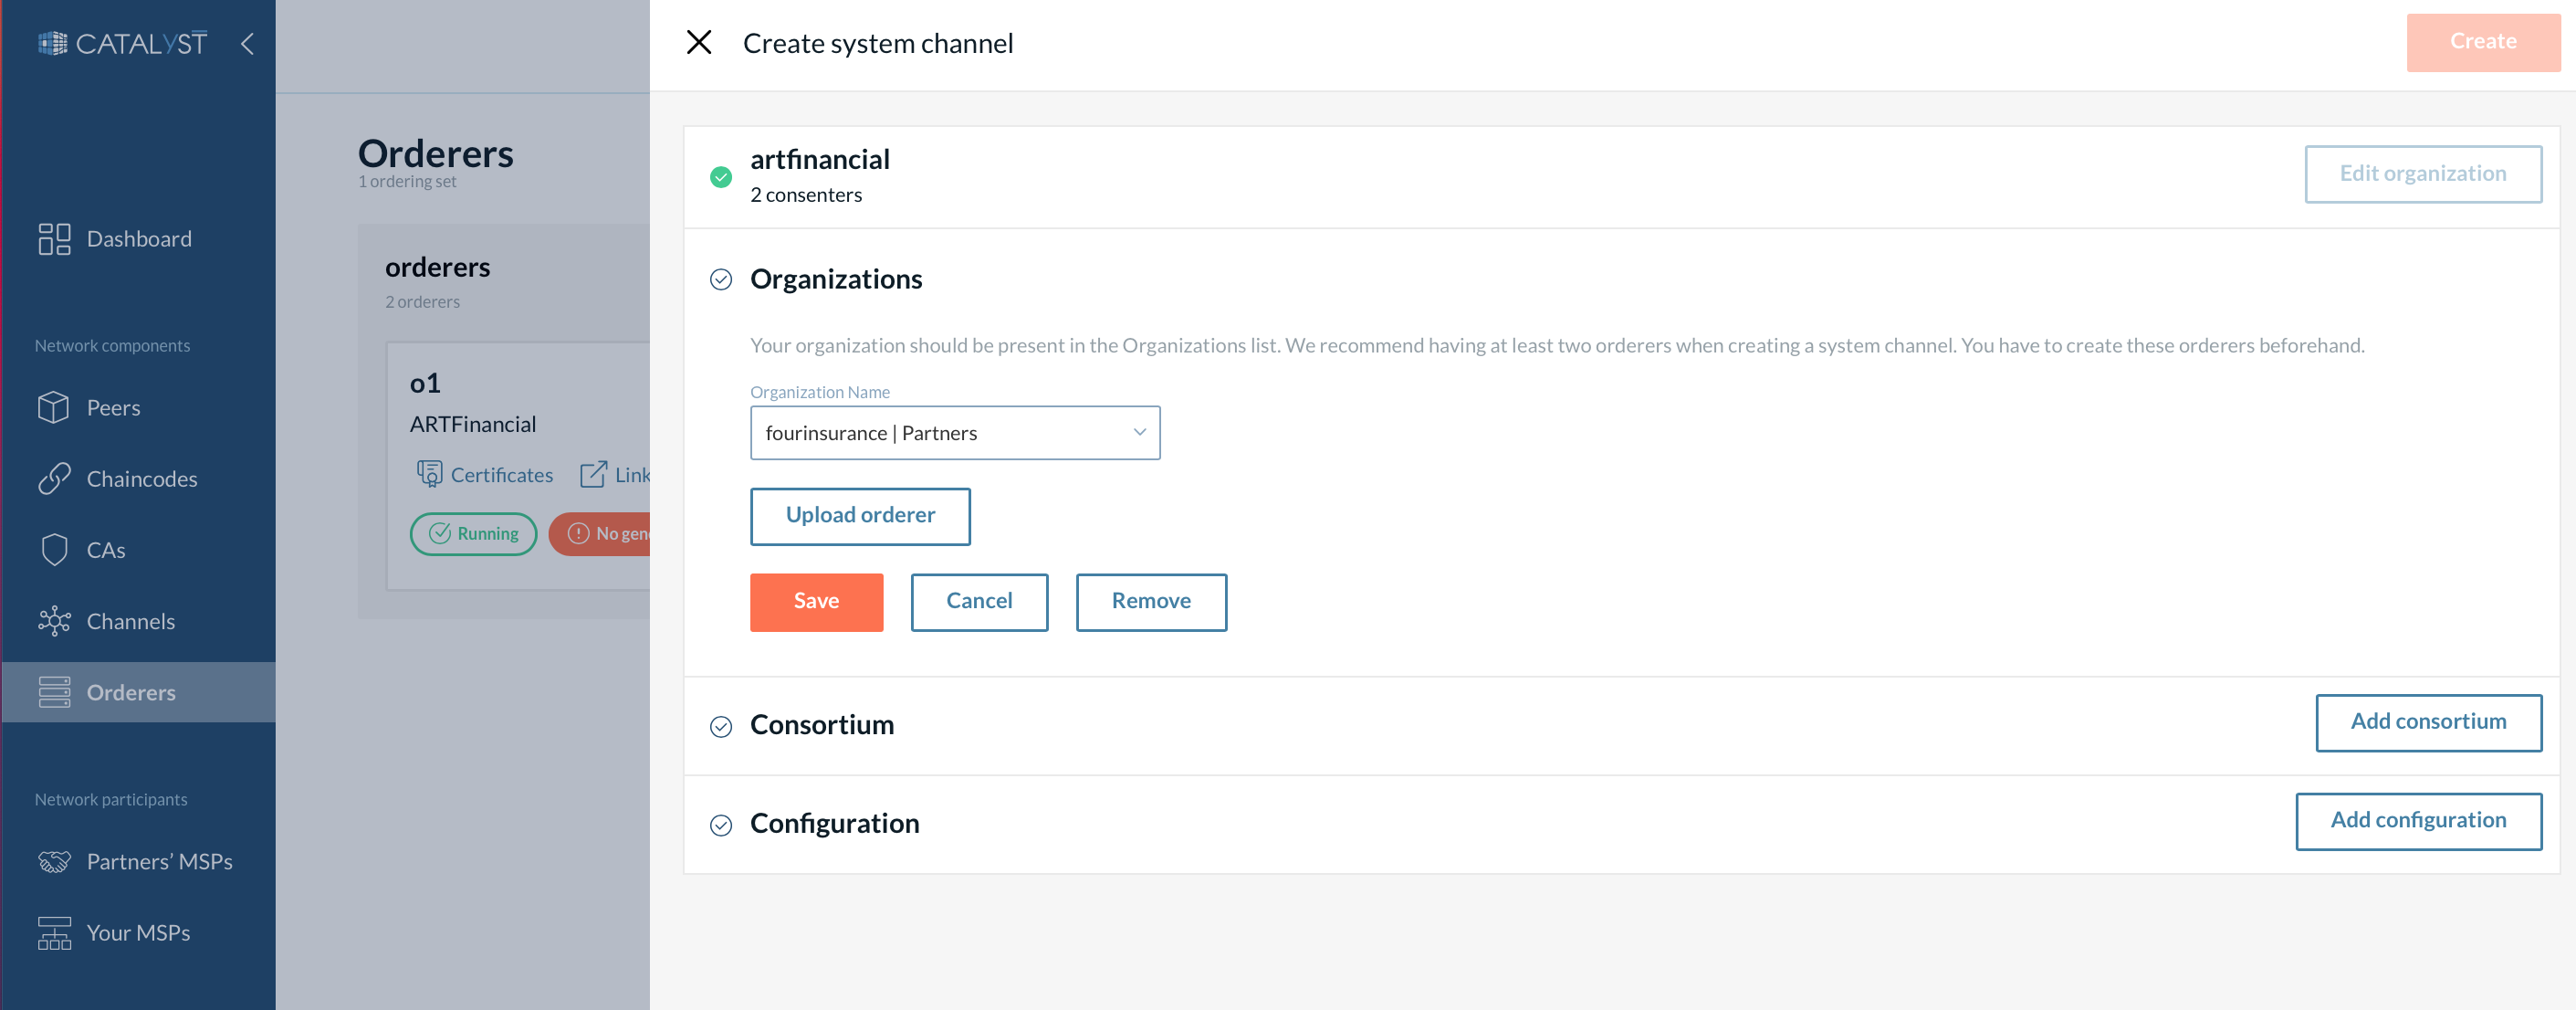
You need to provide the following information.
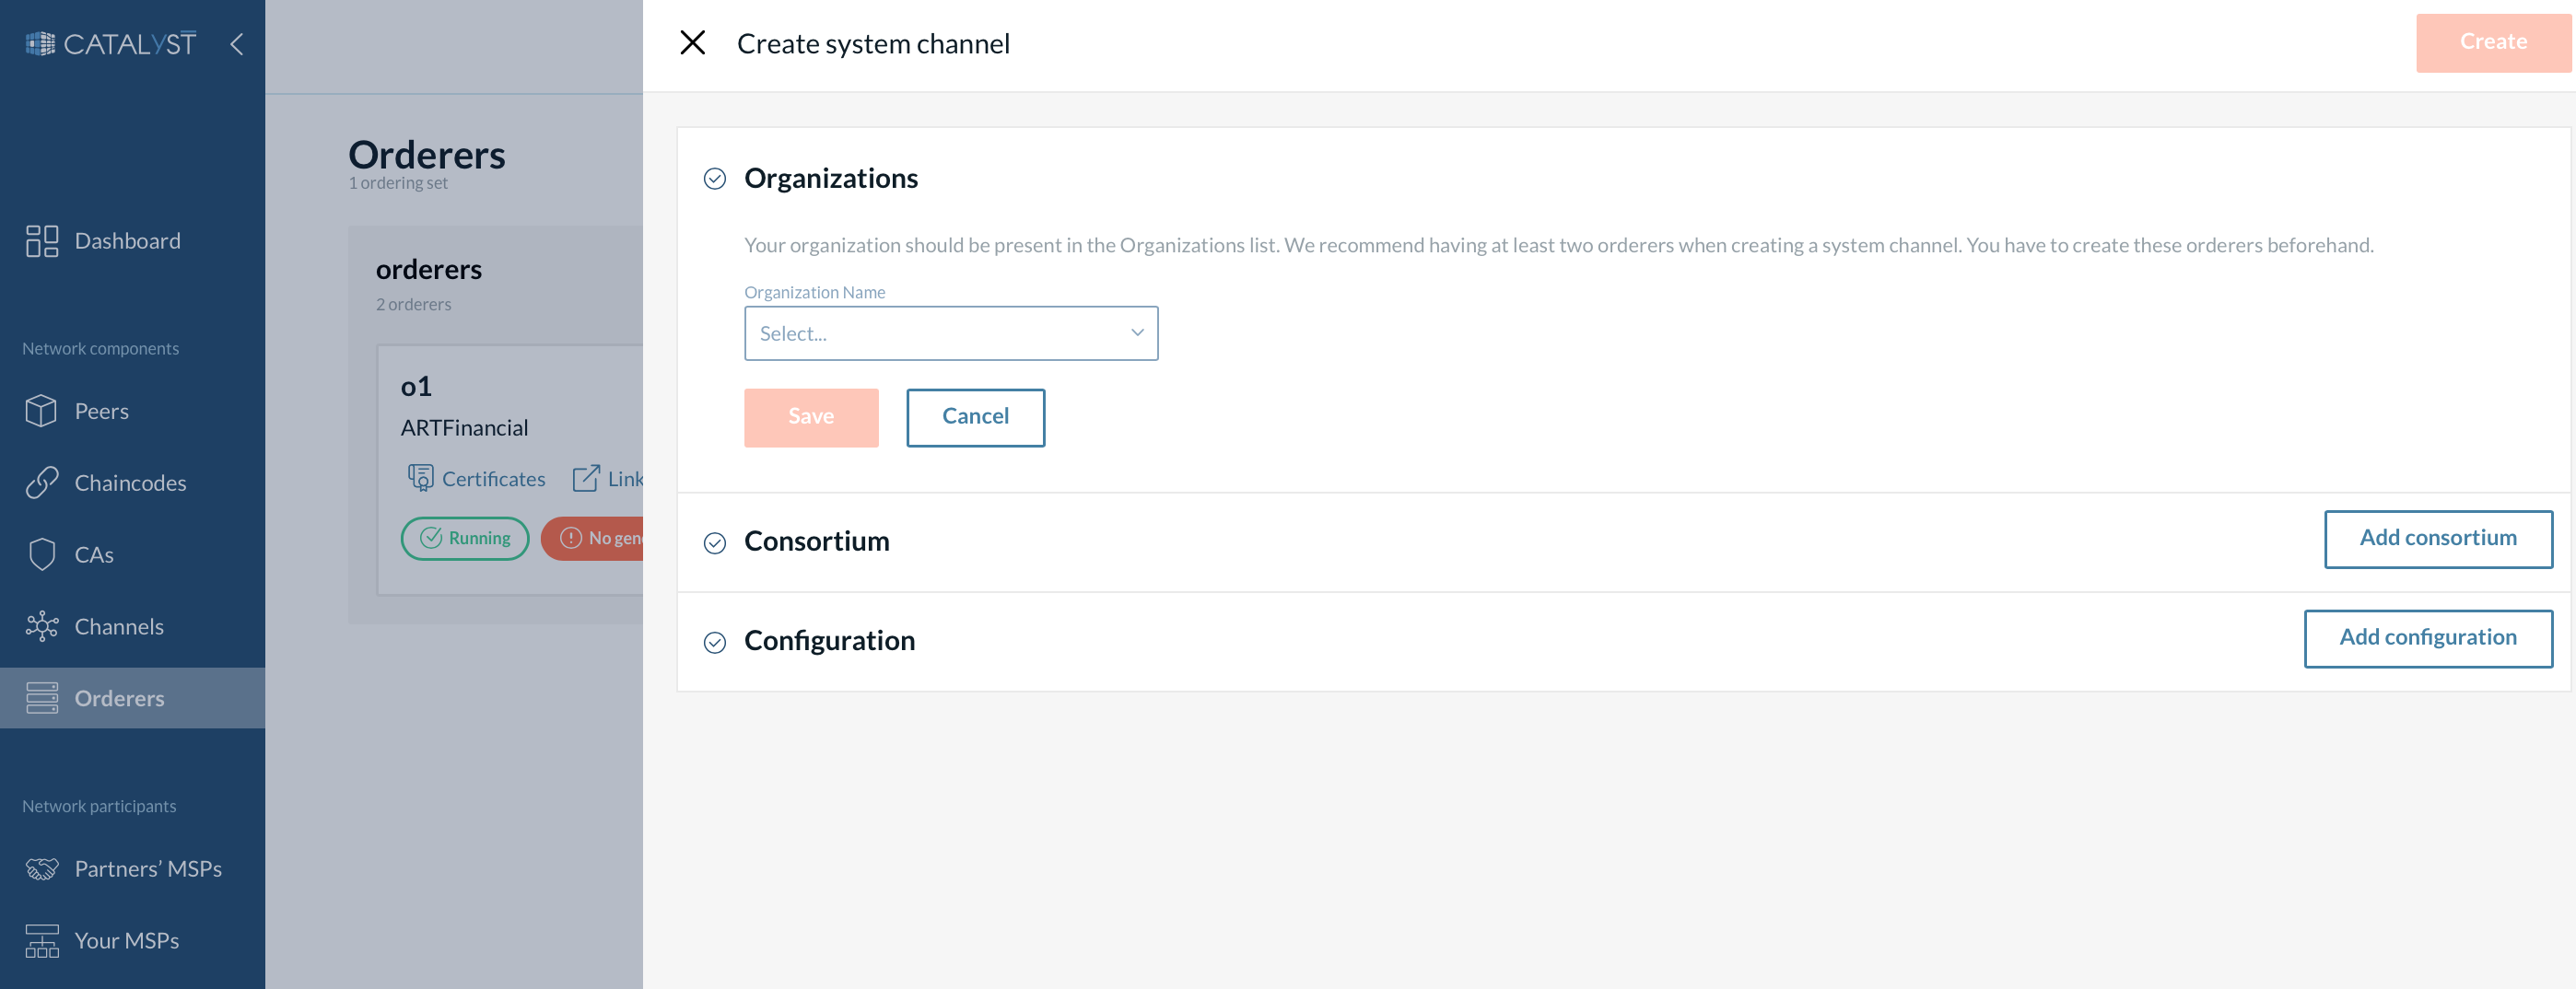
Add orderer organizations
Orderer organizations represent the list of organizations contributing ordering nodes to the ordering service.
You can add only your organization now and other organizations later, or you can add all the organizations while creating a system channel. In any case, your organization should be present in the orderer organizations list.
To add your organization, you should select its MSP and orderers.
When adding your organization, you can select as many orderers as you want (you need to create these ordering nodes before creating the system channel).
| You will be able to add more ordering nodes after the system channel creation. |
.png)
You can add another organization to the orderer organizations list by selecting its MSP and uploading its orderer’s JSON profile (see the screenshot below). Only one orderer can be uploaded for each organization in this case.
| To be able to add an organization, this organization’s MSP has to be added to the partners list. |
|
Orderer’s JSON profile should be exported (see the screenshot below) by the organization you want to add as a member and sent to you via an external messaging channel 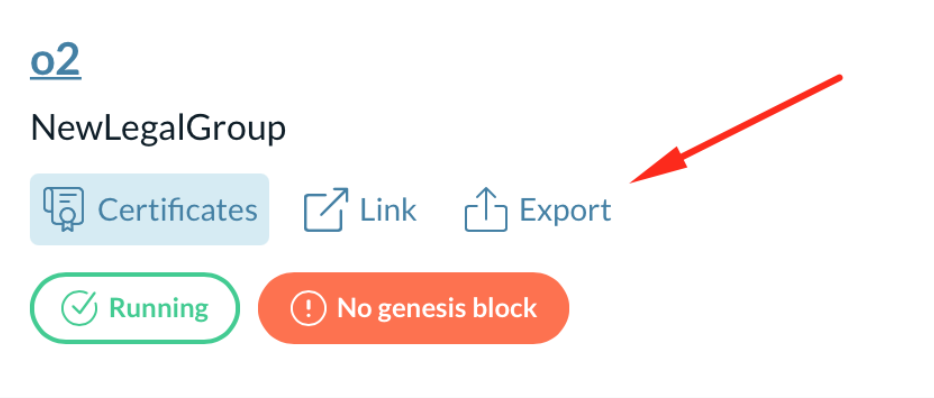
You can skip an orderer uploading if the organization is going to use an external orderer instead. |
| If you are adding other organizations while creating the system channel, your organization needs to have more orderers than the number of organizations you are going to add. If this occurs, a quorum will not be achieved. |
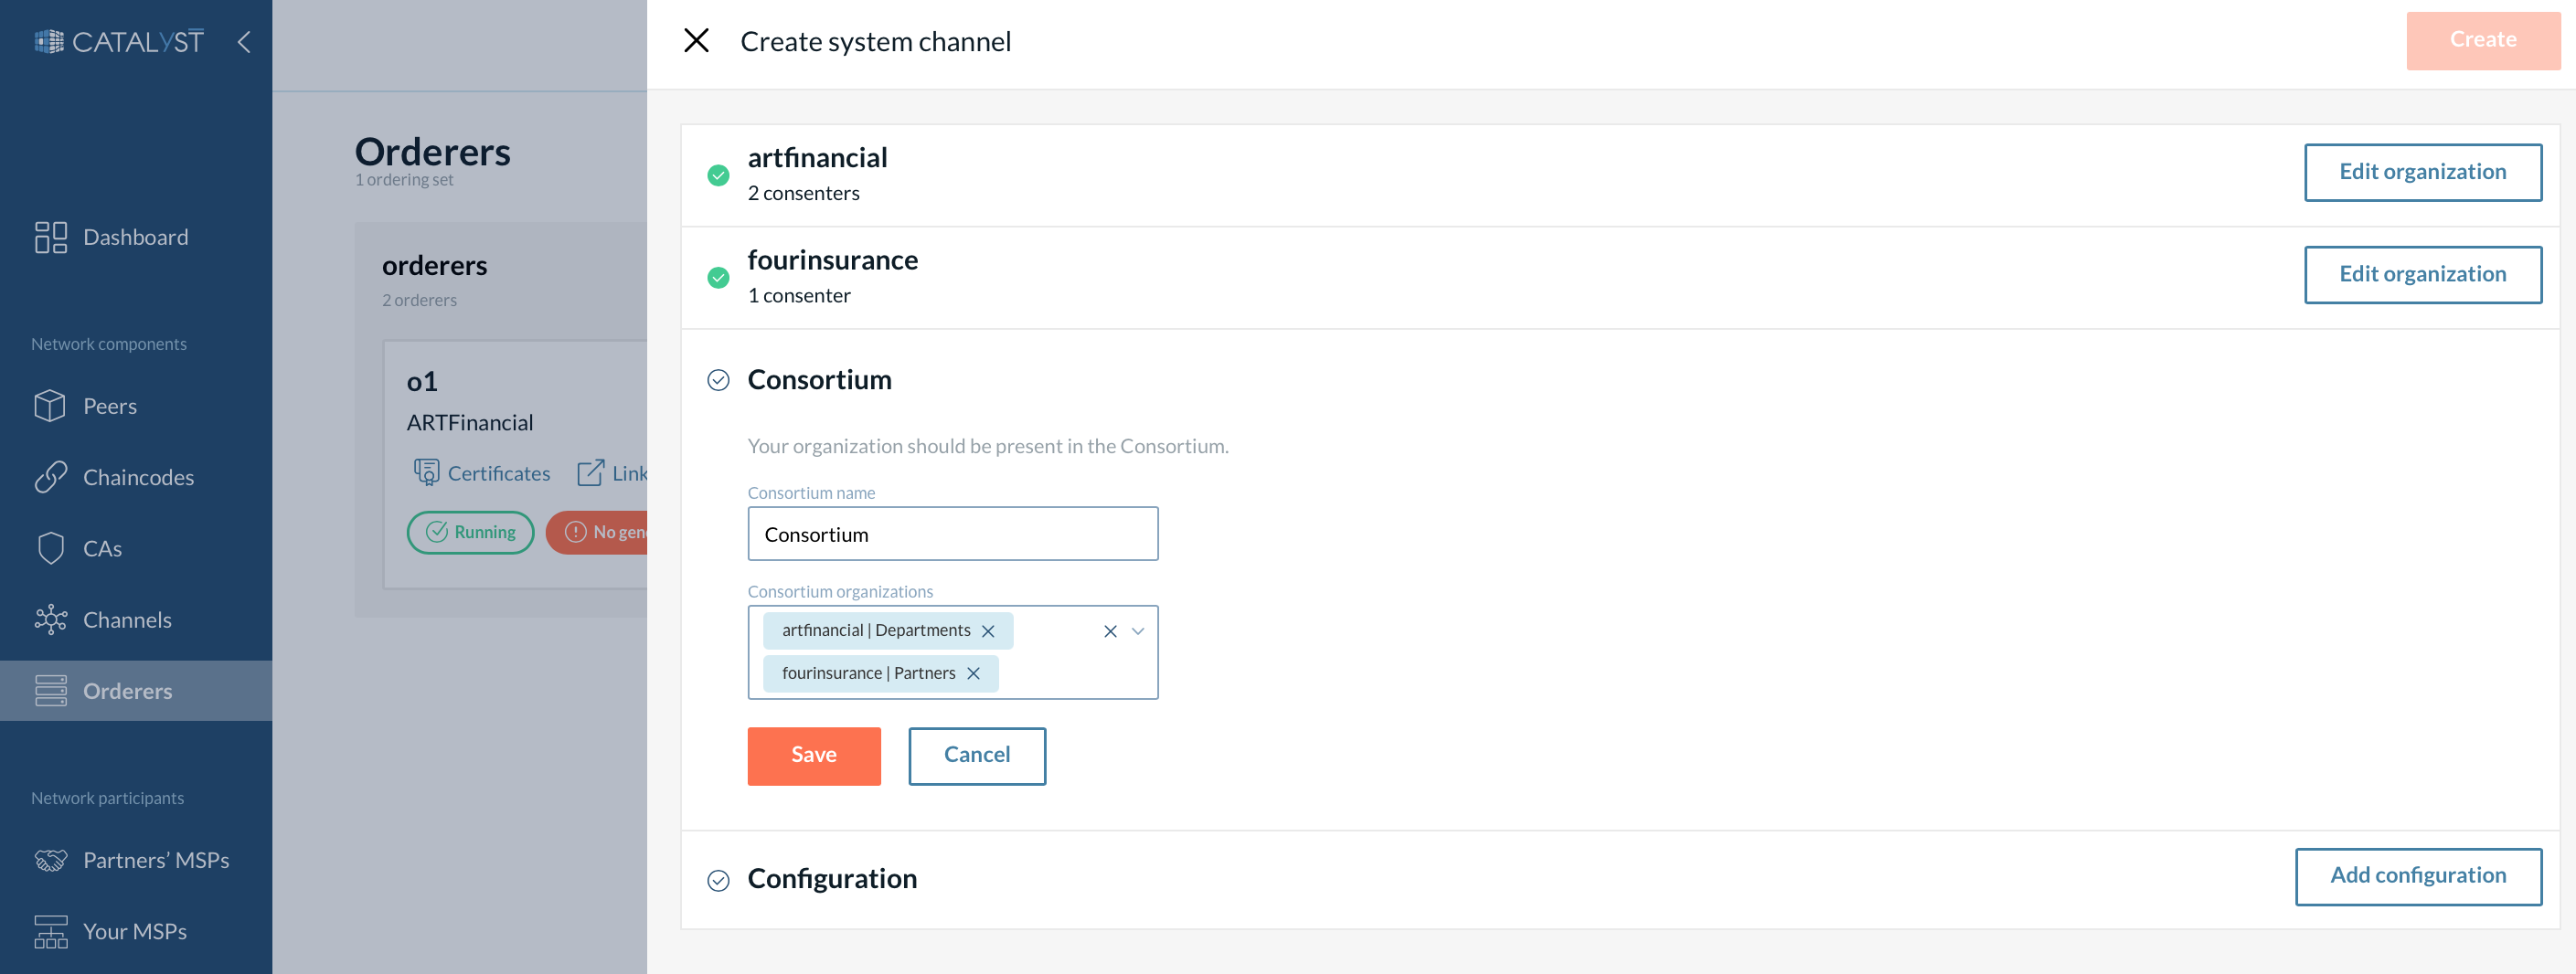
Create a Consortium
The consortium is the list of organizations that can create application channels and be added to the channels upon its creation.
You can add a few organizations to a consortium list or add other organizations later, as described here. In any case, your organization must be added to the consortium.
| To add an organization, its MSP must be added to the “Partners” list first. |
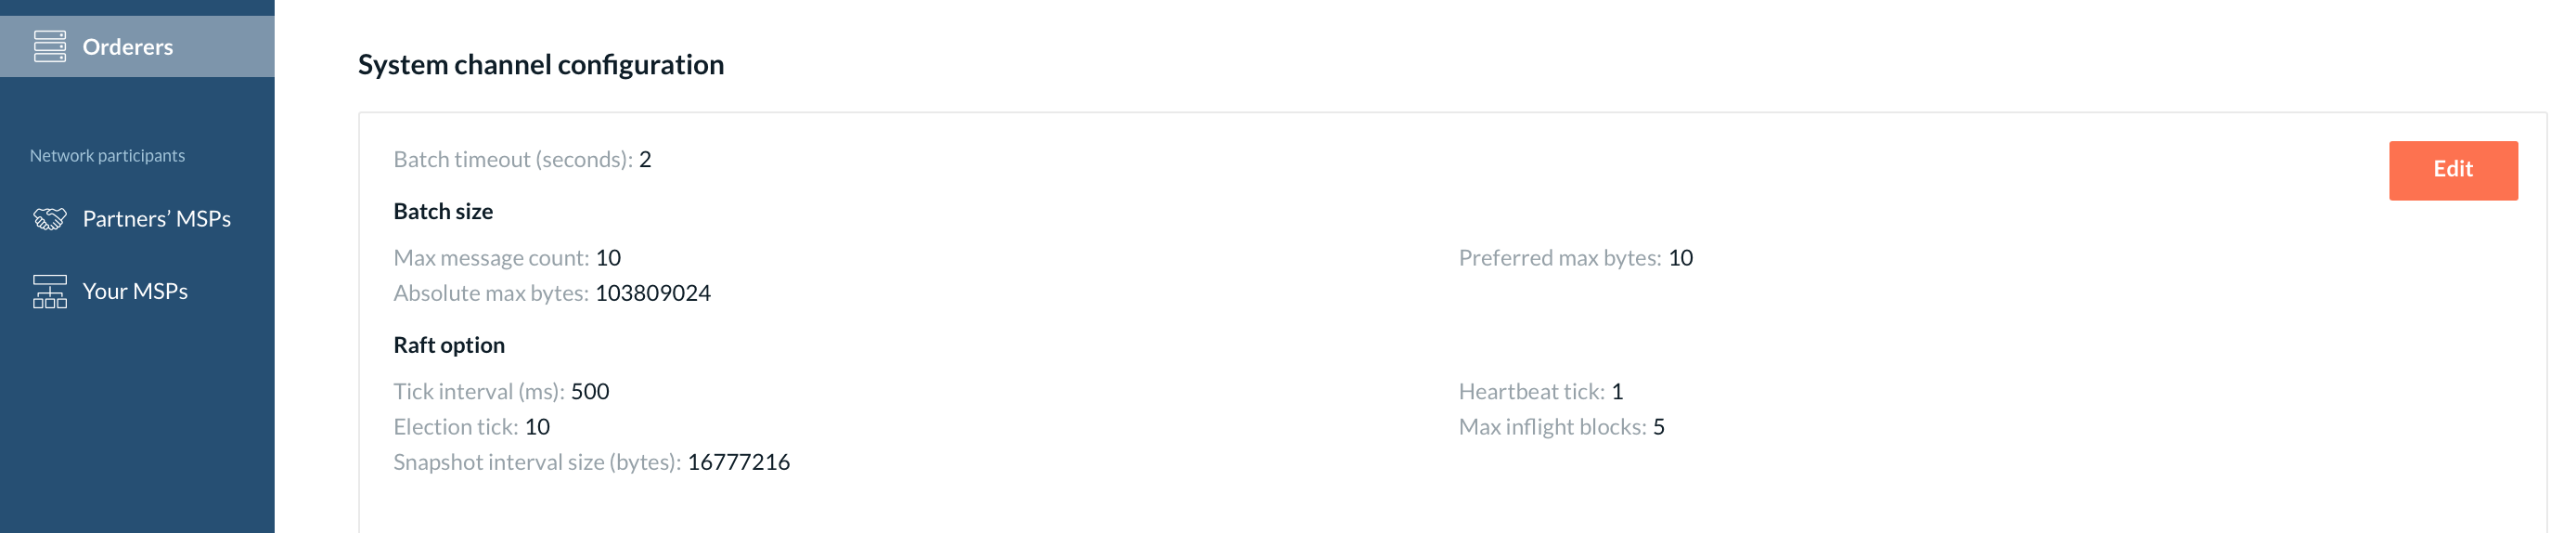
Add the system channel configuration
In this section, you have to configure parameters for a system channel:
-
Define the batch timeout and batch size. Please refer to this section of the Hyperledger Fabric documentation to learn more about these parameters. All fields are pre-populated with the recommended settings that can be modified.
-
Provide the Raft options such as the tick interval or max inflight blocks. To know more about these configurations, please check Hyperledger Fabric Raft configuration docs.
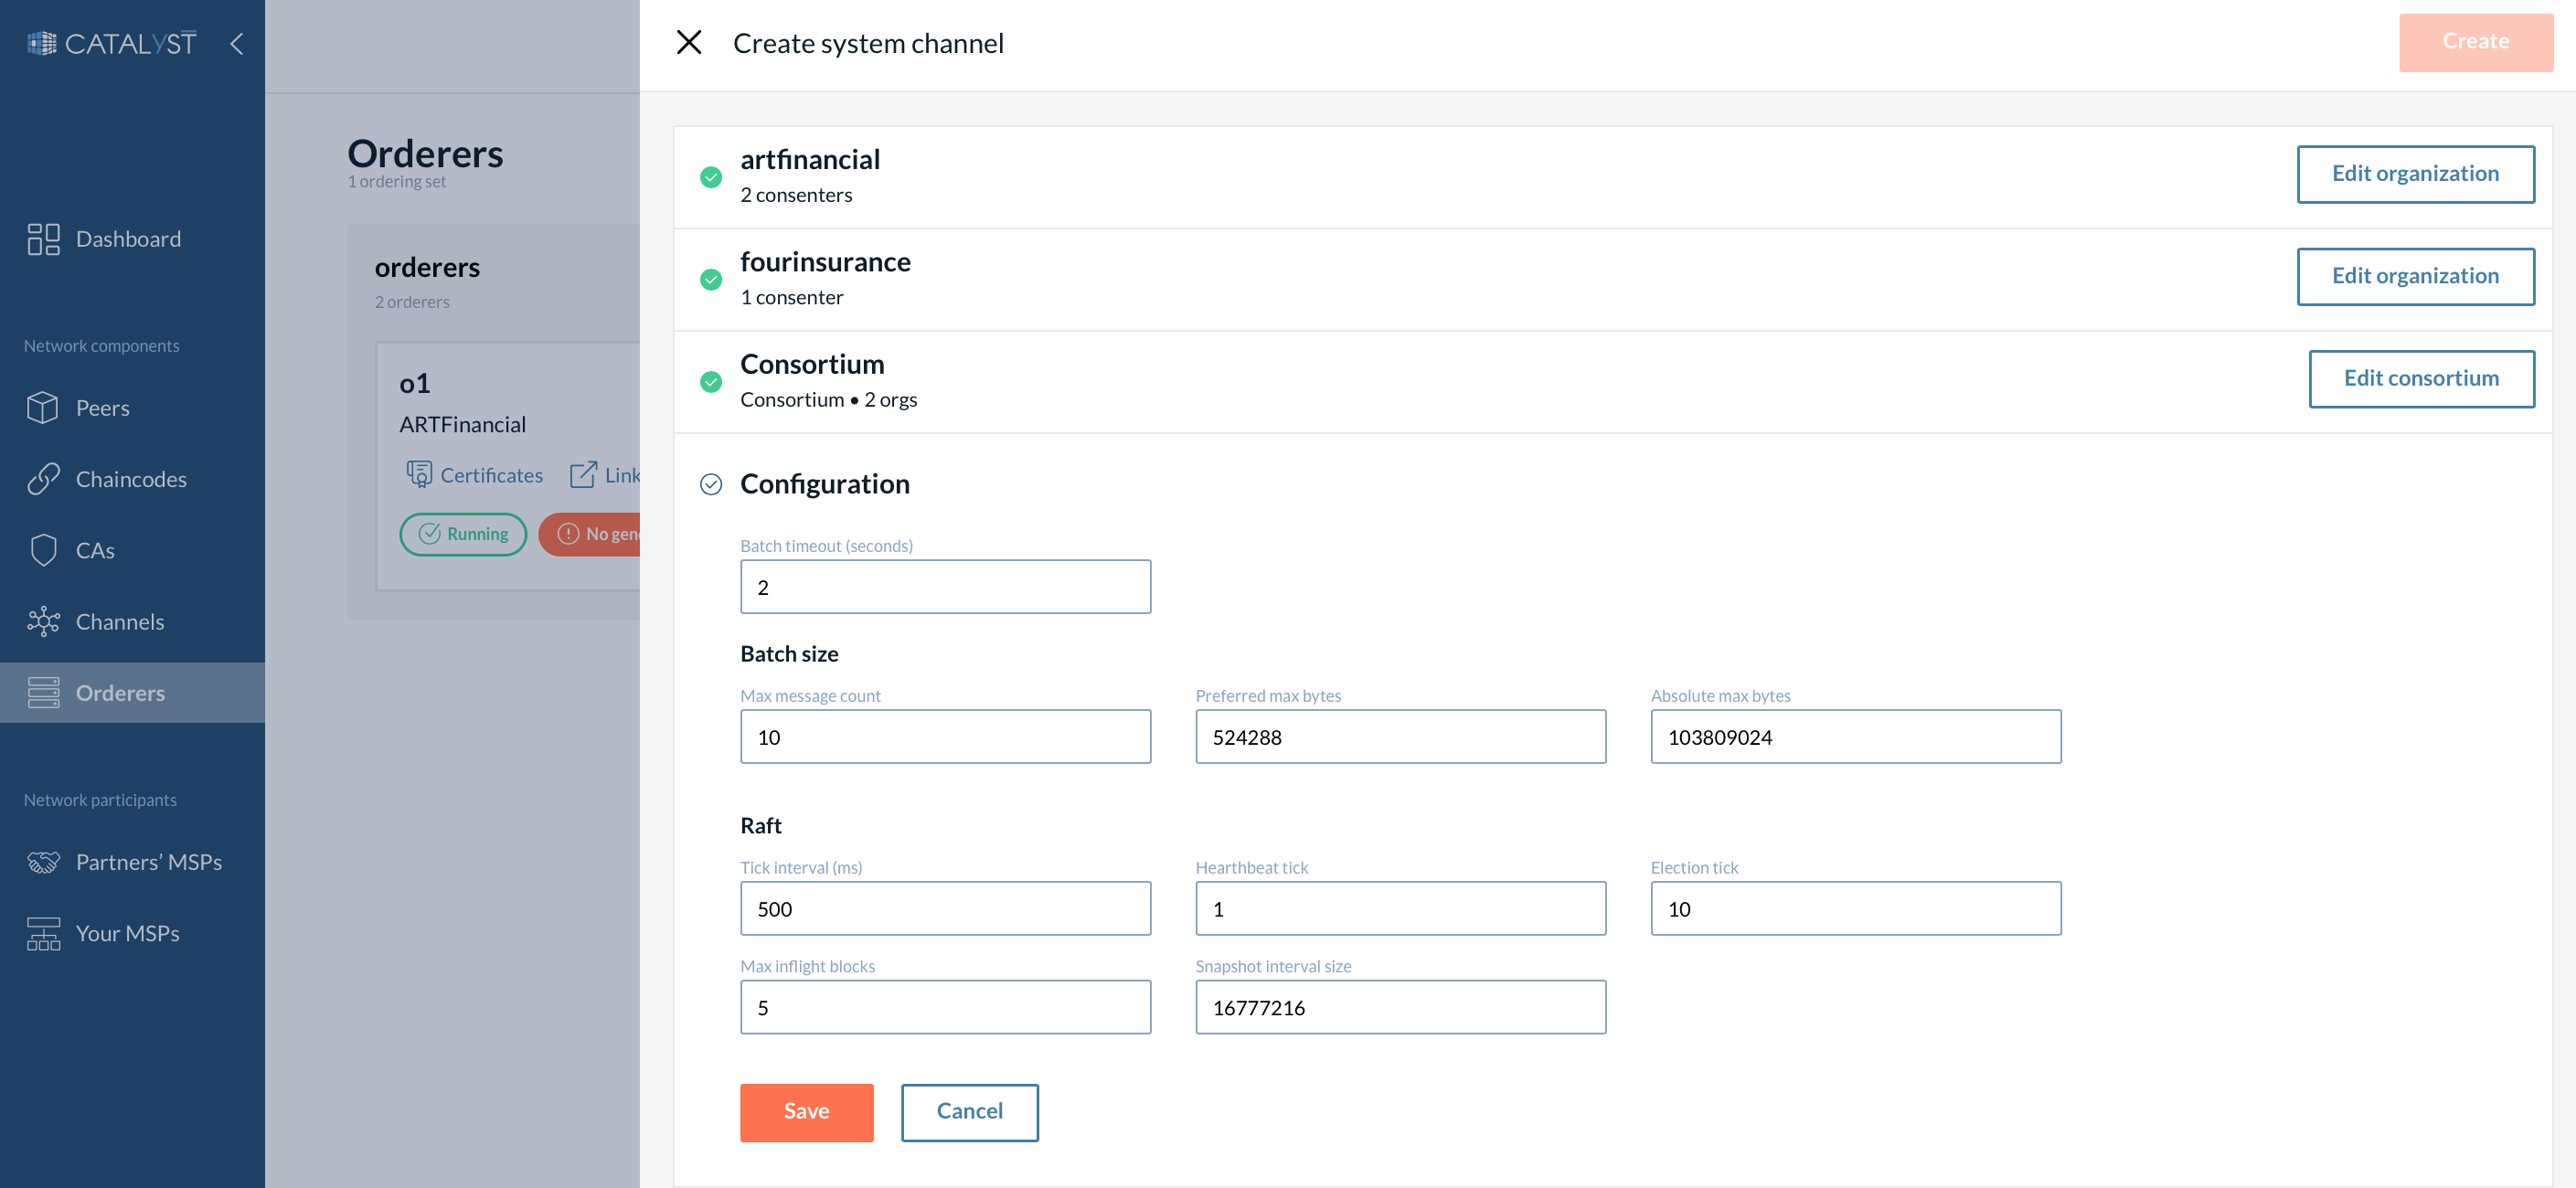
| These values will be inherited by each application channel you will create later. It can be edited later on a system channel and application channels. |
| After clicking on the “Create” button, you need to wait before ordering nodes to get in sync. Then refresh the System channel page. When the system channel is successfully bootstrapped, you will see the details described in the next section. |
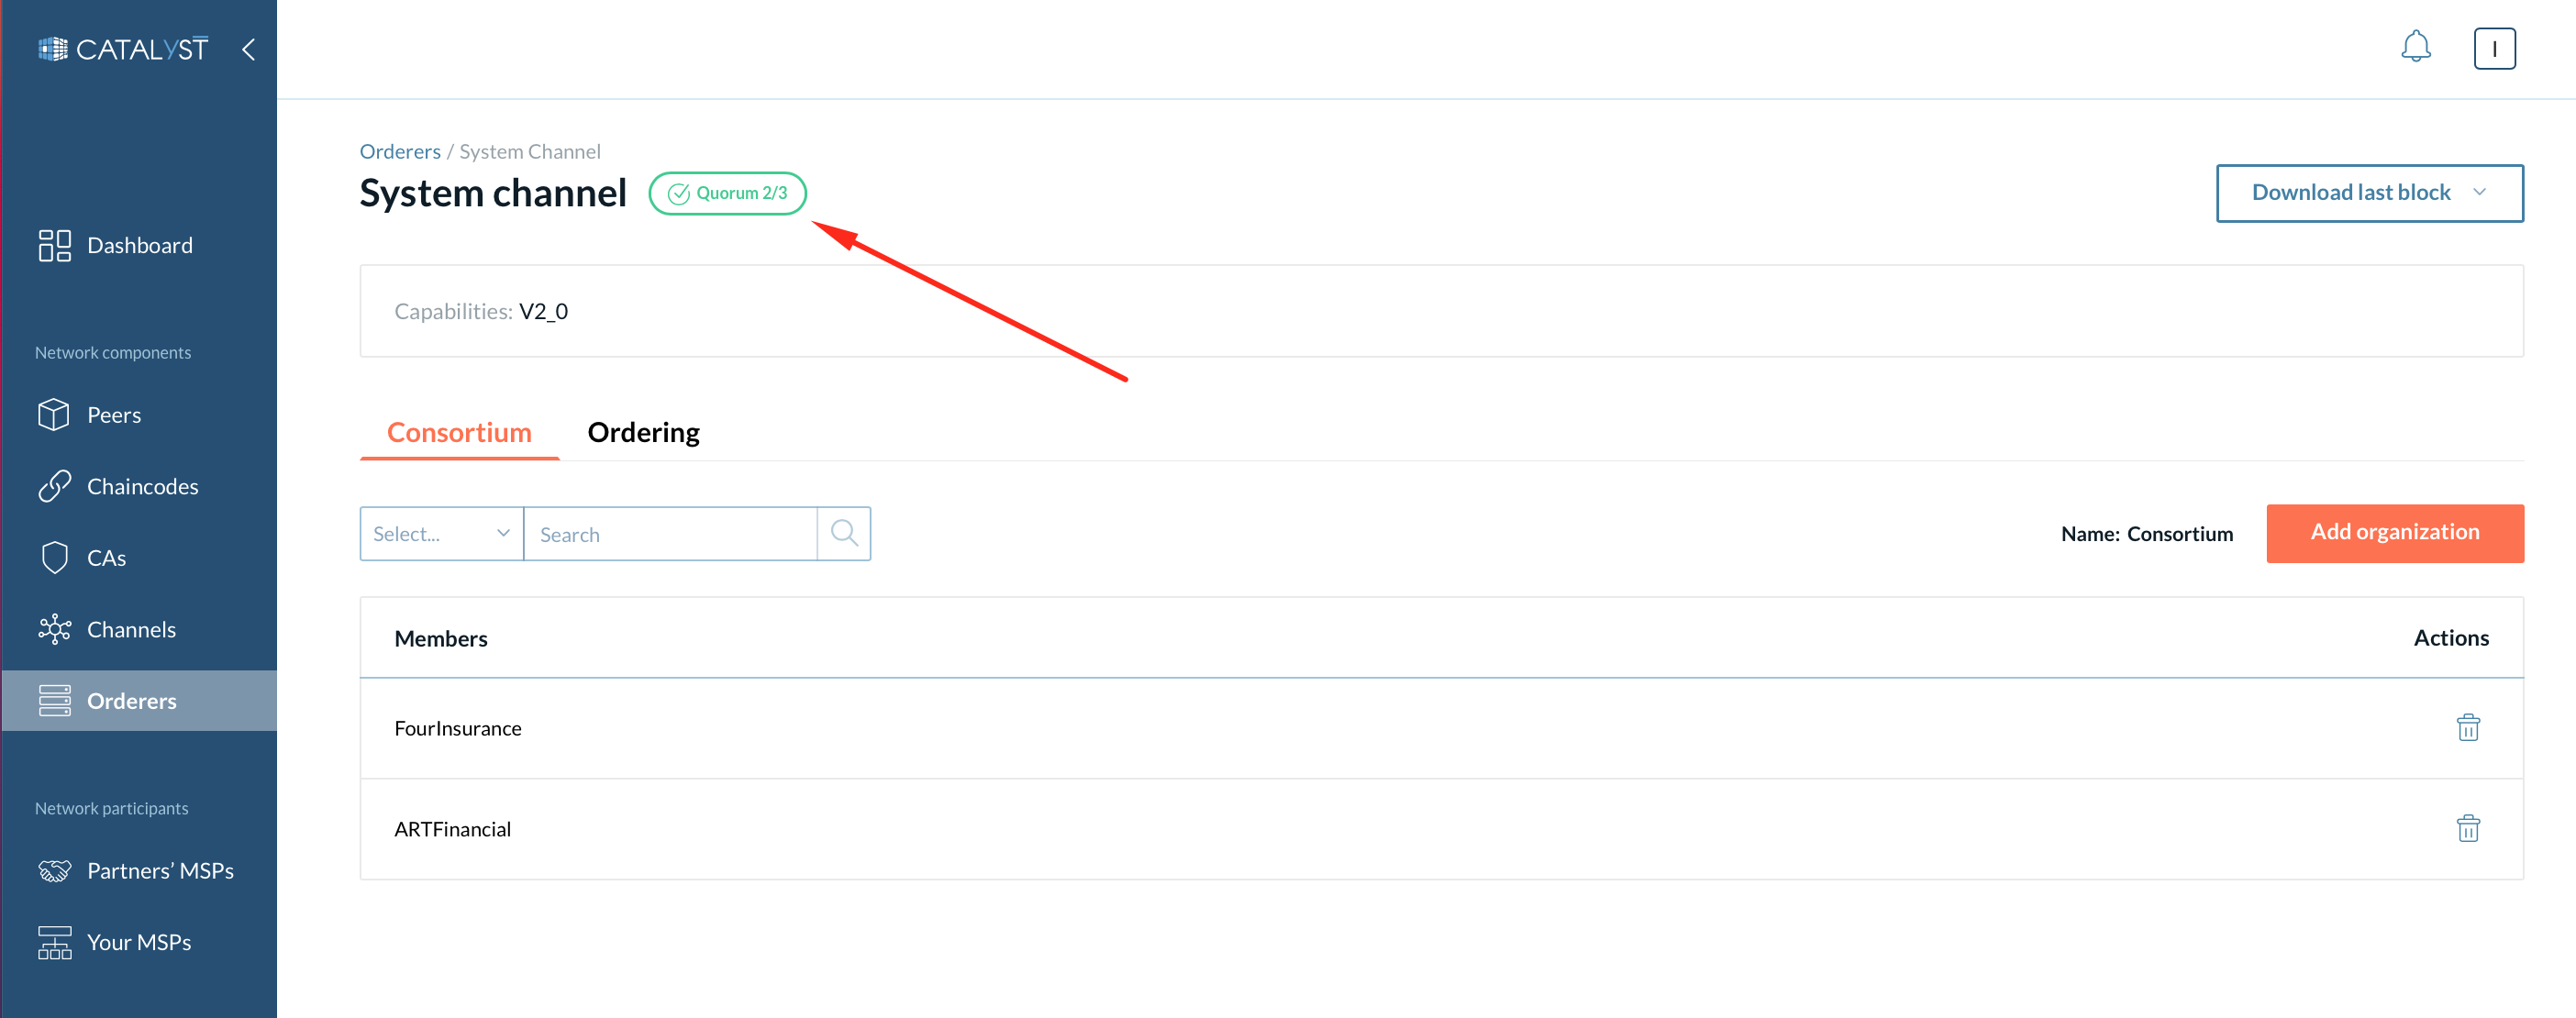
System channel details
By clicking on the System channel button, you can view the system channel you are a member of.
Status
In the upper part of the page, you can check the system channel status. The numbers (X/Y) display how many active orderers (X) are among the consenters’ cluster size (Y).
-
If a quorum is achieved, you will see a green label.
-
If there is no quorum, you will see a red label.
| You need at least Y/2+1 consenters to be active to achieve a quorum. |
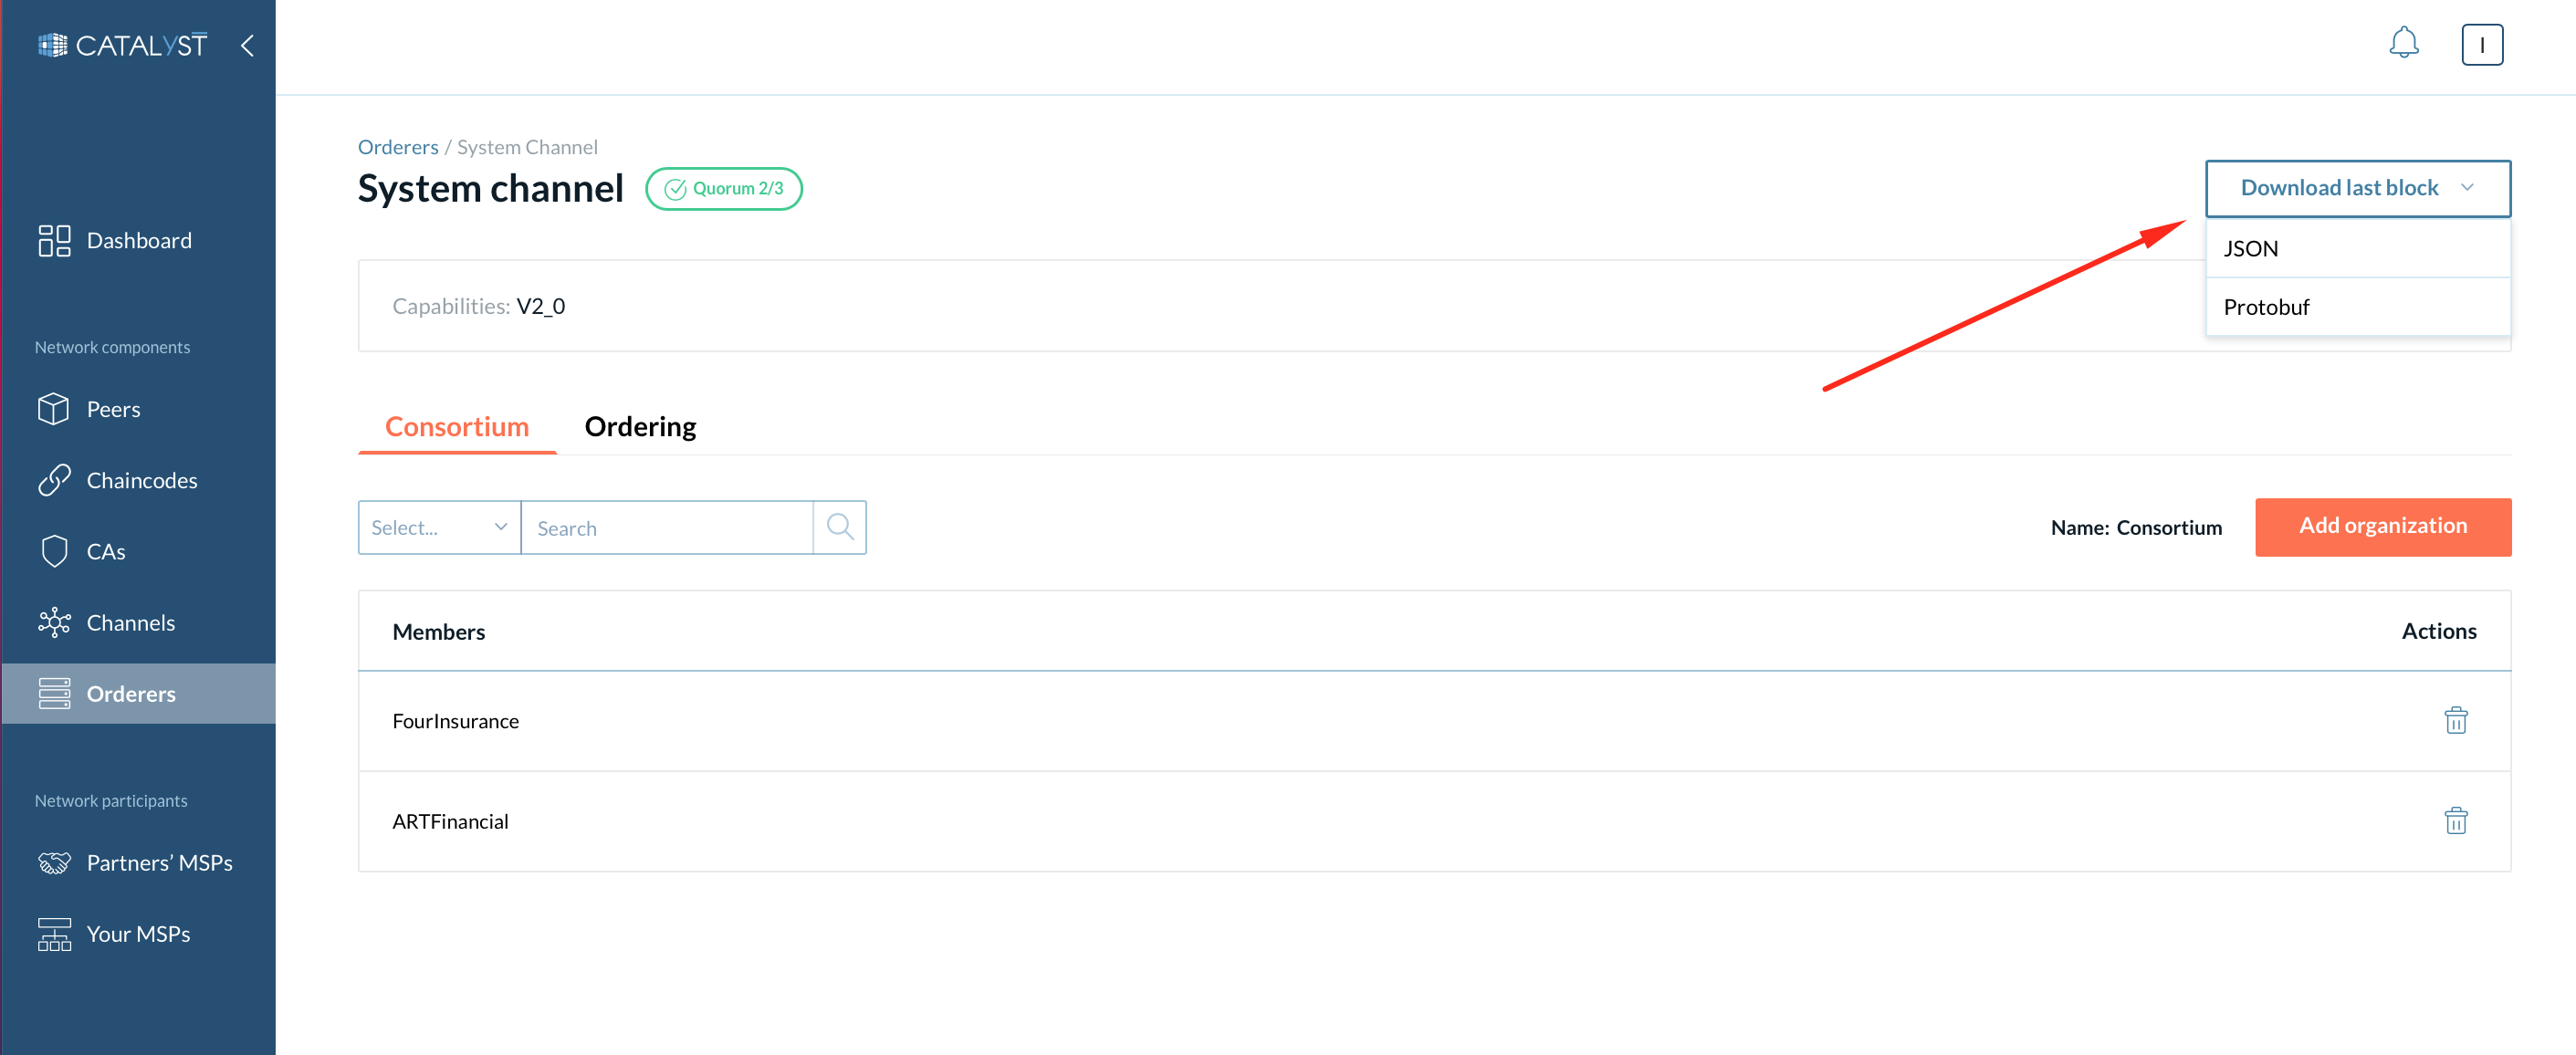
Download last block
Each channel including a system channel contains a chain of blocks with transactions. The last system channel’s block contains the actual configuration of a system channel.
You may need to download the last block in a few cases: e.g. for debugging a problem with a system channel to ensure everything is configured correctly or for uploading the genesis block to another orderer to add it to the system channel.
You can download the last block in JSON or protobuf format. The JSON format is human readable. Meanwhile, the protobuf format is needed to share with another organization for joining its orderer to the system channel.
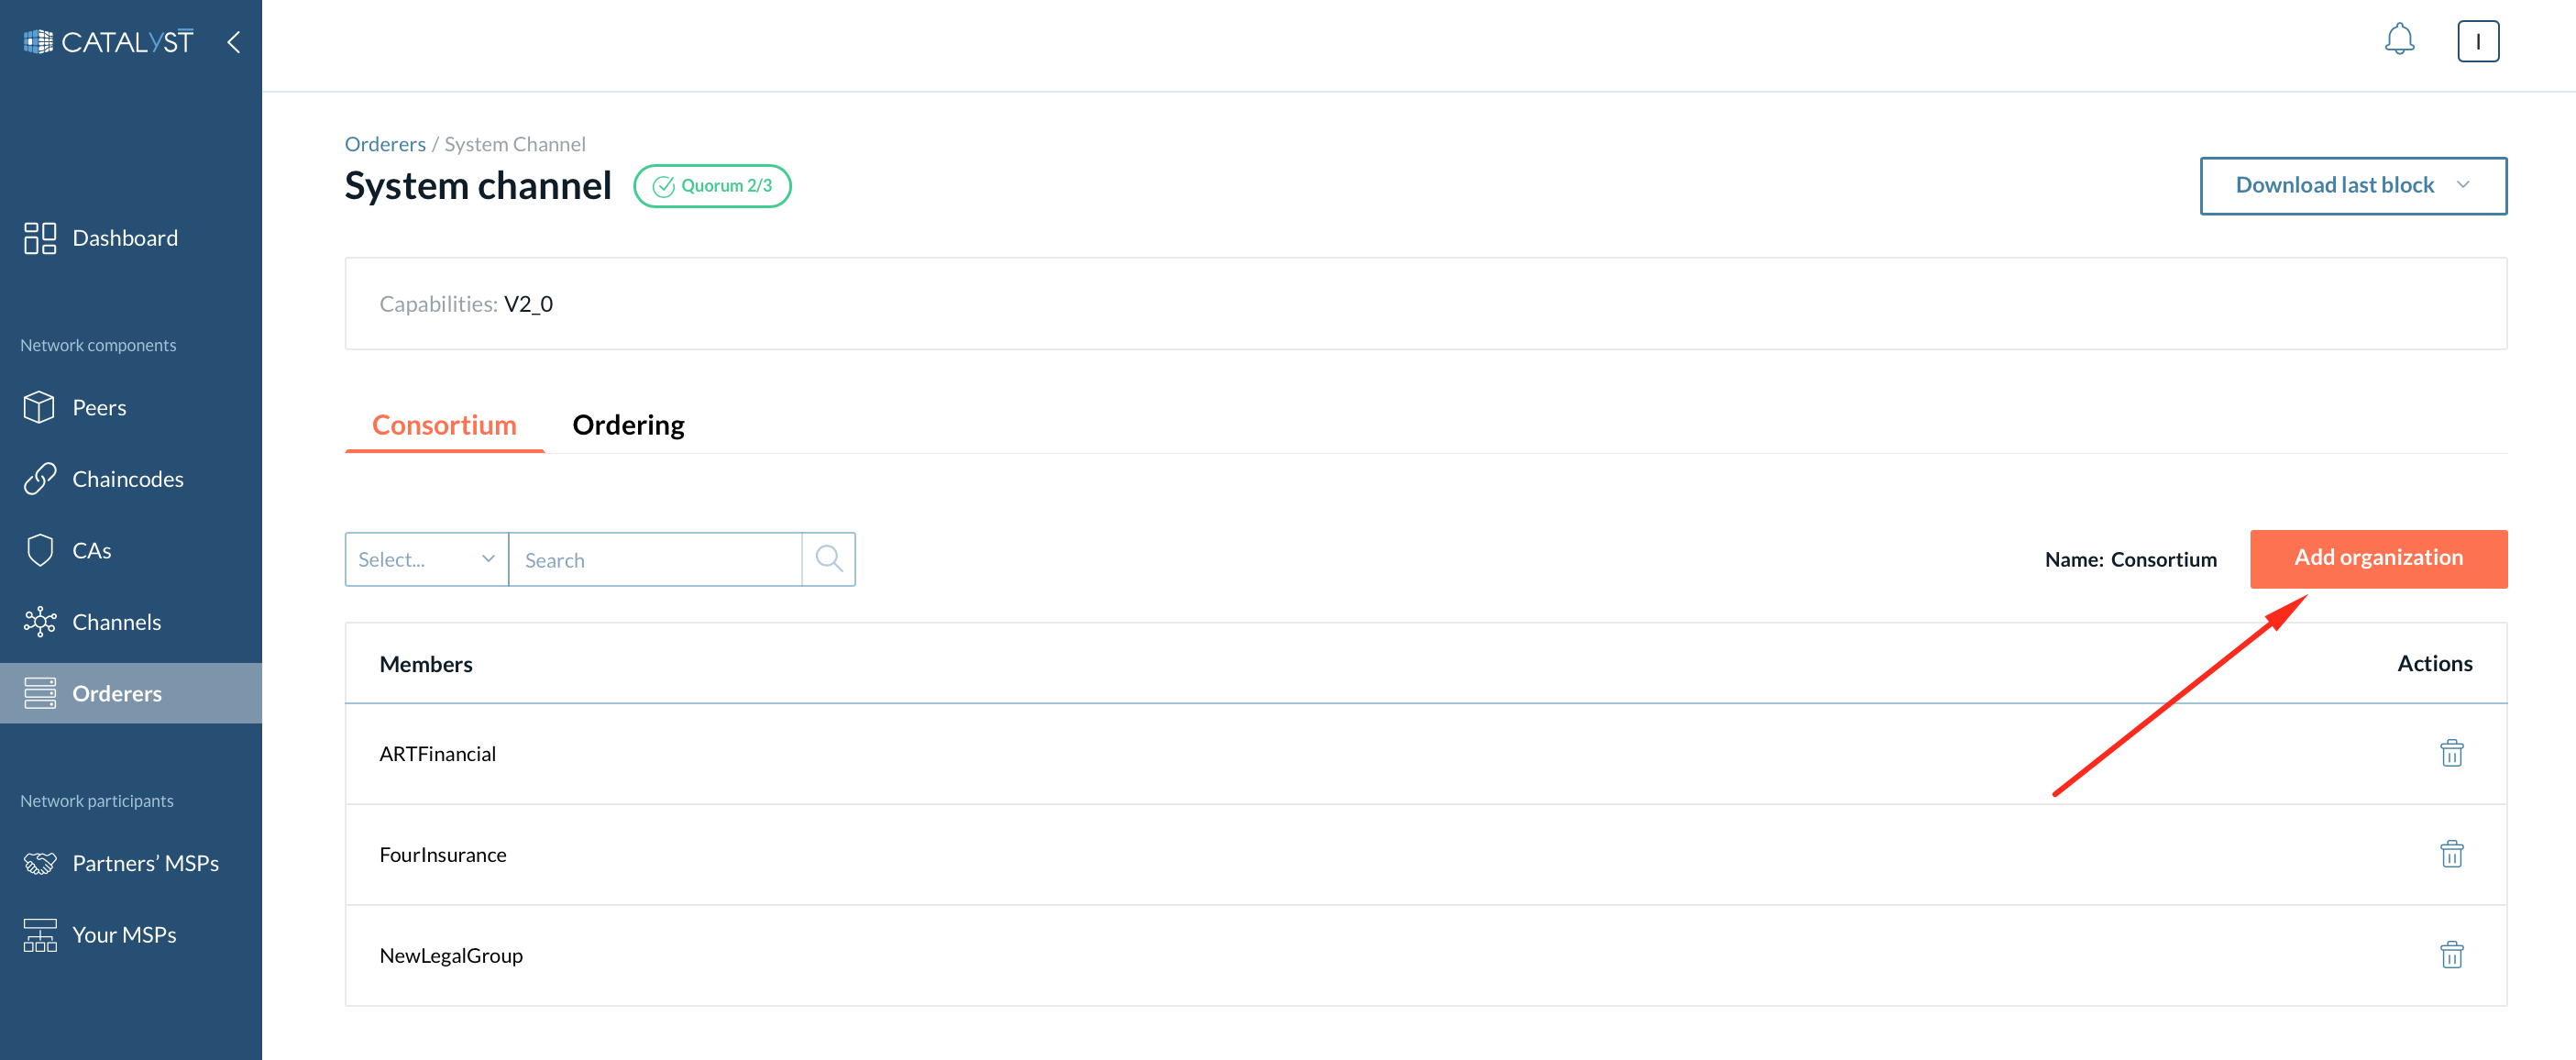
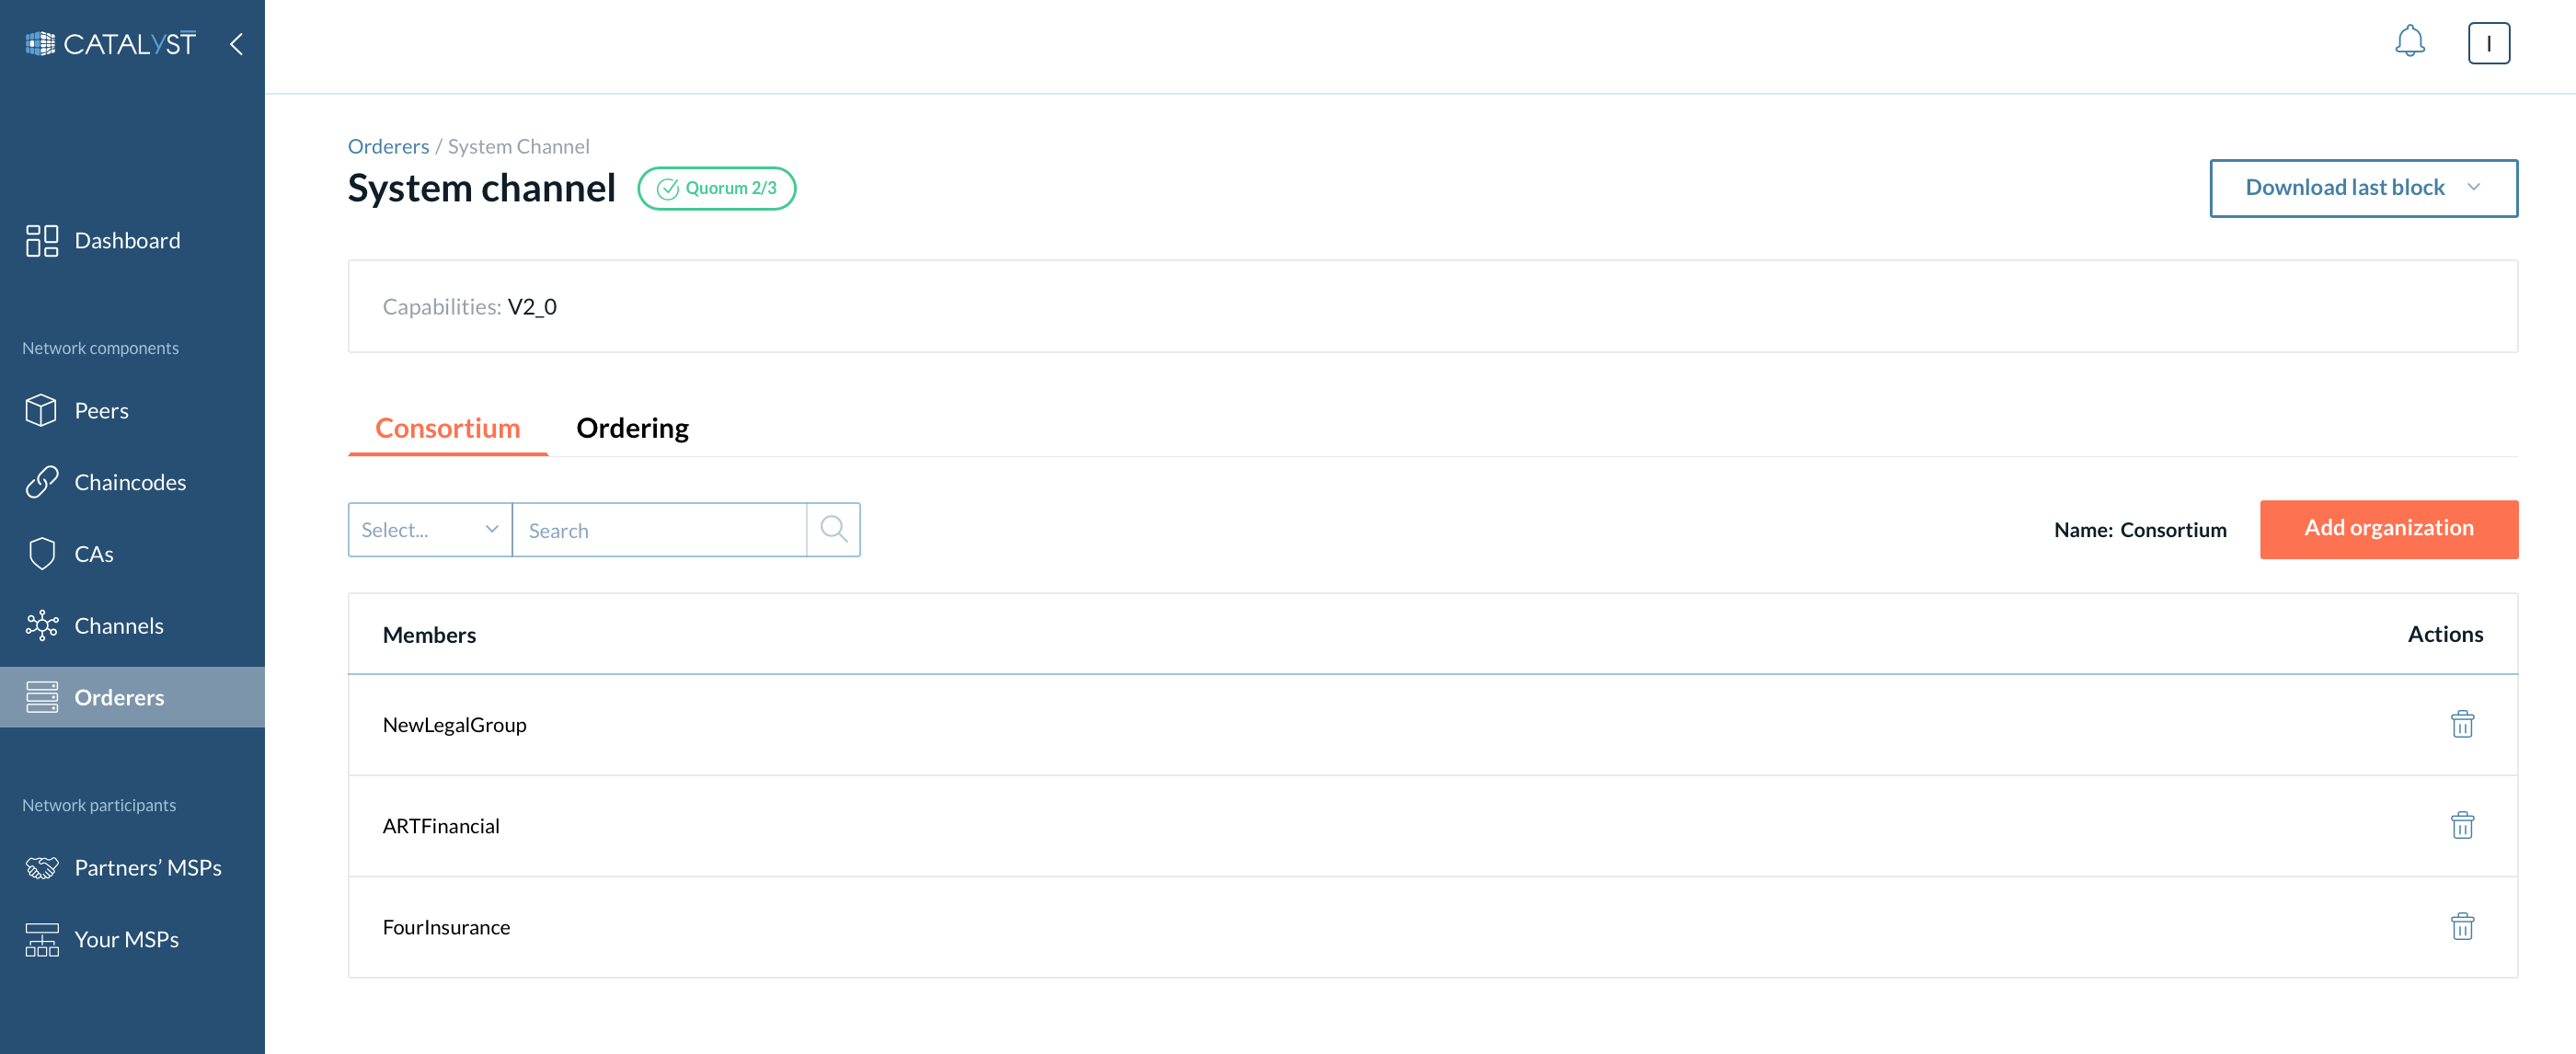
Consortium members
This is the list of the organizations that can create a channel. Under this tab, you can add or remove organizations from the consortium. Any non-consortium members can not create a channel and can not be added to a channel at channel creation. However, the non-consortium members can be added to the channel later by the consortium members.
|
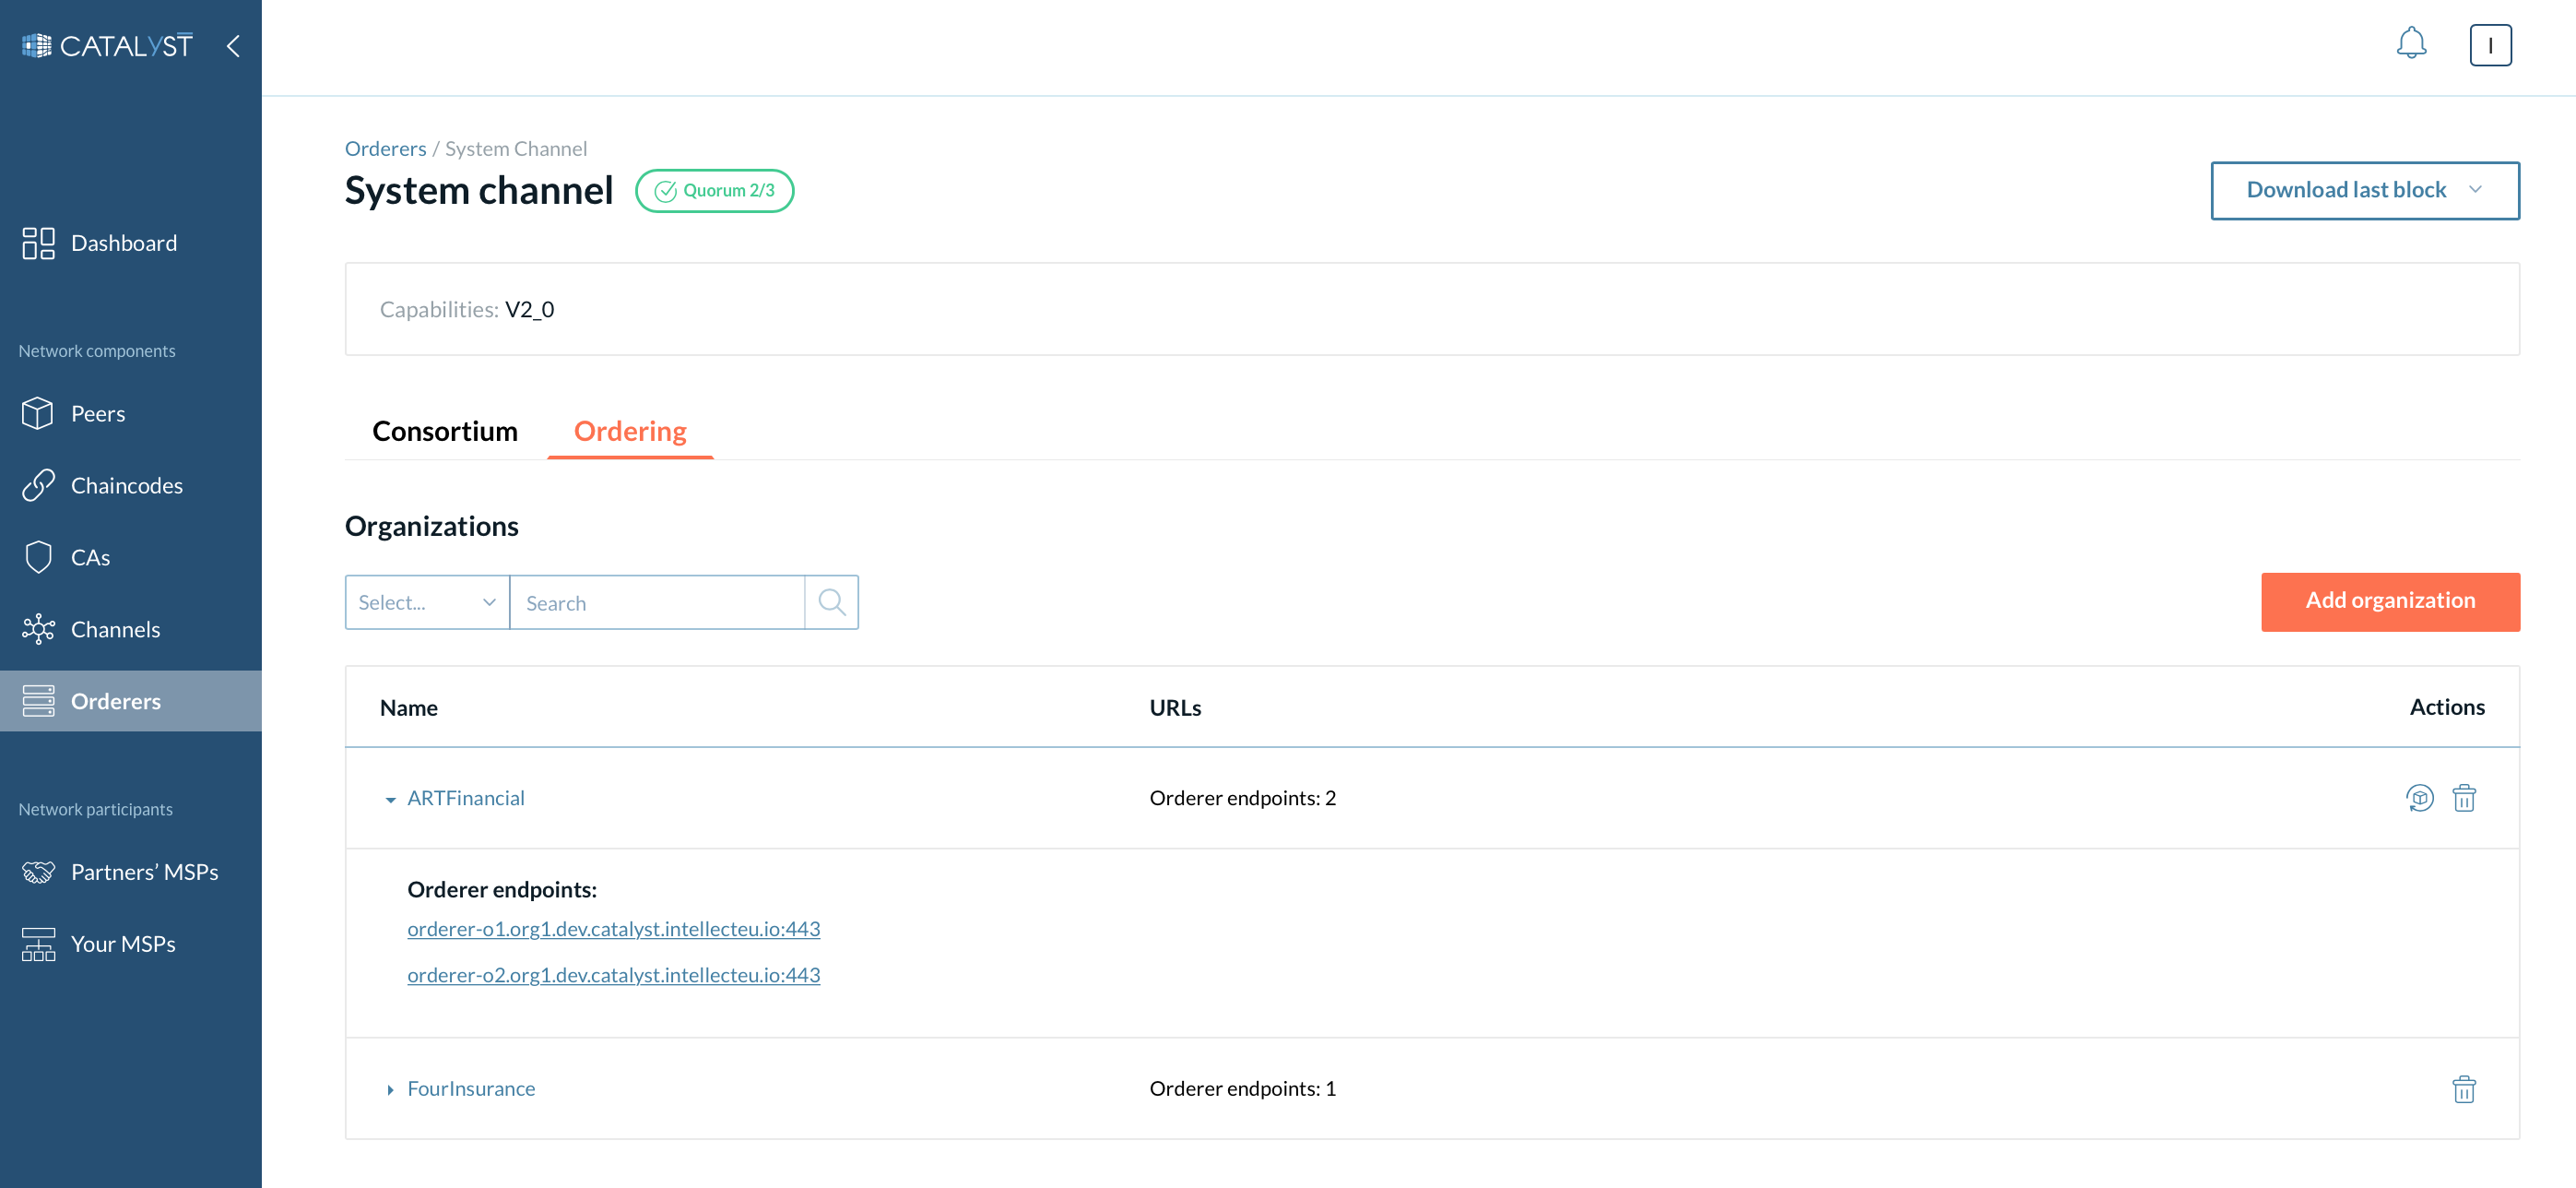
Ordering
There are three sections available under this tab
Orderer organizations
Here is a list of organizations that are added to the system channel as a member of the ordering service. They can add their orderers (consenters) to the channels. You can add organizations as Orderer organizations through the “Add” button or remove organizations by clicking the “Remove” button.
| The Remove organization action removes the organization along with its consenter. Because of Raft specifics, you cannot remove an organization with more than one consenter belonging to this organization. To remove the organization with two or more consenters, please remove its consenters from the channel. |
You can see the orderer endpoints here by clicking on the particular organization. Click the “Update ordering” endpoints button if you want to change the endpoints set. You can specify as many endpoints as needed or select no endpoints.
| We recommend keeping your orderer endpoints synced with the list of your consenters in the channel. If you see “No consenters” in the “Consenters'' block, check if each of your consenters is reflected in the orderer endpoints list. |
| When you add or remove a consenter, which belongs to your organization, its orderer endpoint is automatically added/removed to the orderer endpoints set. If your consenter was added or removed by another organization, you should add/remove its orderer endpoint manually. |
Consenters
In the Consenters block, you can view the MSPID of the consenters, TLS certificates, and perform specific actions such as adding or removing a consenter. You can also see the consenter’s statuses on a particular channel.
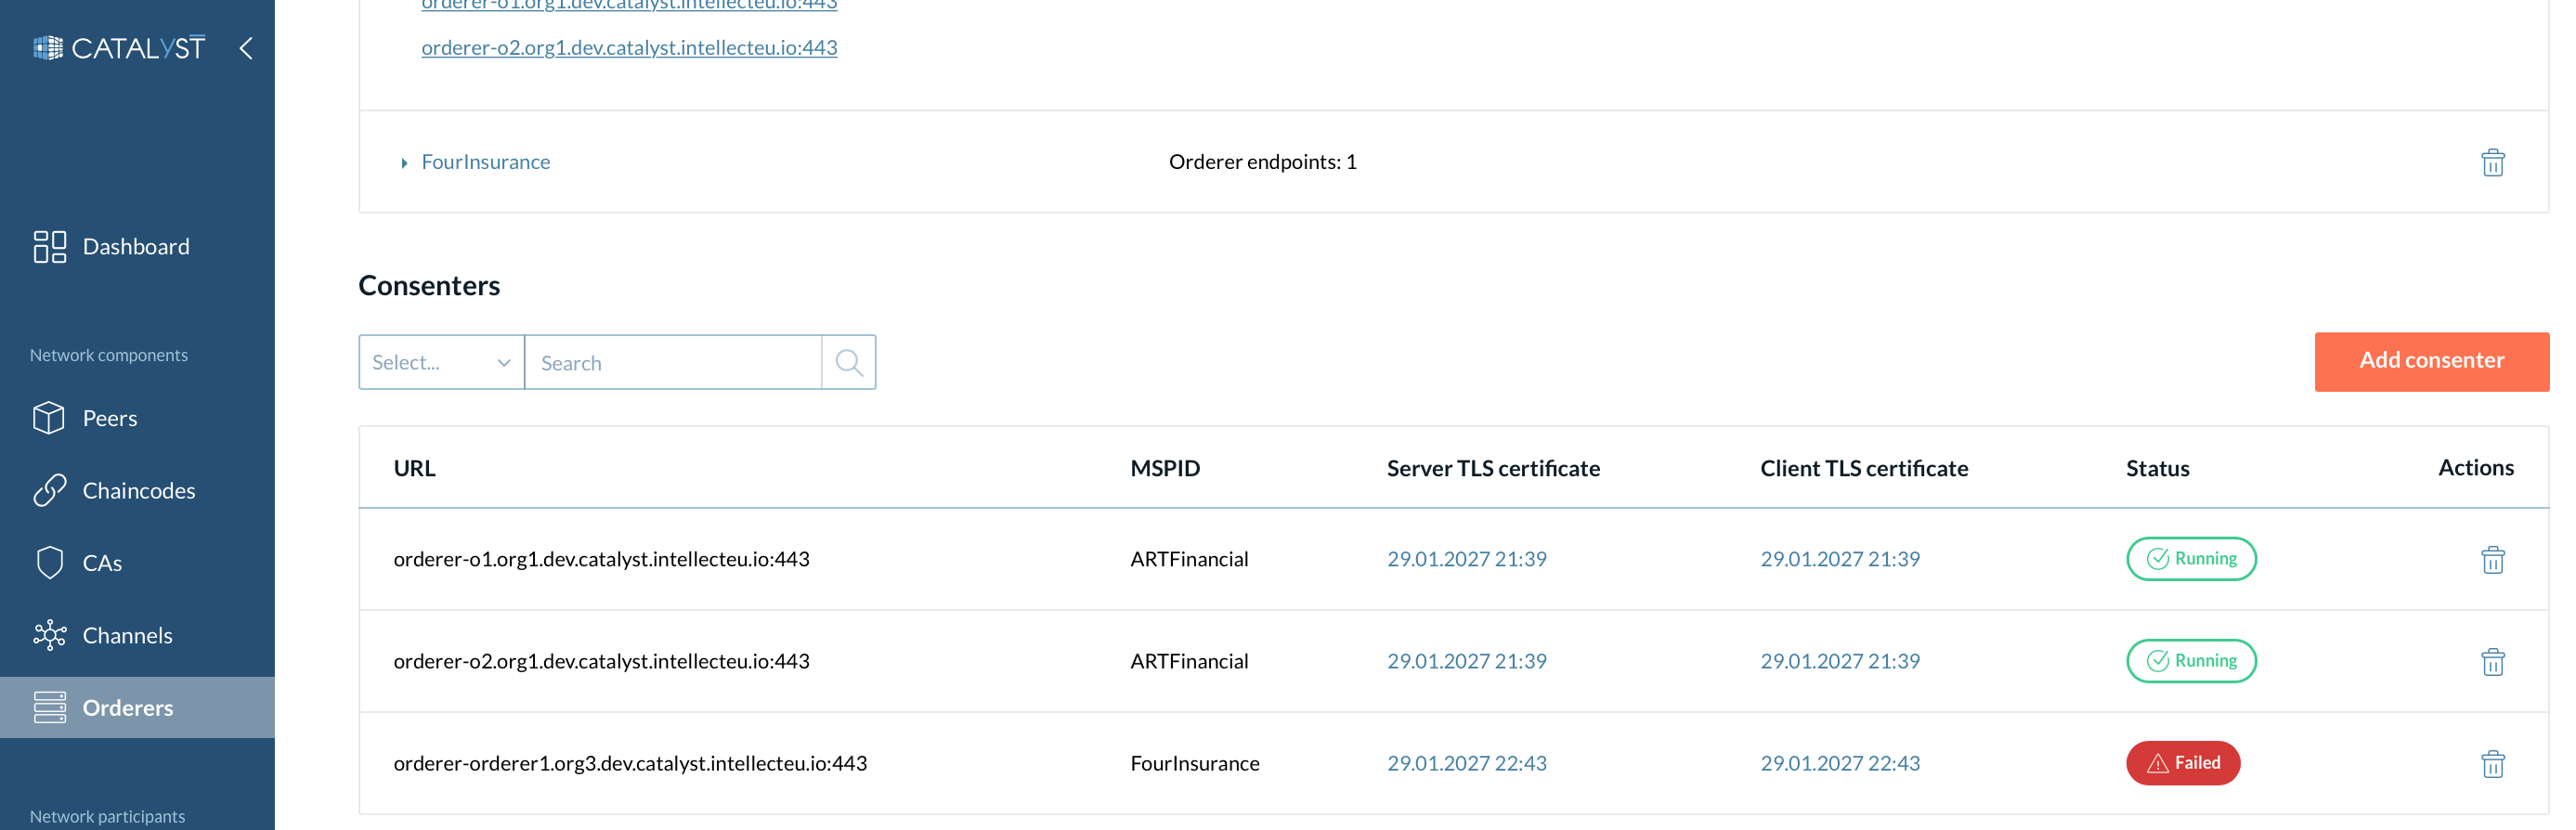
We recommend adding or removing consenters with caution.
| When another organization adds/removes your consenter from the consenters set you should manually update your orderer endpoints. |
Channel configuration
Here you can see the information about the channel genesis block configuration along with the "Edit" option.
How to Add an Organization as an Orderer Organization?
You can add an organization to the list of orderer organizations in one of two ways.
1 - While creating a system channel.
You need to select the organization from the drop-down menu and provide its orderer JSON profile upload (this JSON profile needs to be exported and shared with you by the organization you will add). Only one orderer can be added for each organization that can be only one at a time.
|
The organization to be added must be present in the partners’ MSP list. If it is not present in the partners’ MSP list, it will not appear in the drop-down menu. To add an organization to your partners’ MSP list, please visit this section. |
| If you are adding organizations during this step, please ensure that you’ve added more orderers that belong to your organization than the number of organizations you are going to add. Otherwise, a quorum will not be achieved, and new ordering nodes will not fetch a genesis block to start functioning. |
2 - On the Raft page on the system channel details page.
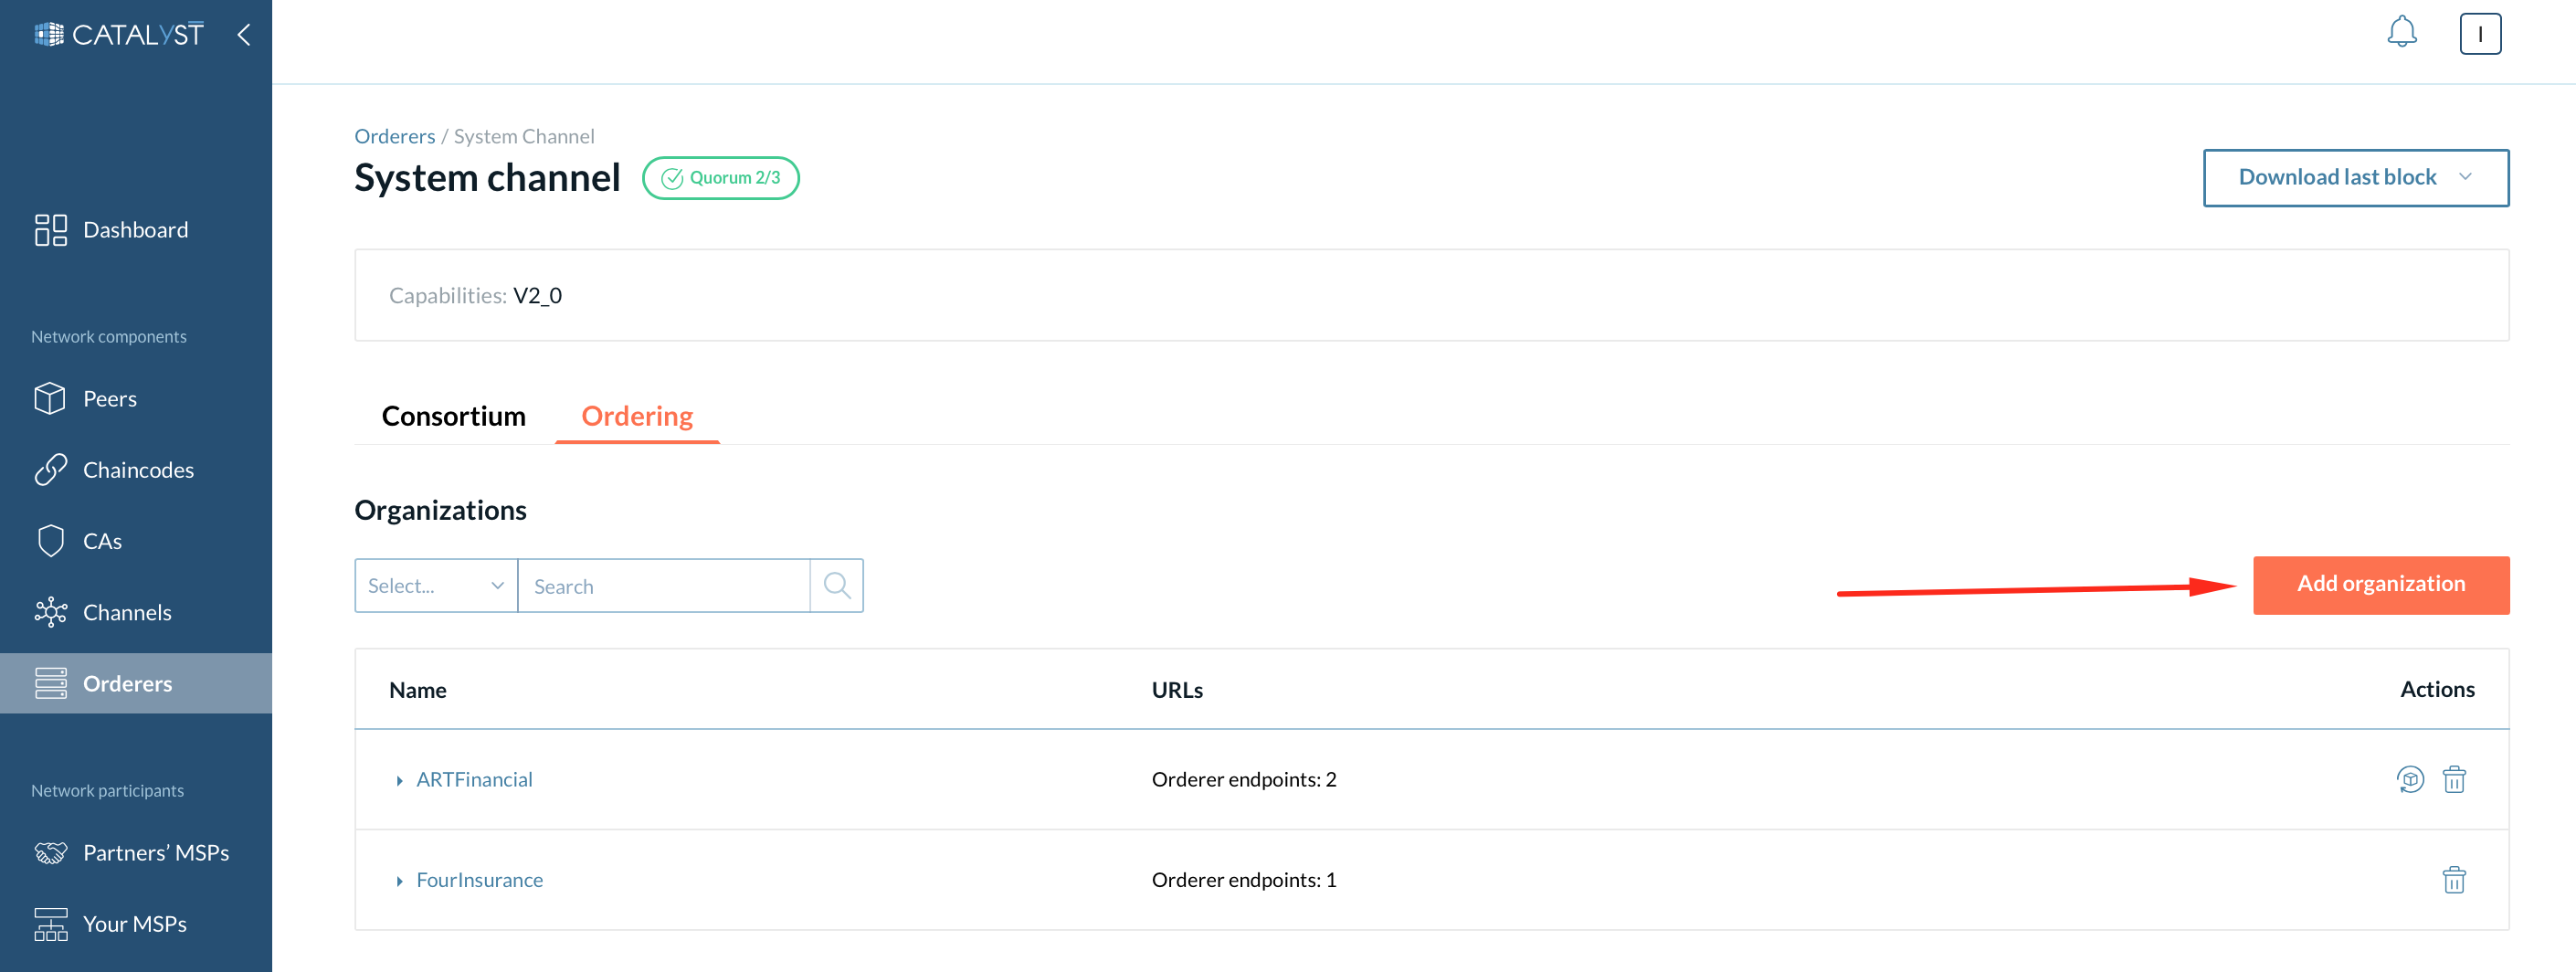
Click the “Add organization” button. The process is the same as described in the previous section.
How to Add an Organization to the Consortium?
You can add an organization to the consortium in one of two ways.
1 - While creating a system channel.
You need to select the organization from the drop-down menu
|
The organization to be added must be present in the partners’ MSP list. If it is not present in the partners’ MSP list, it will not appear in the drop-down menu. To add an organization to your partners’ MSP list, please visit this section. |
2 - On the Consortium page on the system channel details tab.
Click the “Add an Organization” button and select an organization from the drop-down menu.
| The organization to be added to the consortium must be present in the orderer organization list. |
| Only consortium members can add other organizations to the consortium. |