IaC Canton Console Setup
Prerequisites
-
Clarify Route53 zone name (subdomain for TLD)
-
Share NS records from a newly created zone and ask a client to federate them in their TLD-hosted zone
-
Clarify budget for infra and instance types
-
Request access to create new users/roles/policies in AWS IAM
-
Clarify which region to use in a cloud provider
|
Request intellecteu to provide you access to all required repos; gitlab; jfrog and other required resources. |
-
Fork the GitLab group
IaC
Fork the GitLab group
-
Update parameters for the AWS CloudFormation Stack to create an S3 bucket and DynamoDB table. CF is located under the
./cloudformationfolder. Proceed to the creation of a stack:
aws cloudformation create-stack --stack-name $YOUR_STACK_NAME \
  --template-body file://cloudformation/terraform-state-resources.yaml \
--region $YOUR_REGION-
Change in
./environments/$site/eks/backend.tf desired S3 + DynamoDB(from the previous step), region and key (name of the state file), e.g., check the dev env. -
Update the env configuration and location of the Addons + Workloads repos in
./environments/$site/eks/main.tf. Also, enable/disable desired addons/workloads (default ones will be enabled if not specified).
      ...
        addons_org        = "git@gitlab.com:intellecteu"
        addons_repo       = "$LINK_TO_YOUR_REPO"
        addons_revision   = "main"
        addons_basepath   = ""
        addons_path       = "bootstrap/control-plane/addons"
        workload_org      = "git@gitlab.com:intellecteu"
        workload_repo     = "$LINK_TO_YOUR_REPO"
        workload_revision = "main"
        workload_basepath = ""
        workload_path     = "bootstrap/workloads"
        ...
$LINK_TO_YOUR_REPO looks like "products/catalyst/cat-bp/shared/$SUBGROUP_NAME/catalyst-eks-workloads-$CUSTOMER_NAME"
-
Update VPC CIDR, AWS region, and preferable instance types in
./environments/$site/eks/main.tf -
To initialize the project for the first time, execute
terraform init -upgradein the desired environment folder, e.g., inside the./environments/dev/eksfolder. Then run `terraform apply
At this point, you should have infra with created secrets in AWS Secrets Manager and running ArgoCD.
To configure ArgoCD and default add-ons/workloads for the first time we need to:
-
Enable ArgoCD Access:
# Example using port-forward
kubectl port-forward service/argocd-server -n argocd 8080:443
# Or start port-forward via Lens ( Services -> argocd-server -> Forward )|
After the addons repo is set up, LoadBalancer for ArgoCD will be created. |
-
Retrieve the initial admin password. It’s named catalyst-eks-argocd-$site by default and should be created via Terraform in AWS Secrets Manager.
-
Login in argocd via web browser in [e.g. localhost:8080 ]
-
Configure access keys in Settings of desired repos and ArgoCD itself to allow ArgoCD to retrieve all needed repos/charts:
-
Preparation:
-
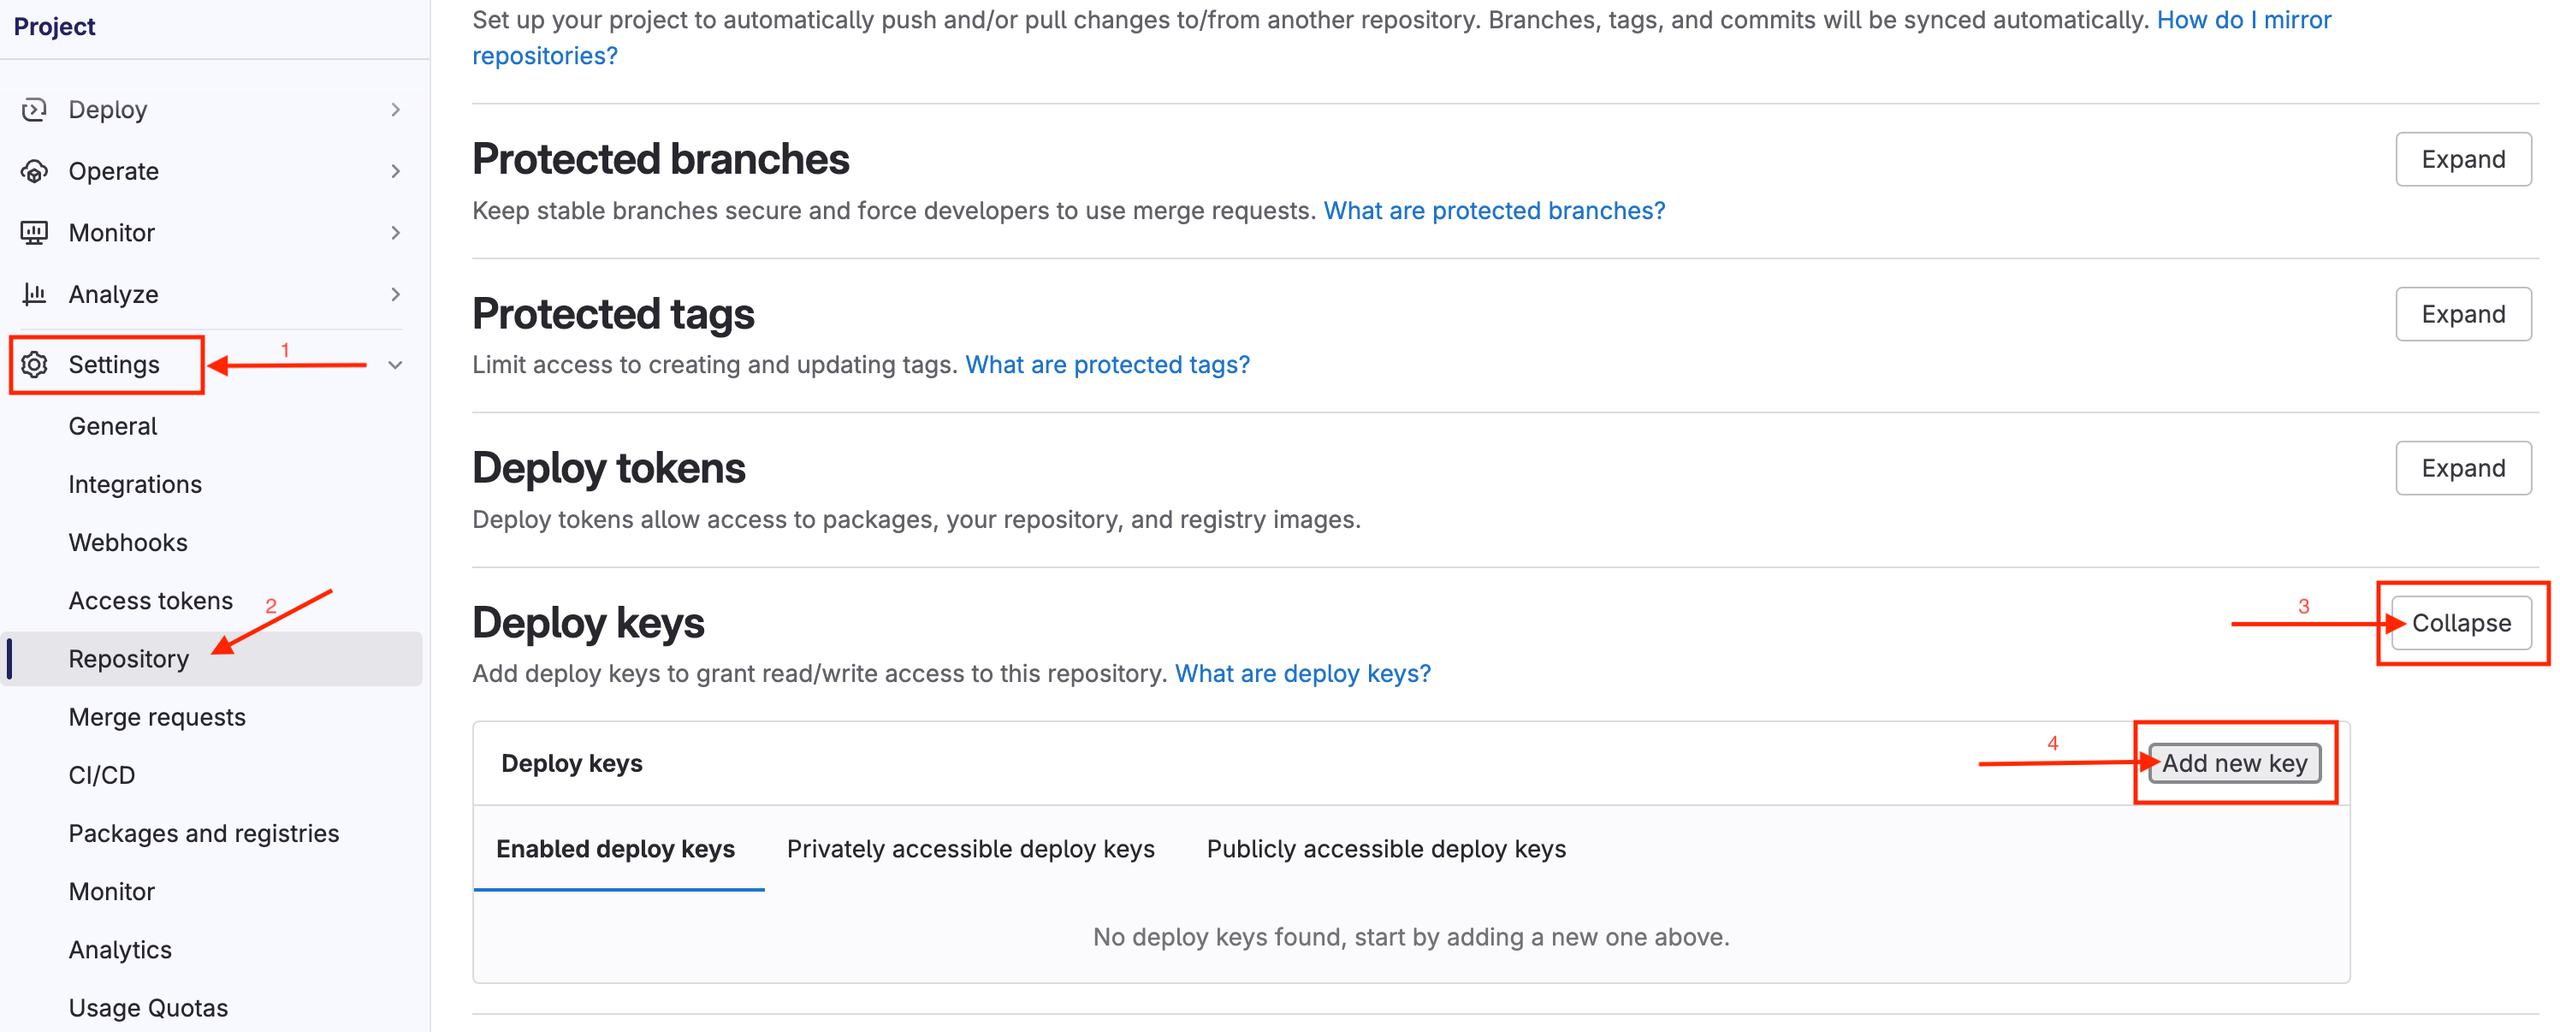
In GitLab go to ( Settings → Repository → Deploy Keys (click [Expand]) → Add new key ) and add the public key to the list .Repeat in other repositories by clicking [Enable] for the same key.
-
-
-
Go to IntellectEU’s Jfrog and log in using credentials created for this customer in the service desk ticket. These credentials should be stored/available in the 1Password Validators Vault.Then in JFrog click on your user and choose ( Set Me Up → helm ). Paste your JFrog password and click [Generate Token & Create Instructions]. This token will be used later as CUSTOMER_PASSWORD to set up a connection to the docker and helm registries
-
In ArgoCD:
-
-
Go to ( Settings/Repositories → +Connect Repo ) and follow this guide using the private SSH key created by Terraform in AWS Secrets Manager.
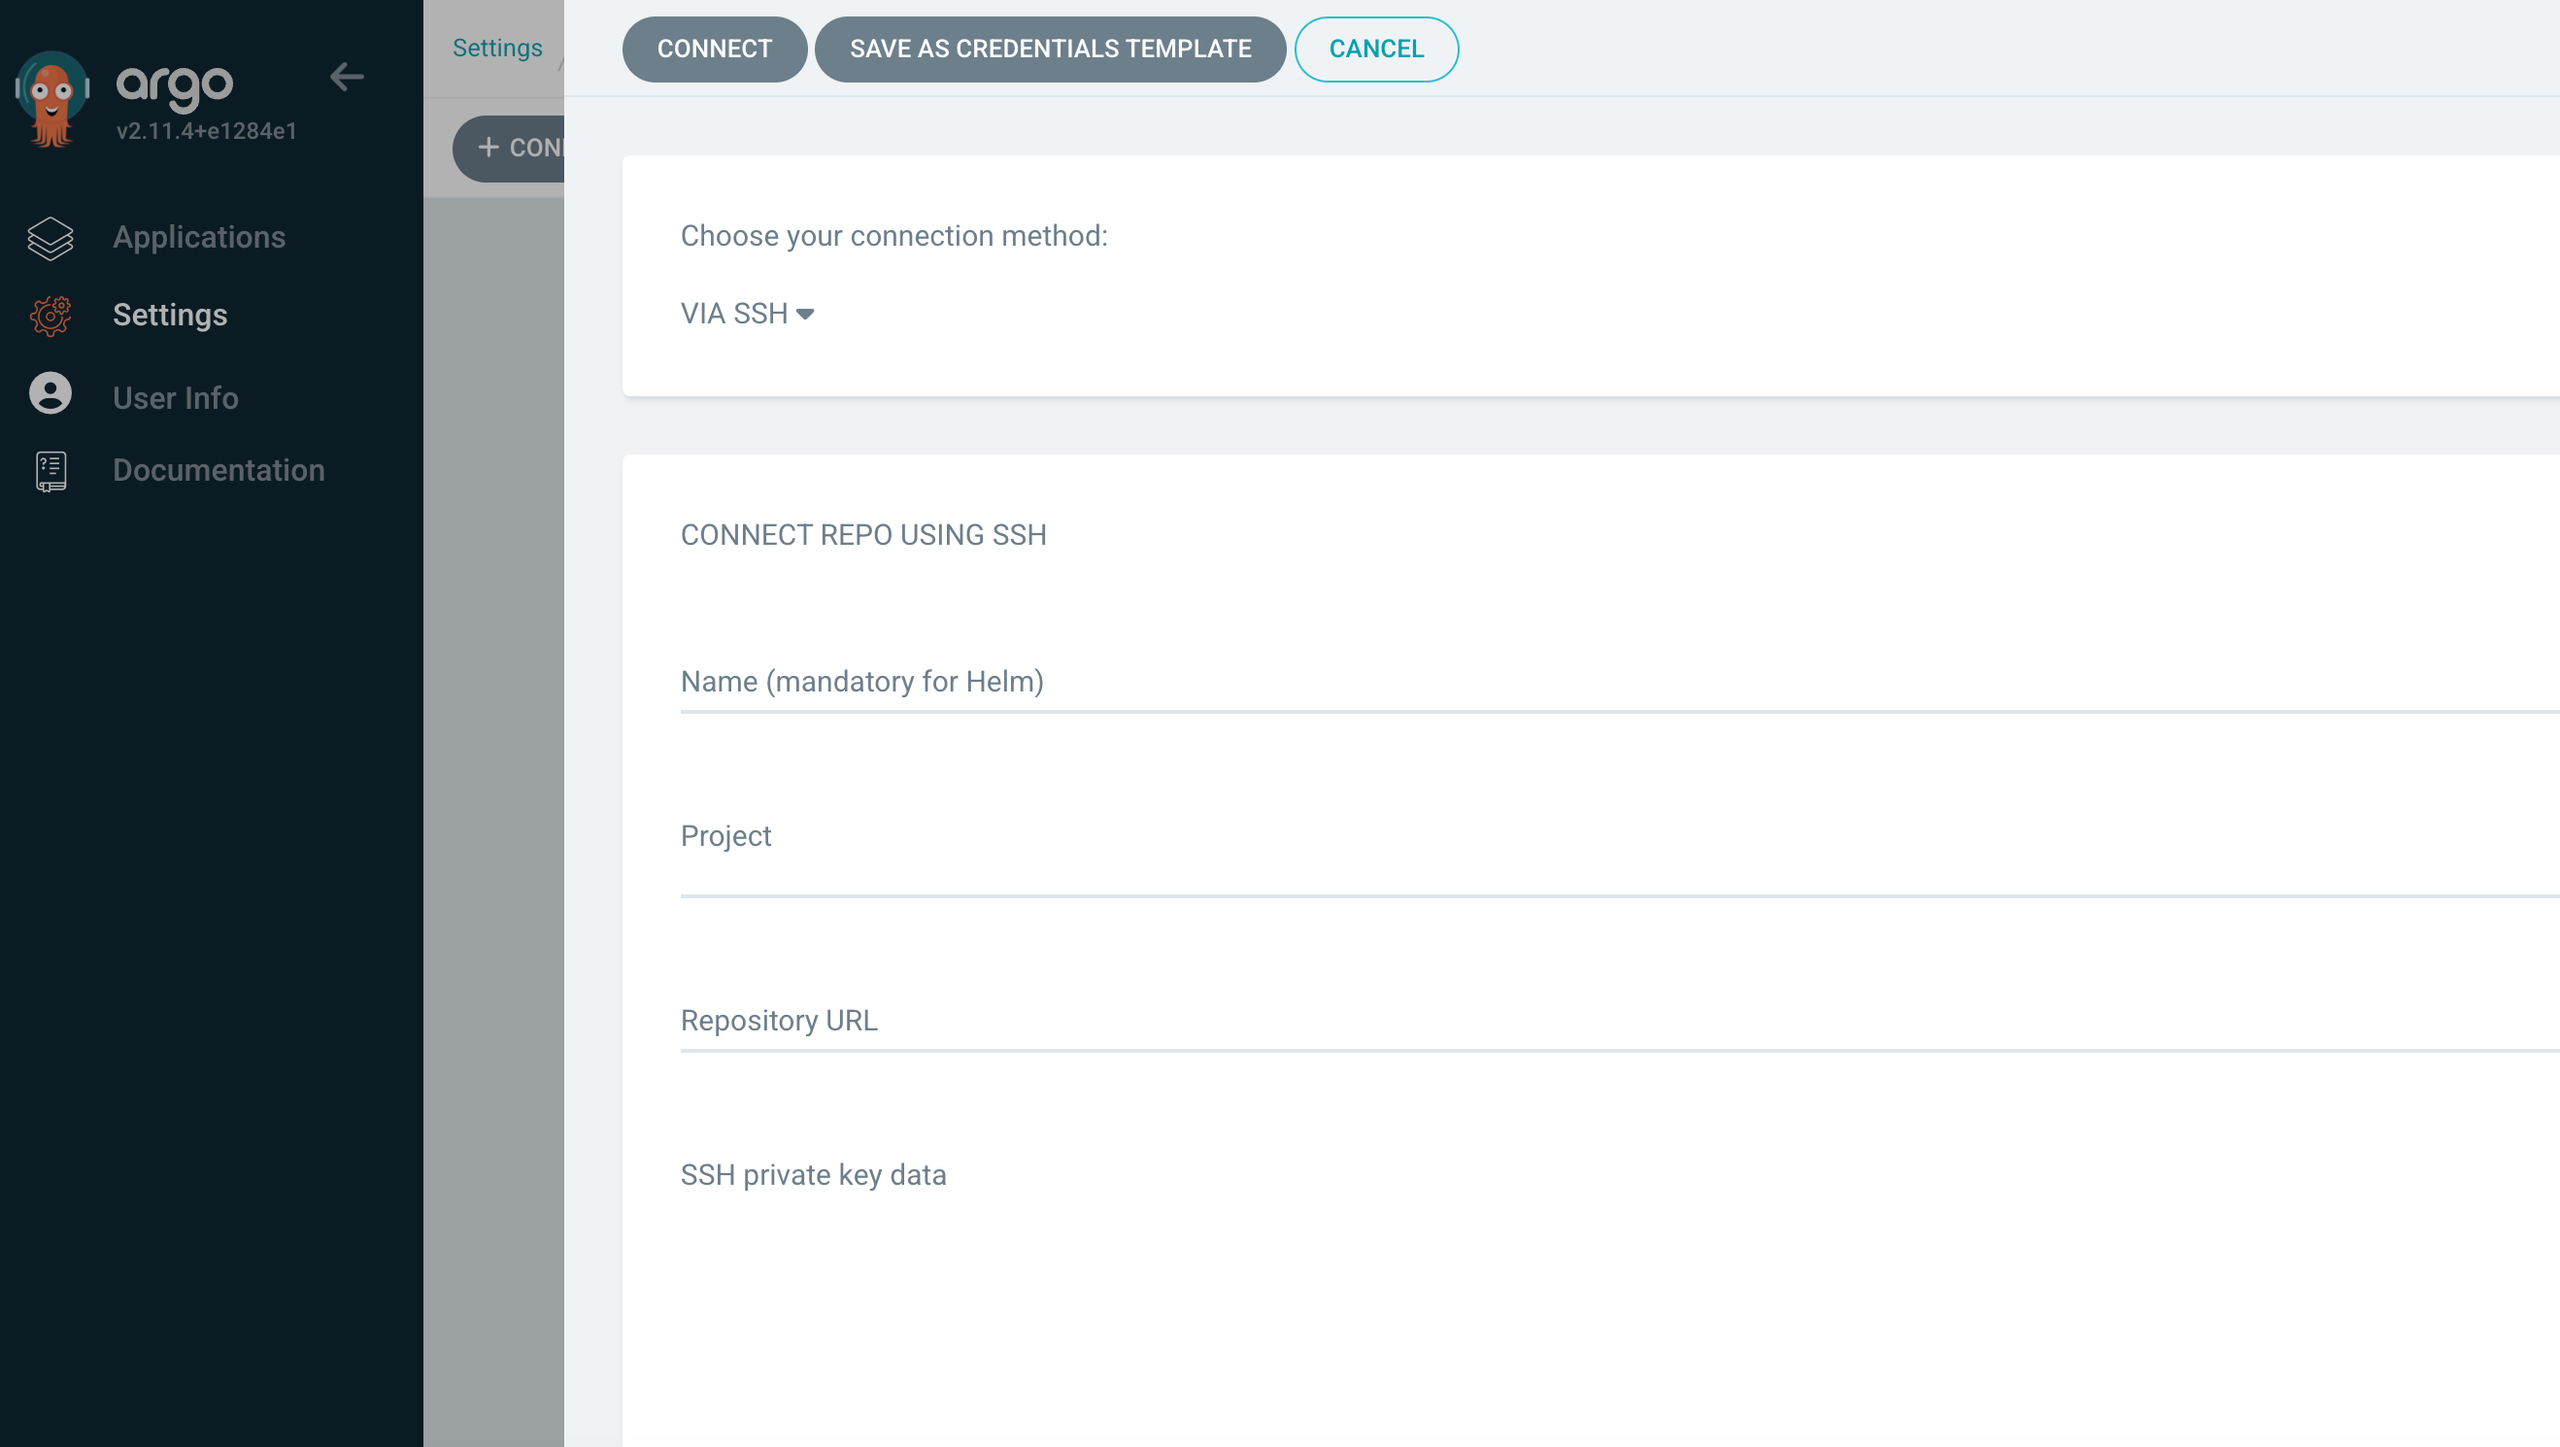
Repeat for other repositories
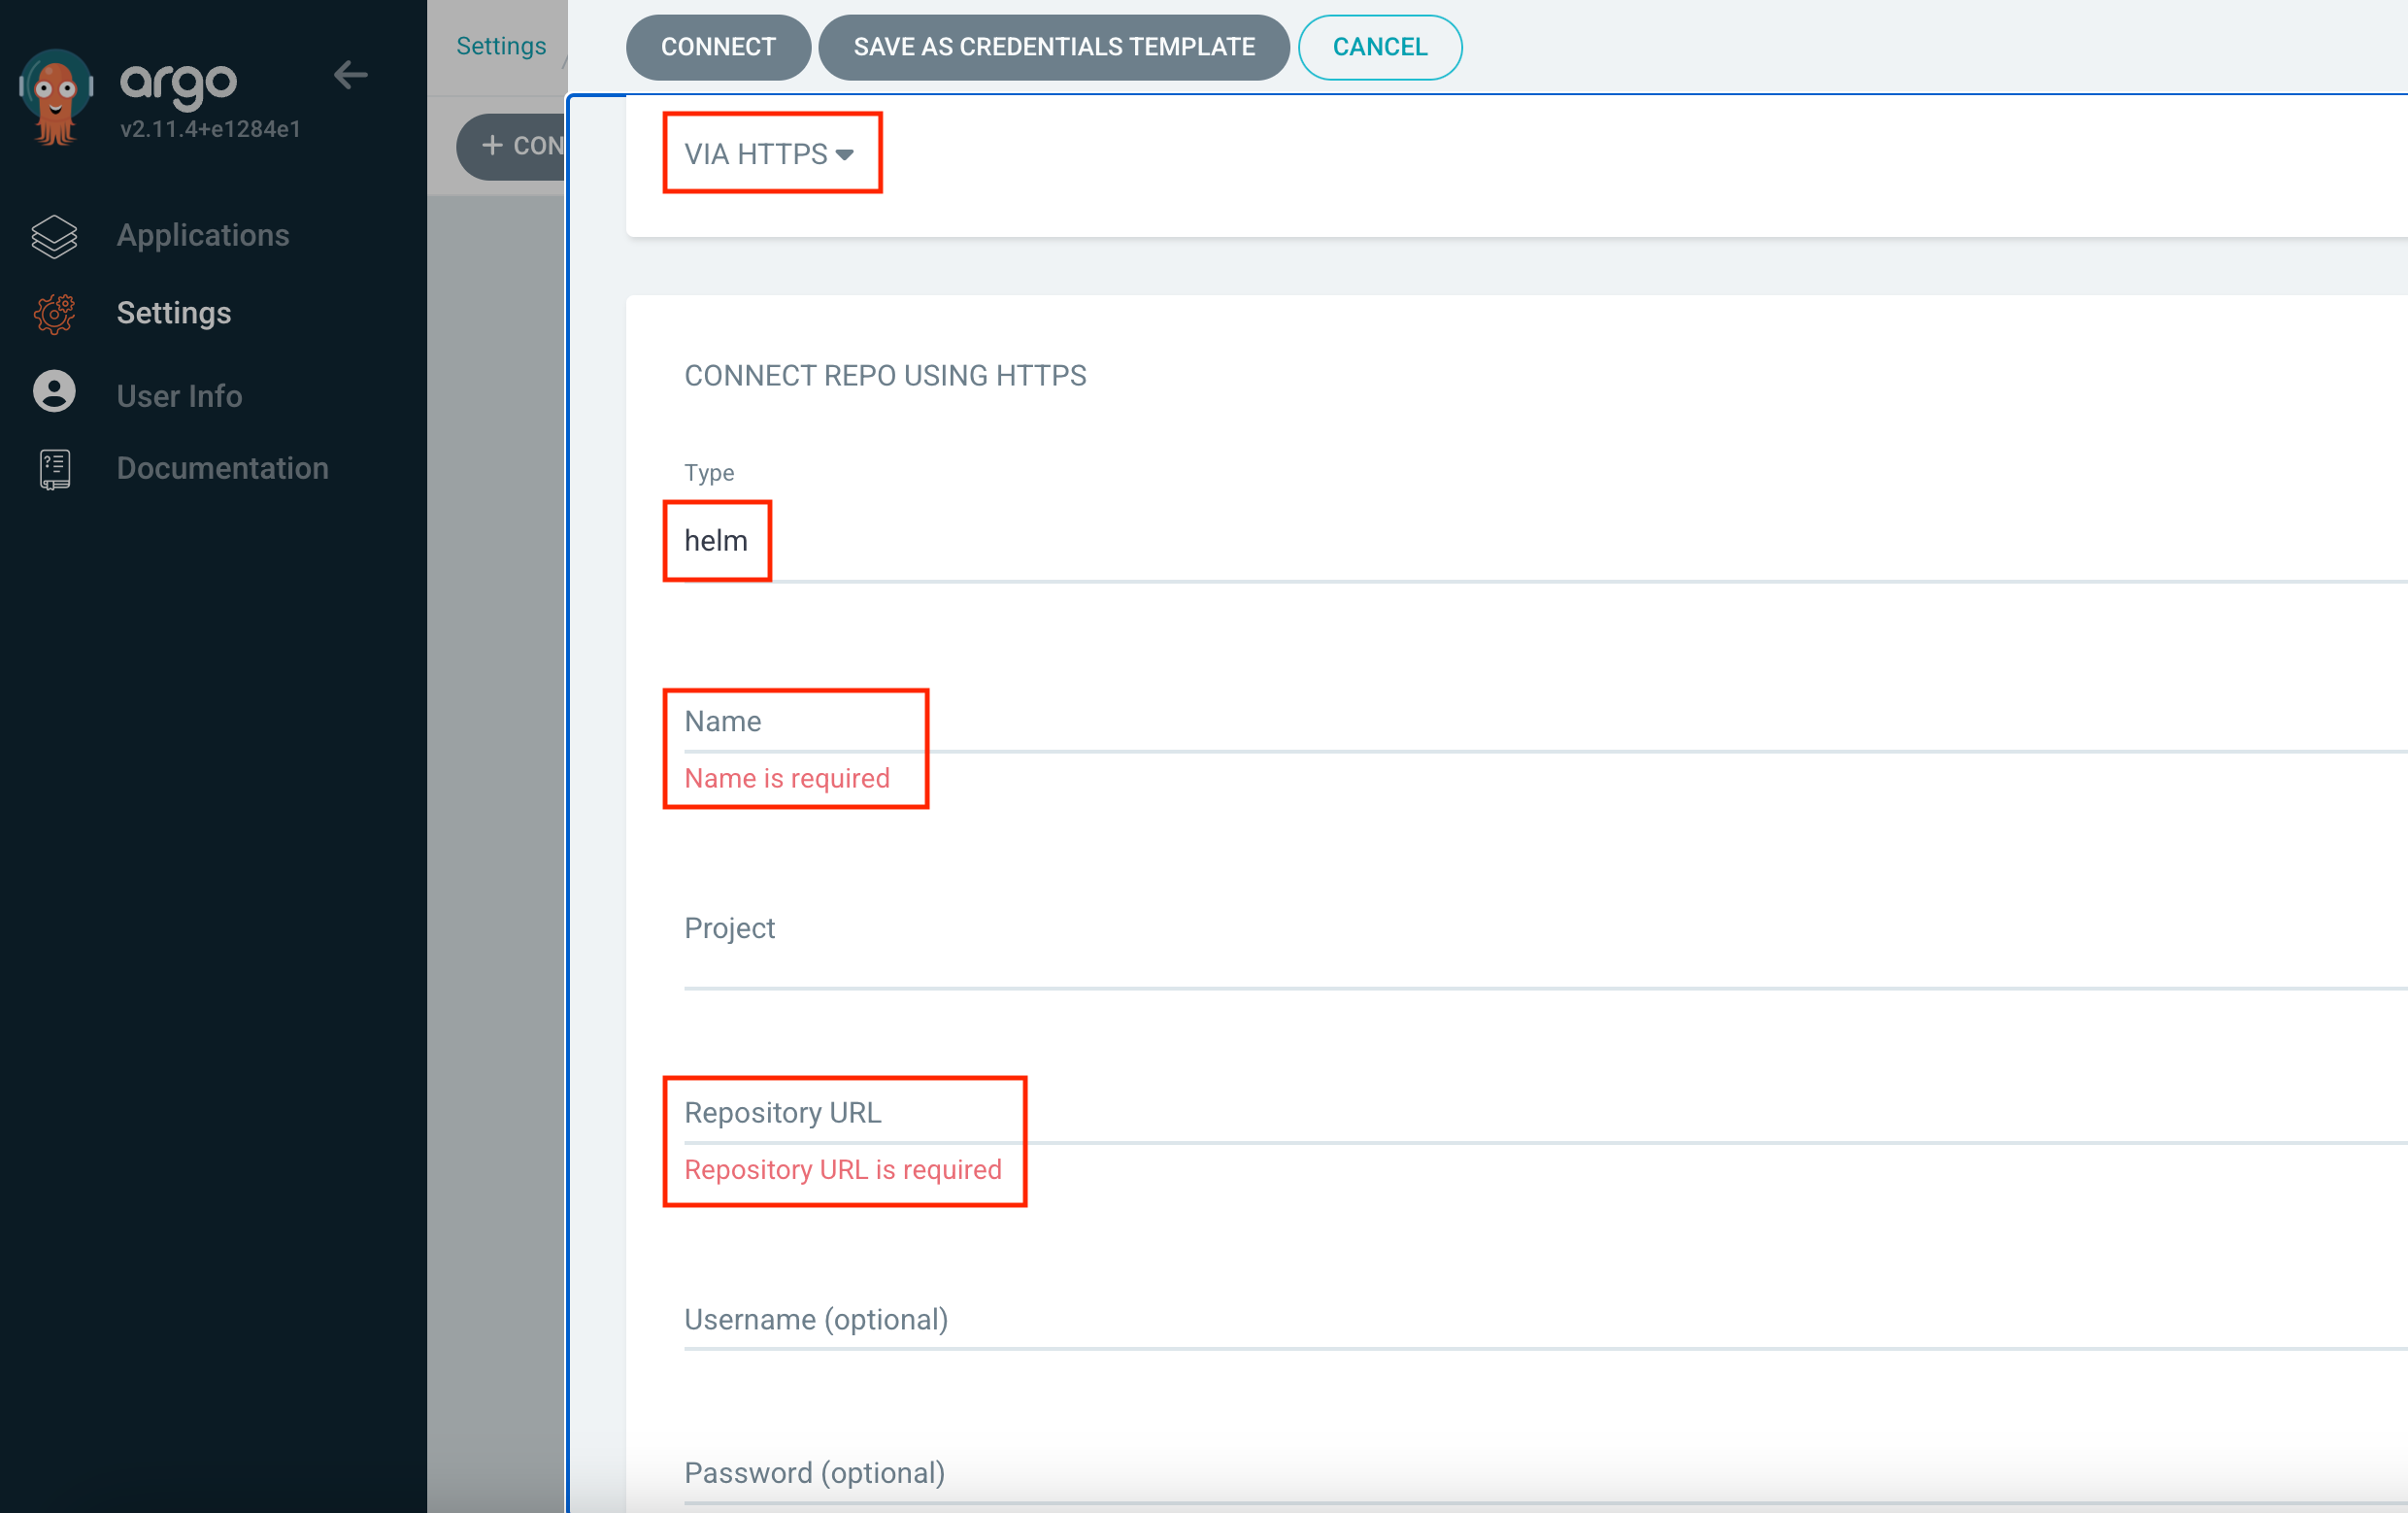
Again click [+Connect Repo] and now choose your connection method via HTTPS and type helm. Input any name, e.g., canton-console-jfrog-CUSTOMER_NAME; username and password from JFrog (Preparation step above)
-
Create a Kubernetes secret to pull canton-related images from IntellectEU’s JFrog kubectl create secret docker-registry intellecteu-jfrog-access --docker-server=intellecteu-catbp-docker.jfrog.io --docker-username=CUSTOMER_USERNAME --docker-password=CUSTOMER_PASSWORD --docker-email=CUSTOMER_EMAIL -n catalyst-canton
|
CUSTOMER_USERNAME == CUSTOMER_EMAIL |
-
Create a Kubernetes secret to pull canton-related images from DA’s JFrog
|
TO DO request a new secret for the customer As of now the same secret is used everywhere |
Now ArgoCD will track any changes you make in add-ons/workloads repositories.
Add-ons
-
catalyst-eks-addons repo
|
We have three methods for specifying Helm values, depending on whether we want to apply changes globally, per cluster, or per environment. The priority for applying these values is as follows:
By structuring values this way, you can ensure that general settings apply across all environments, while allowing for customization at both the cluster and environment levels. |
|
IaC will install the following addons by default (some of them are needed by Catalyst): Cert Manager: Enables Cert Manager to manage certificates. External Secrets: Enables External Secrets to manage Kubernetes Secrets. AWS EBS CSI Resources: Enables AWS EBS CSI (Container Storage Interface) resources for dynamic provisioning of Amazon EBS volumes. Cluster Autoscaler: Enables Cluster Autoscaler to automatically adjust the size of the cluster based on resource usage. Kube Prometheus Stack: Enables the Kube Prometheus Stack for monitoring and alerting using Prometheus and Grafana. Metrics Server: Enables Metrics Server to collect resource metrics from Kubelets and expose them via the Kubernetes API server. Traefik: Enables Traefik as an ingress controller for managing ingress traffic. Crossplane: Enables Crossplane for managing cloud infrastructure using Kubernetes. AWS Crossplane Upbound Provider: Enables the AWS Crossplane Upbound Provider for integrating AWS resources with Crossplane. |
-
Adjust settings for Cert Manager, External Secrets, Kube Prometheus Stack
-
Cert-Manager changes
-
Navigate to environments/$ENV/addons/cert-manager/values.yaml and update the following:
-
AWS Hosted Zone ID
-
Region
-
DNS Domains
-
Issuer Email
-
Default Wildcard Certificate for Traefik (added to the default TLSStore)
-
-
External-Secrets changes
-
Navigate to environments/$ENV/addons/external-secrets/values.yaml (and update the following:
-
AWS External Secrets Role ARN (Created by the Terraform IaC project)
-
Region
-
-
Kube-Prometheus-Stack changes
-
DNS Hosts: Update all DNS hosts as required for Keycloak integration and Grafana ingress creation. Note that the Grafana authentication section is not required.
-
Workloads
-
catalyst-eks-workloads repo
|
IaC will install the following workloads by default: Keycloak: Enables Keycloak to manage Catalyst authentication. Canton-Console: Enables Catalyst Operator for Canton management. |
-
Keycloak configuration
-
Navigate to environments/$ENV/workloads/keycloak/values.yaml and update the following:
-
DNS Hosts: Update all DNS hosts as needed for certificates and Keycloak ingress creation.
-
RDS Database: Creation will be handled by Crossplane. Update the following items in the Instance object:
-
region: $YOUR_REGION
-
dbSubnetGroupName: $CUSTOMER_NAME-$ENV-eks-private
-
vpcSecurityGroupIds: Update the security group ID to allow Kubernetes nodes to access this private RDS (security group with the most entries)
-
Review the remaining fields and update if needed
-
-
-
Navigate to ?environments/$ENV/workloads/keycloak/realm.json` and update DNS Hosts together with
displayName/displayNameHtmlfields
-
After Keycloak is up and running, you can log in using catalyst-eks-keycloak-admin-$site secret from the AWS Secrets Manager.
In Keycloak navigate to the [Create realm] and import the `catalyst-eks-workloads/environments/$ENV/workloads/keycloak/realm.json file.
Go to ( Users → [Add user] and fill the fields similar to Screenshot 2024-09-30 at 17.34.06.png . Then confirm and go to ( Credentials → [Set password] ). Save that password in 1Password. This will be the admin user for the canton-console.
|
-
Canton Console Configuration
Navigate to environments/$ENV/addons/external-secrets/values.yaml and update the following:
-
AWS External Secrets Role ARN (Created by the Terraform IaC project)
-
Region
-
License Key
-
Secrets for canton-api and canton-operator.
-
To do that you should log into the keycloak admin panel, open canton-console realm and then go to the clients scope. Find there canton-api and canton-operator. Open each, navigate to the credentials tab, and regenerate the password. Then copy that new password and paste it in the corresponding field inside the canton-console/values.yaml file
-
|
In case you need some additional help please contact IntellectEU Support team. |