Okta Setup Guide
Catalyst Blockchain Manager allows users to integrate with the OKTA platform for identity provision.
In this guide, we show you how to set up your environment to enable the integration with OKTA.
1 - Catalyst client setup
To use Catalyst we need to configure two new clients.
-
Clients can be found in Applications→Application
1.1 - UI client
For creating the client that the UI user will access, select the following options:
-
for Sign-in method, choose:
-
OIDC - OpenID Connect
-
-
For Application type, choose:
-
Single-Page Application
-
-
In Grant type, select
-
Authorization code
-
Refresh Token
-
Once the client has been created:
-
In the client page go to LOGIN→Sign-in redirect URIs and add the following urls
-
<UI url>
-
<UI url>/domains
-
<UI url>/participants
-
<UI url>/domains
-
-
Add the same for Sign-in redirect URIs
1.2 - API client
This client is used by the other components. When creating it, choose from the following options:
-
For Sign-in method, choose:
-
OIDC - OpenID Connect
-
-
For Application type, choose:
-
Web Application
-
-
Go to the next form and on the Grant type select:
-
Client Credentials
-
Authorization Code
-
Refresh Token
-
|
The final result should look like it is displayed on the table below |
Client |
Sign in Method |
Application Type |
Grant types |
Has Client Secret |
UI |
OIDC - OpenID Connect |
Single-Page Application |
Authorization code; Refresh Token |
No |
API |
OIDC - OpenID Connect |
Web Application |
Client Credentials; Authorization Code; Refresh Token |
Yes |
2 - Catalyst user access setup
The User has access to Catalyst Blockchain Manager console. You have to assign the users to the UI Client to access it. Additionally there are two roles that the user can employ to perform operations in Catalyst canton_viewer and canton_writer. These roles need to be added to the token. Below are instructions on how to add them.
2.1 - Set role based access fields
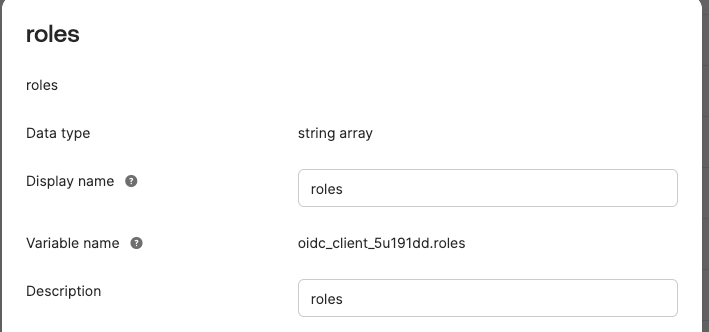
To configure the roles field for role based access in the user profile
Profile Editor→User(default):
-
Select Add attribute choose string array
-
Set Display name as roles
-
Set Variable name as roles
|
Alternatively you can set the roles in Application User Profile, either way the field should look like this: |
Next, go to Security→API→(The auth server you intend to use):
-
Go to Claims and select Add Claim
-
Name should be roles (It must be this exact name as this will affect the token)
-
Include in token type: Access Token
-
Add the Value: user.roles if the field was added to the default user appuser.roles if it was added to the application user profile
-
Add Claim again with the same fields but change the “Include in token type” field to ID token
|
You can test the token in Security→API→Token preview, it should have a roles claim in the token with canton_viewer and canton_writer as shown below, for both id_token and token |

3 - Add required fields to Helm charts
Fill in the following fields on the helm charts
auth:
  url: ""
  client:
    idApiOperator: ""
    idUI: ""
secret: ""-
auth.url : For the Issuer URI to be obtained in the Okta Admin interface:
-
Go to Security→API
-
Use the Issuer URI field shown in the default server
-
-
auth.client.idApiOperator : Select Applications→Applications and select API client that we created and get the Client ID
-
auth.client.idUI : Select Applications→Applications and UI client that we created and get the Client ID
-
auth.client.secret : Select Applications→Applications and API client that we created and get the Client Secret
4 - Creating clients and users for the new validators
4.1 - CNS and Wallet clients
When creating clients for CNS and Wallet, select the following options. Two separate clients can be created:
-
For Sign-in method, select:
-
OIDC - OpenID Connect
-
-
For Application type, select:
-
Single-Page Application
-
-
Go to the next form and in Grant type select:
-
Authorization Code
-
Refresh Token
-
After creating the validator, go to the wallet page and obtain the wallet url. This needs to be added to the redirect URI:
-
In the client page go to LOGIN→Sign-in redirect URIs and add that url
4.2 - Ledger client
When creating the Client for the ledger:
-
for Sign-in method choose: API Services
|
The final result should look like it is displayed on the table bellow |
Client |
Sign in Method |
Application Type |
Grant types |
Has Client Secret |
Wallet |
OIDC - OpenID Connect |
Single-Page Application |
Authorization code; Refresh Token |
NO |
CNS |
OIDC - OpenID Connect |
Single-Page Application |
Authorization code; Refresh Token |
NO |
Ledger |
API Services |
- |
- |
YES |
5 - Obtaining the fields to create the validator in the UI
CNS Client Id, Wallet Client Id, Ledger API Client Id: On Applications→Applications a list of clients with IDs is displayed
Ledger API Client Secret:
-
Can be found on the client page
Ledger API User:
-
Same as the Ledger API Client Id by default on okta
Wallet User:
-
The username for the main wallet user
Audience:
-
On Security→API check the Audience for the Auth server you are using